
Your Free Ring Size Chart Printable for the Perfect Fit
- Luke Zucco
- Dec 24, 2025
- 14 min read

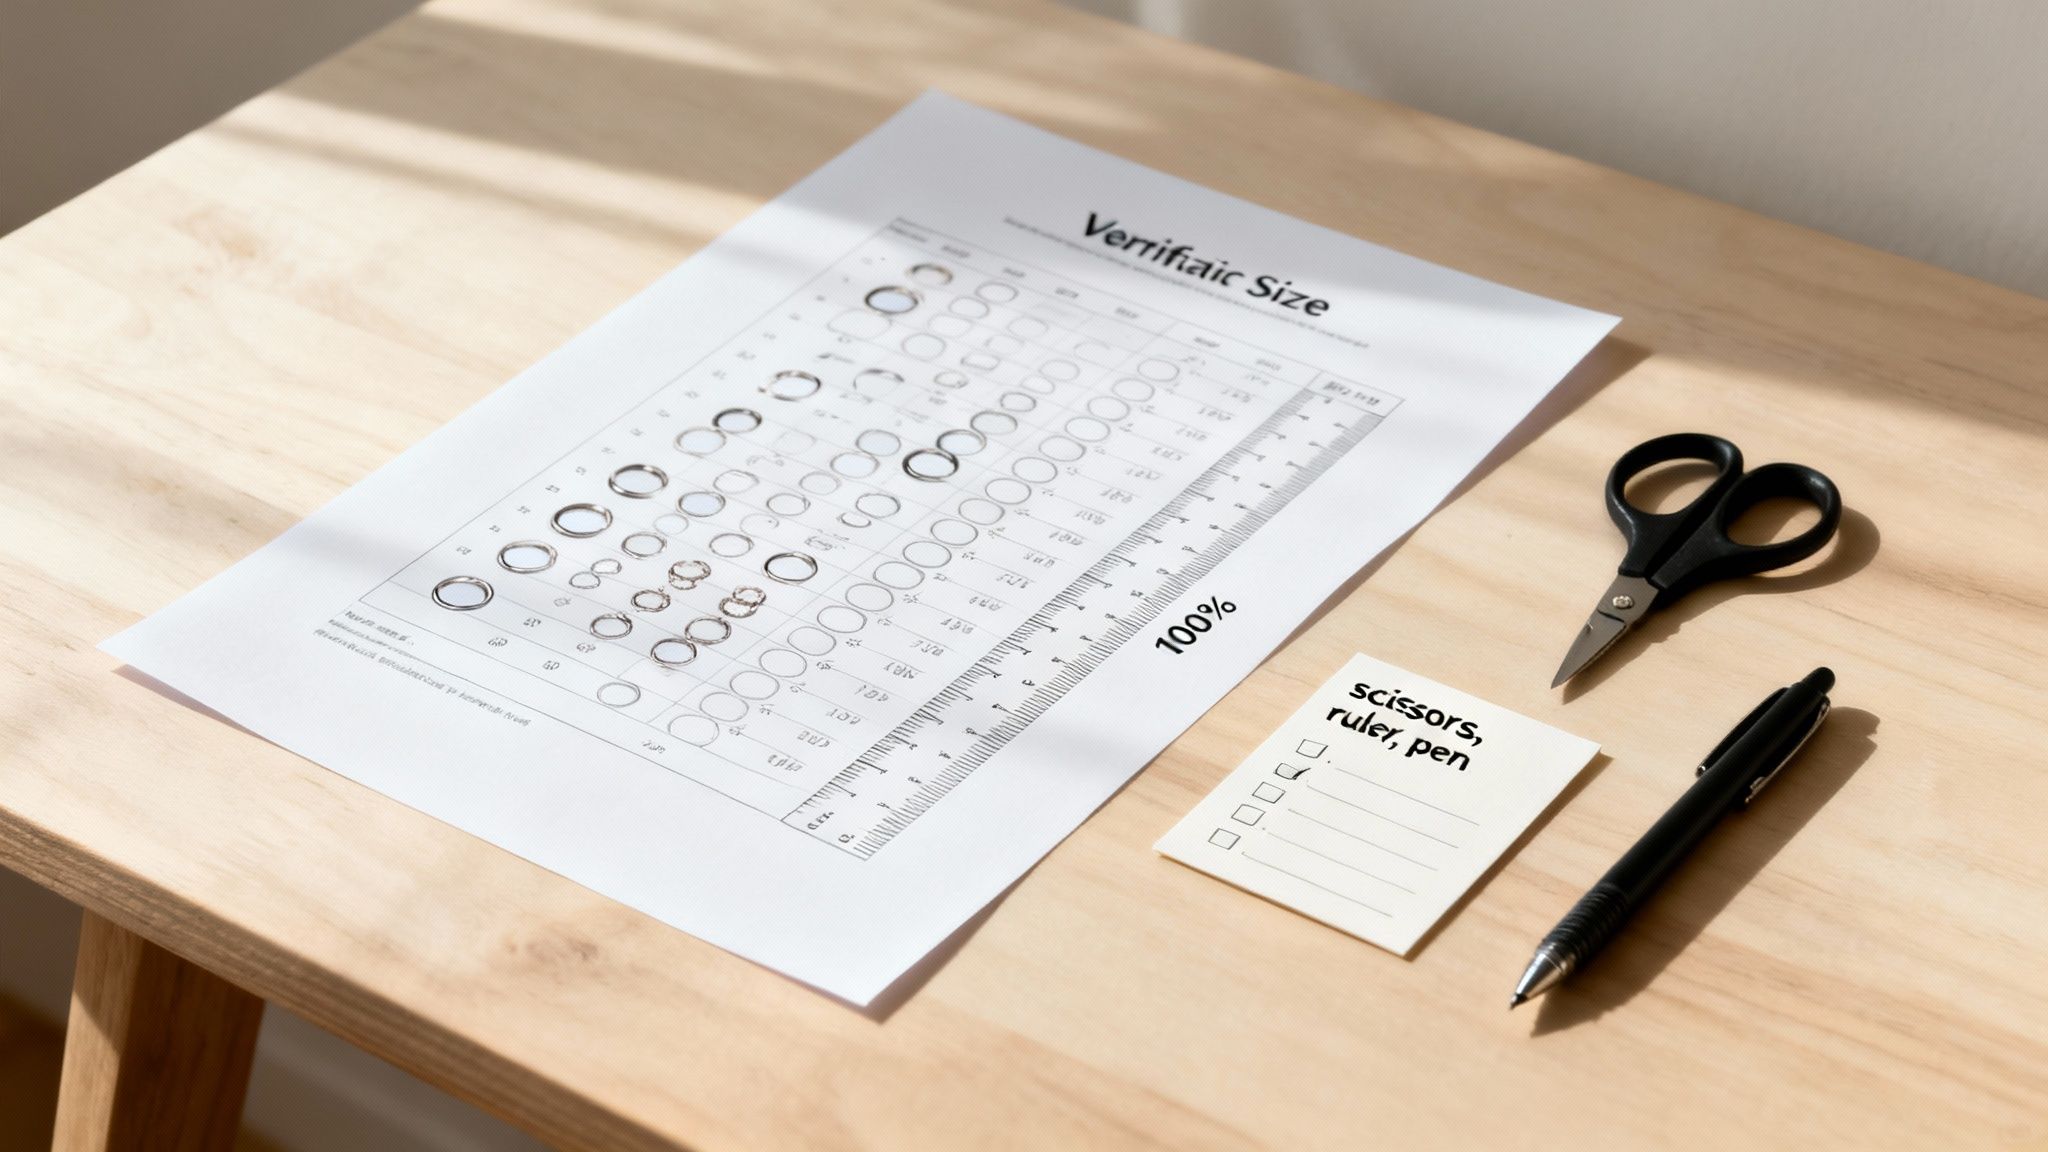
Finding your perfect ring fit at home starts right here. Our free printable ring size chart is a fast, reliable way to measure your finger or an existing ring that you already love. Just download the PDF, print it out at 100% scale, and you'll have your ideal size figured out in minutes.
Your Guide to At-Home Ring Sizing
Shopping for a ring online can feel like a bit of a gamble, especially when it comes to the fit. A ring that’s too tight is just plain uncomfortable, while one that’s too loose is always at risk of getting lost.
The good news? You don't need a trip to the jeweler to find your exact size. Our downloadable ring sizer is designed to give you an accurate measurement from the comfort of your own home. This guide will walk you through everything you need to know, making sure your next piece from Panther De Luxe Shop fits like it was made for you.
Two Simple Measurement Methods
Our printable chart gives you two easy ways to find your size.
The Ring Method: If you already have a ring that fits the right finger perfectly, this is your best bet. You just place it over the circles on our chart until you find the one that matches. It's often the quickest and most foolproof option.
The Sizer Method: Don't have a go-to ring? No problem. The chart includes a paper sizer that you can cut out and wrap around your finger to measure its circumference directly.
Both methods work great, but their accuracy depends on one critical step: printing correctly. The most important thing you can do is set your printer to 100% scale (sometimes called "Actual Size"). Even a tiny 3% sizing error can throw your measurement off by an entire ring size.
Before you do anything else, grab a ruler and check the calibration line on the printed chart. If it doesn't measure up exactly as indicated, your sizing will be off. This is a non-negotiable step for getting it right.
Your Pre-Measurement Checklist for Accuracy
To set yourself up for success, it helps to gather a few simple items and make sure the conditions are right. A little prep work now goes a long way in guaranteeing an accurate result. Here’s a quick rundown of what you’ll need before you start.
Item or Condition | Why It Is Important | Quick Tip |
|---|---|---|
Printer and Paper | You'll need a physical copy of the chart to work with. | Use standard 8.5" x 11" letter-sized paper for the best result. |
A Physical Ruler | This is essential for verifying that the chart printed at the correct scale. | In a pinch, a credit card works. Its standard length is 3.37 inches (85.6mm). |
Scissors | You'll need these to cut out the paper sizer strip. | Use sharp scissors. A clean, straight edge makes for a much more precise wrap. |
Room Temperature | Our fingers actually swell in the heat and shrink in the cold. | It's best to measure in the late afternoon when your fingers are naturally at their largest. |
With these items ready, you're all set to get an accurate measurement and find a ring that feels truly comfortable.
How to Print and Use Your Ring Sizer Correctly
Getting an accurate ring measurement at home all comes down to one thing: printing your chart correctly. Seriously, the difference between a perfect fit and a disappointing guess is usually buried in your printer settings. This guide will walk you through it, so your measurement is just as reliable as a jeweler's.

First things first, open the PDF and pull up your printer's dialog box. You're looking for a setting called "Page Scaling," "Scale," or something similar. This is the crucial part: you must select "100%" or "Actual Size."
Steer clear of settings like "Fit to Page" or "Scale to Fit." These will automatically shrink or stretch the chart, making the measurements totally useless.
Once it’s printed, don't just trust it blindly. Your next move is to make sure it’s accurate.
Verifying Your Printed Chart
Our ring size chart printable includes a handy verification ruler right on the page. Grab a physical ruler or even a credit card (they have a standard length of 3.37 inches or 85.6mm) and hold it up against the printed ruler.
If the lines match up perfectly, you’re good to go. If not, your sizing will be off. Head back to your print settings, double-check that the scale is set to 100%, and print it again. It's worth the extra sheet of paper, trust me.
This verification step isn't optional—it's everything. A tiny printing error can have a huge impact. A mistake of just 1 mm in diameter can throw the circumference off enough to change your ring size by almost a full size. It’s a game of millimeters.
This is where a little document quality control mindset comes in. You’re not just printing a piece of paper; you’re creating a precision tool.
Using the Chart with an Existing Ring
Have a ring that already fits the intended finger perfectly? This is by far the fastest and most reliable method. It’s simple and removes all the guesswork.
Place your ring on the chart. Just lay it flat on top of the printed circles.
Find the perfect match. Slide the ring from circle to circle until you find the one where the inner edge of your ring lines up exactly with the outer edge of the circle. The black circle on the paper should be completely visible inside your ring, with no gaps.
Read your size. The number inside that circle is your ring size. If you're stuck between two sizes, we always suggest choosing the larger one for a more comfortable fit, especially if you're looking at a ring with a wider band.
Using the Cut-Out Paper Sizer
If you don't have a go-to ring to measure, the paper sizer is your next best bet. This little tool measures your finger’s circumference directly.
Start by carefully cutting out the paper sizer from the chart. Use sharp scissors—a clean, straight cut is key for getting an accurate reading. Then, make a small slit where indicated on the sizer.
Now, wrap the paper strip around the base of the finger you're sizing. Make sure the numbers are facing out so you can read them.
Slide the pointed end of the sizer through the slit you cut, creating a little paper belt for your finger. Pull the end until the paper is snug against your skin.
The tension here is important. It should be tight enough not to fall off, but loose enough that you can slide it over your knuckle without a major struggle. A good rule of thumb is to check that it can still rotate a little. The number the arrow points to is your ring size.
Mastering At-Home Finger Measurement Techniques
If you don’t have a perfectly fitting ring on hand, don't sweat it. Measuring your finger directly is the next best thing, and you can get a surprisingly accurate result with just a couple of household items. The trick is to be meticulous and understand a few simple principles that we jewelers use every single day.
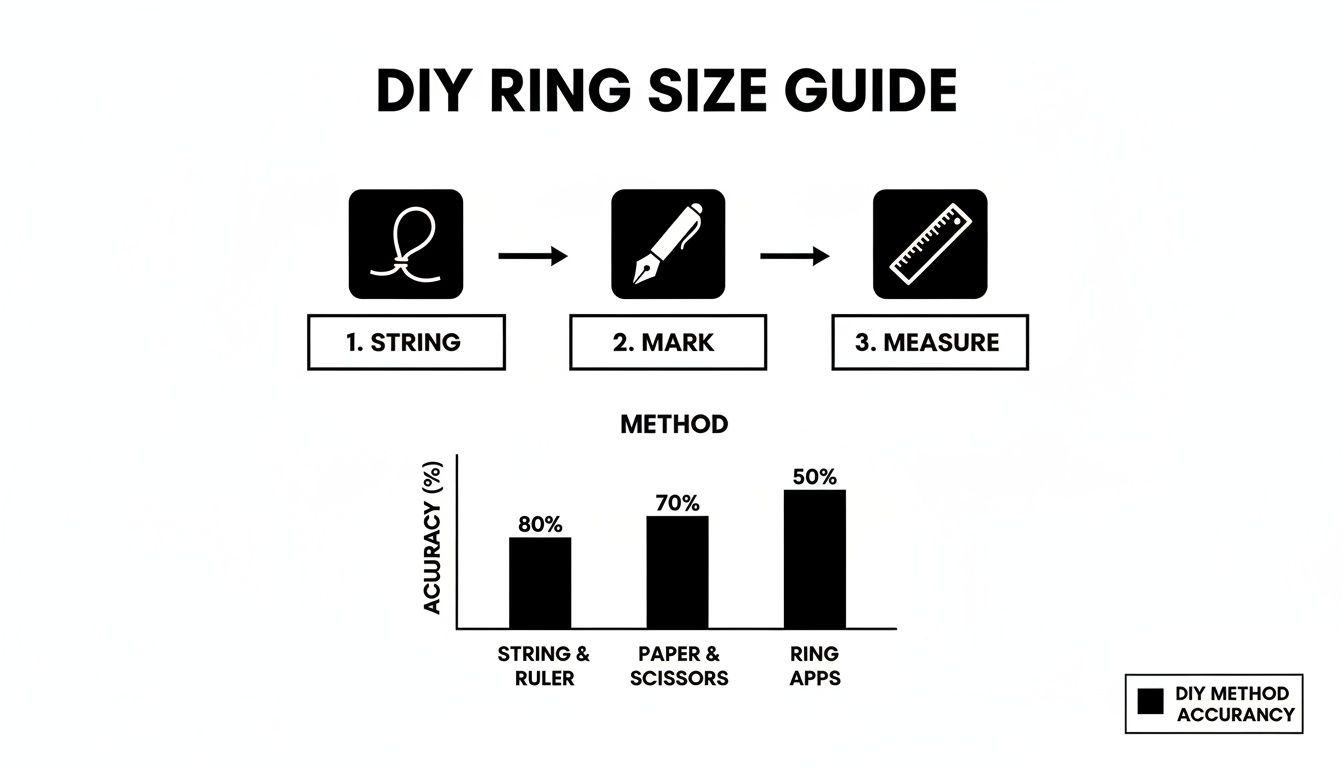
We're going to walk through the two most common and reliable DIY methods: using a simple piece of string and using a thin strip of paper. Both techniques are designed to measure the circumference of your finger, which you can then match up with our ring size chart printable to find your size.
The String Method: A Classic Approach
Using a piece of string or even dental floss is a popular way to measure your finger at home. It’s a method that’s been around forever, but its accuracy really hinges on your technique and the string you choose.
First off, pick your material carefully. The biggest mistake people make is using a string that has any stretch to it, like yarn or elastic thread. This will almost always lead to an incorrect measurement because it’s so easy to pull it too tight, leaving you with a size that’s way too small.
Find Your String: Grab a piece of non-stretchy string, thin cord, or dental floss.
Wrap Your Finger: Loop the string around the base of your finger, right where the ring will sit. It should feel snug but not tight. You want it to feel like a perfect ring—secure enough that it won't fall off, but loose enough to slide over your knuckle.
Mark the Spot: With a fine-tipped pen, carefully mark the exact point where the end of the string overlaps the rest of the strand. A thick marker can easily add an extra millimeter, so precision here is key.
Once you've made your mark, lay the string flat against a ruler and measure the length from the end to your mark in millimeters. That measurement is your finger's circumference.
Using a Paper Strip for Better Accuracy
Honestly, a thin strip of paper often gives a more accurate reading than string. It doesn’t stretch, and it lies flat against the finger, which better mimics the feel of a real ring band. This is my personal recommendation for at-home measurements.
Start by cutting a straight, thin strip of paper—keep it no wider than about 1/4 inch (or 6mm). If the strip is too wide, the edges can skew the measurement and give you an inaccurate size.
Just like the string method, wrap the paper strip around the base of your finger. Pull it so it's snug, then use a pen to mark where the paper overlaps. Don't be afraid to do this a few times to make sure your mark is consistent.
Pro Tip: When you're wrapping the paper or string, try sliding it back and forth over your knuckle. If it gets stuck or you have to force it, your measurement is too tight. A perfect fit allows the ring to pass over the knuckle with just a slight twist.
Unroll the paper and measure the length from the end to your mark with a ruler. This gives you the circumference in millimeters, which you can then compare to the sizing chart. You can find more tips on nailing this technique in our comprehensive guide on how to measure for a ring size at home.
For Ultimate Precision: The Caliper Method
If you happen to have a ring that fits well but want a more precise measurement than what the circle chart offers, a digital caliper is an amazing tool. Calipers are designed for exact measurements and can determine the inner diameter of your ring down to a fraction of a millimeter.
Just open the jaws of the caliper, place them on the inside edges of the ring at its widest point, and close them gently until they touch the metal. The digital screen will give you the precise inner diameter. You can then use that number with any international conversion chart to find your exact size. This is a huge leap in precision from historical methods, where sizing was entirely bespoke. It wasn't until the 20th century that standardization really began, like when the British system was reworked in 1987 to use metric steps of 1.25 mm per size, making printable charts universally practical.
Navigating International Ring Size Conversions
Shopping for the perfect ring online opens up a world of beautiful designs from across the globe. But it also throws you into the sometimes-confusing landscape of international ring sizing. A size 7 in the US isn't a size 7 in the UK, and it means something entirely different in Germany or Japan.
Getting a handle on these differences is the key to making a confident purchase. You don't need to be a sizing expert, but knowing how the systems relate to each other will save you from the disappointment of receiving a ring that just doesn't fit.
The Major Global Sizing Systems
Across the world, you'll mainly run into a few key sizing standards. Each one uses a different logic to arrive at its final number or letter.
US and Canada: This system uses a numerical scale, often including half and even quarter sizes for a more precise fit.
UK and Australia: Here, you'll find an alphabetical system, starting from A for the smallest sizes and moving up.
Europe (ISO 8653): This is probably the most straightforward standard. The size is simply the ring's inner circumference in millimeters. So, a size 54 ring has a circumference of exactly 54 mm.
The universal language in all of this is millimeters (mm). That's why our printable chart includes these precise measurements—they're your single source of truth.
This visual breaks down how to get that initial measurement. A precise circumference in millimeters is the most critical first step before you even think about converting sizes.
How to Use a Conversion Chart
A good conversion chart is your best friend here. Think of it as a translator, letting you convert your known size from one standard to another with total confidence. The trick is to start with what you know for sure—ideally, your finger’s circumference or a ring’s diameter in millimeters.
For instance, imagine you live in Germany and know your finger circumference is 57 mm. In the European system, your size is simply 57. If you're eyeing a piece from a US-based store like Panther De Luxe Shop, you'd look at the chart, find 57 mm circumference, and see that it lines up perfectly with a US size 8.
International Ring Size Conversion Chart
This table acts as your go-to translator, bridging the gap between global sizing standards. Just find the measurement you know—whether it's the diameter in millimeters or your local size—and look across the row to find its international equivalent.
Diameter (mm) | Circumference (mm) | US / Canada | UK / Australia | EU / ISO |
|---|---|---|---|---|
14.05 | 44.14 | 3 | F | 44 |
14.45 | 45.40 | 3.5 | G | 45.5 |
14.86 | 46.68 | 4 | H | 46.5 |
15.27 | 47.97 | 4.5 | I | 48 |
15.70 | 49.32 | 5 | J | 49.5 |
16.10 | 50.58 | 5.5 | K | 50.5 |
16.51 | 51.87 | 6 | L | 52 |
16.92 | 53.16 | 6.5 | M | 53 |
17.35 | 54.51 | 7 | N | 54.5 |
17.75 | 55.76 | 7.5 | O | 55.5 |
18.19 | 57.15 | 8 | P | 57 |
18.53 | 58.21 | 8.5 | Q | 58 |
18.89 | 59.34 | 9 | R | 59.5 |
19.41 | 60.98 | 9.5 | S | 61 |
19.84 | 62.33 | 10 | T | 62.5 |
20.20 | 63.46 | 10.5 | U | 63.5 |
20.68 | 64.97 | 11 | V | 65 |
21.08 | 66.22 | 11.5 | W | 66 |
21.49 | 67.51 | 12 | X | 67.5 |
21.89 | 68.77 | 12.5 | Y | 68.5 |
22.33 | 70.15 | 13 | Z | 70 |
Remember, it’s always best to rely on the millimeter measurement. Sizing can have slight variations between brands, but a millimeter is a millimeter everywhere in the world.
A Real-World Conversion Example
Let's walk through another common scenario. Say you're in Australia and know you wear a size P ring. You've found the perfect piece on a US website, but the sizes are all numbers. What do you do?
First, find your starting point: Locate size "P" in the UK/Australia column of the conversion chart.
Next, cross-reference the measurements: Look across that same row to find the corresponding US size. You'll see that a size P is the same as a US size 7.5.
Finally, verify with millimeters: For extra assurance, check the circumference for that size, which should be around 55.8 mm. If your at-home measurement confirms this, you can order that US 7.5 with total peace of mind.
Mastering these conversions can feel like learning a new language, but it's much simpler than it looks. For a deeper dive, be sure to read our detailed article, which offers a Global Guide to the Perfect Fit. It provides even more detail to ensure your next international jewelry purchase is a success.
Expert Tips for a Flawless Ring Fit

So, you've printed your ring size chart printable and have your basic measurement. That's a great start, but now we get to the good part: fine-tuning the fit. Getting it perfect is more of an art than a science, and it comes down to a few insider secrets that we jewelers rely on. A number on a chart is just your starting point; these tips will help you find a ring that feels like it was made just for you.
One of the biggest things people overlook when sizing at home is the ring’s design. The width of the band, for instance, has a surprisingly huge impact on how a ring actually feels on your finger. A delicate, thin band sits completely differently than a bold, wide statement piece.
How Band Width Changes Everything
Think of it like clothing: a wide belt feels much tighter than a thin string around your waist, even if they have the same circumference. The exact same principle applies to rings. A wider band covers more real estate on your finger, creating more friction and displacing more skin, which all adds up to a much snugger fit.
As a general rule of thumb, for any ring with a band wider than 6mm, you should seriously consider going up a half size from what you measured. It seems small, but that tiny adjustment makes all the difference, giving you the room you need to avoid that tight, constricting feeling.
Thin bands (1mm - 3mm): Stick to your measured size.
Medium bands (4mm - 6mm): Your measured size should be spot-on.
Wide bands (over 6mm): It's always wise to size up by at least a half size.
The Knuckle Conundrum
Another classic challenge is navigating knuckles that are larger than the base of your finger. This is incredibly common, so don't sweat it. The goal here is to find a size that’s just big enough to slide over the knuckle with a little twist but isn't so loose that it spins around once it's on.
Trying to force a ring over your knuckle is just a recipe for discomfort. The right size should require a gentle push and a slight turn to guide it past the joint. Once it settles at the base of your finger, it should feel secure—not like it could slide right back off. If a ring is too loose at the base, you risk it getting damaged or, even worse, lost.
The perfect fit is all about balance. Your ring should be snug enough not to fall off but loose enough to accommodate the natural swelling and shrinking your fingers do all day. And if you get the size slightly wrong, don't panic. Our guide on how to get a ring resized breaks down the entire process.
Timing and Temperature Matter More Than You Think
Did you know your fingers actually change size throughout the day? They react to everything—temperature, humidity, even that salty snack you had. This is exactly why when you measure is so critical for getting an accurate reading.
Your fingers are usually a bit smaller in the morning or when you're feeling cold. On the flip side, they tend to swell in warmer weather, after a workout, or after you've had something high in sodium. Measuring under those conditions can lead you to pick a size that’s either way too tight or too loose for everyday wear.
For the most reliable measurement, try to size your finger under these conditions:
At the end of the day: This is when your fingers are naturally at their largest from daily activity.
At a comfortable room temperature: Avoid measuring right after you've come in from the cold or stepped out of a hot shower.
By measuring in the late afternoon or evening, you're accounting for your finger's maximum size. It's a small detail, but it makes a world of difference in ensuring your ring stays comfortable from morning to night.
Common Questions About Ring Sizing at Home
Even with the perfect printable chart, a few questions always come up. That’s completely normal. Nailing your ring size at home involves a few little details that can make all the difference, and it’s smart to get them right before you commit.
We’ve heard all the common worries—from trying to buy a surprise engagement ring to figuring out what to do when your measurement lands exactly between two sizes. Let's clear up these final uncertainties so you can feel totally confident in your choice.
What If I Am Between Two Sizes?
It happens all the time. You measure carefully, and you’re sitting right between a size 6 and a 6.5. So, what’s the move?
When in doubt, always choose the larger size.
A ring that’s a tiny bit loose is a world away from one that’s painfully tight. Your fingers naturally swell with heat and daily activity, and a snug ring can quickly become impossible to wear. Going up that half-size gives you a much-needed comfort buffer.
This is especially critical for rings with wider bands. As a rule of thumb, any band over 6mm is going to feel tighter, so sizing up isn't just a suggestion—it’s pretty much essential for a good fit.
How Can I Secretly Find My Partner's Ring Size?
This one requires a bit of detective work, but you've got this. The goal is to get an accurate size without giving away the surprise. Luckily, there are a few clever ways to do it.
Borrow an Existing Ring: This is the gold standard. Discreetly borrow a ring they already wear on the correct finger and hand. Don’t guess! Measure it against the circles on our printable chart.
Ask for Help: A trusted friend or family member can be your secret weapon. They could casually bring up jewelry in conversation or suggest "window shopping" together to get the info you need.
The Comparison Trick: If you can't sneak a ring away, try this when they take it off. Slip it onto one of your own fingers (your pinky is often a good candidate) and use a pen to mark exactly where it stops. Later, you can measure that spot on your finger.
Be careful with this one. Don't grab a ring they wear on their middle finger or thumb and assume it will fit their ring finger. Sizes vary a lot, even on the same hand.
When Is the Best Time of Day to Measure?
Your fingers aren't static—they actually change size throughout the day. Measuring at the wrong moment can throw your results off completely.
The best time to measure is at the end of the day, usually late afternoon or evening. This is when your fingers are at their largest after a full day of activity and warmer body temperatures. If you measure first thing in the morning when your fingers are colder and smaller, you risk choosing a size that will feel uncomfortably tight by dinnertime.
Ready to put your sizing skills to the test? Explore the full collection at the Panther De Luxe Shop and choose a ring that fits you flawlessly.
Find your next favorite piece at https://www.pantherdeluxe.com.
Comments