
A Guide to Using a Printable Ring Sizer Chart for the Perfect Fit
- Luke Zucco
- Dec 28, 2025
- 15 min read

Shopping for a ring online can feel like a shot in the dark, but a free printable ring sizer chart is one of the easiest ways to find your perfect fit right from home. This guide gives you a reliable chart and two simple methods: one for matching a ring you already own and another for measuring your finger directly with a paper strip.
Getting the size right is everything—it’s about comfort, confidence, and making sure your new piece stays exactly where it belongs.
Why a Printable Ring Sizer Chart Is Your Best Tool
Let's be real: you shouldn't need a trip to the jeweler just to find your ring size. A printable chart is a quick, convenient, and surprisingly accurate solution you can use right now. It empowers you to shop online with total confidence, whether you're treating yourself or planning the perfect surprise.
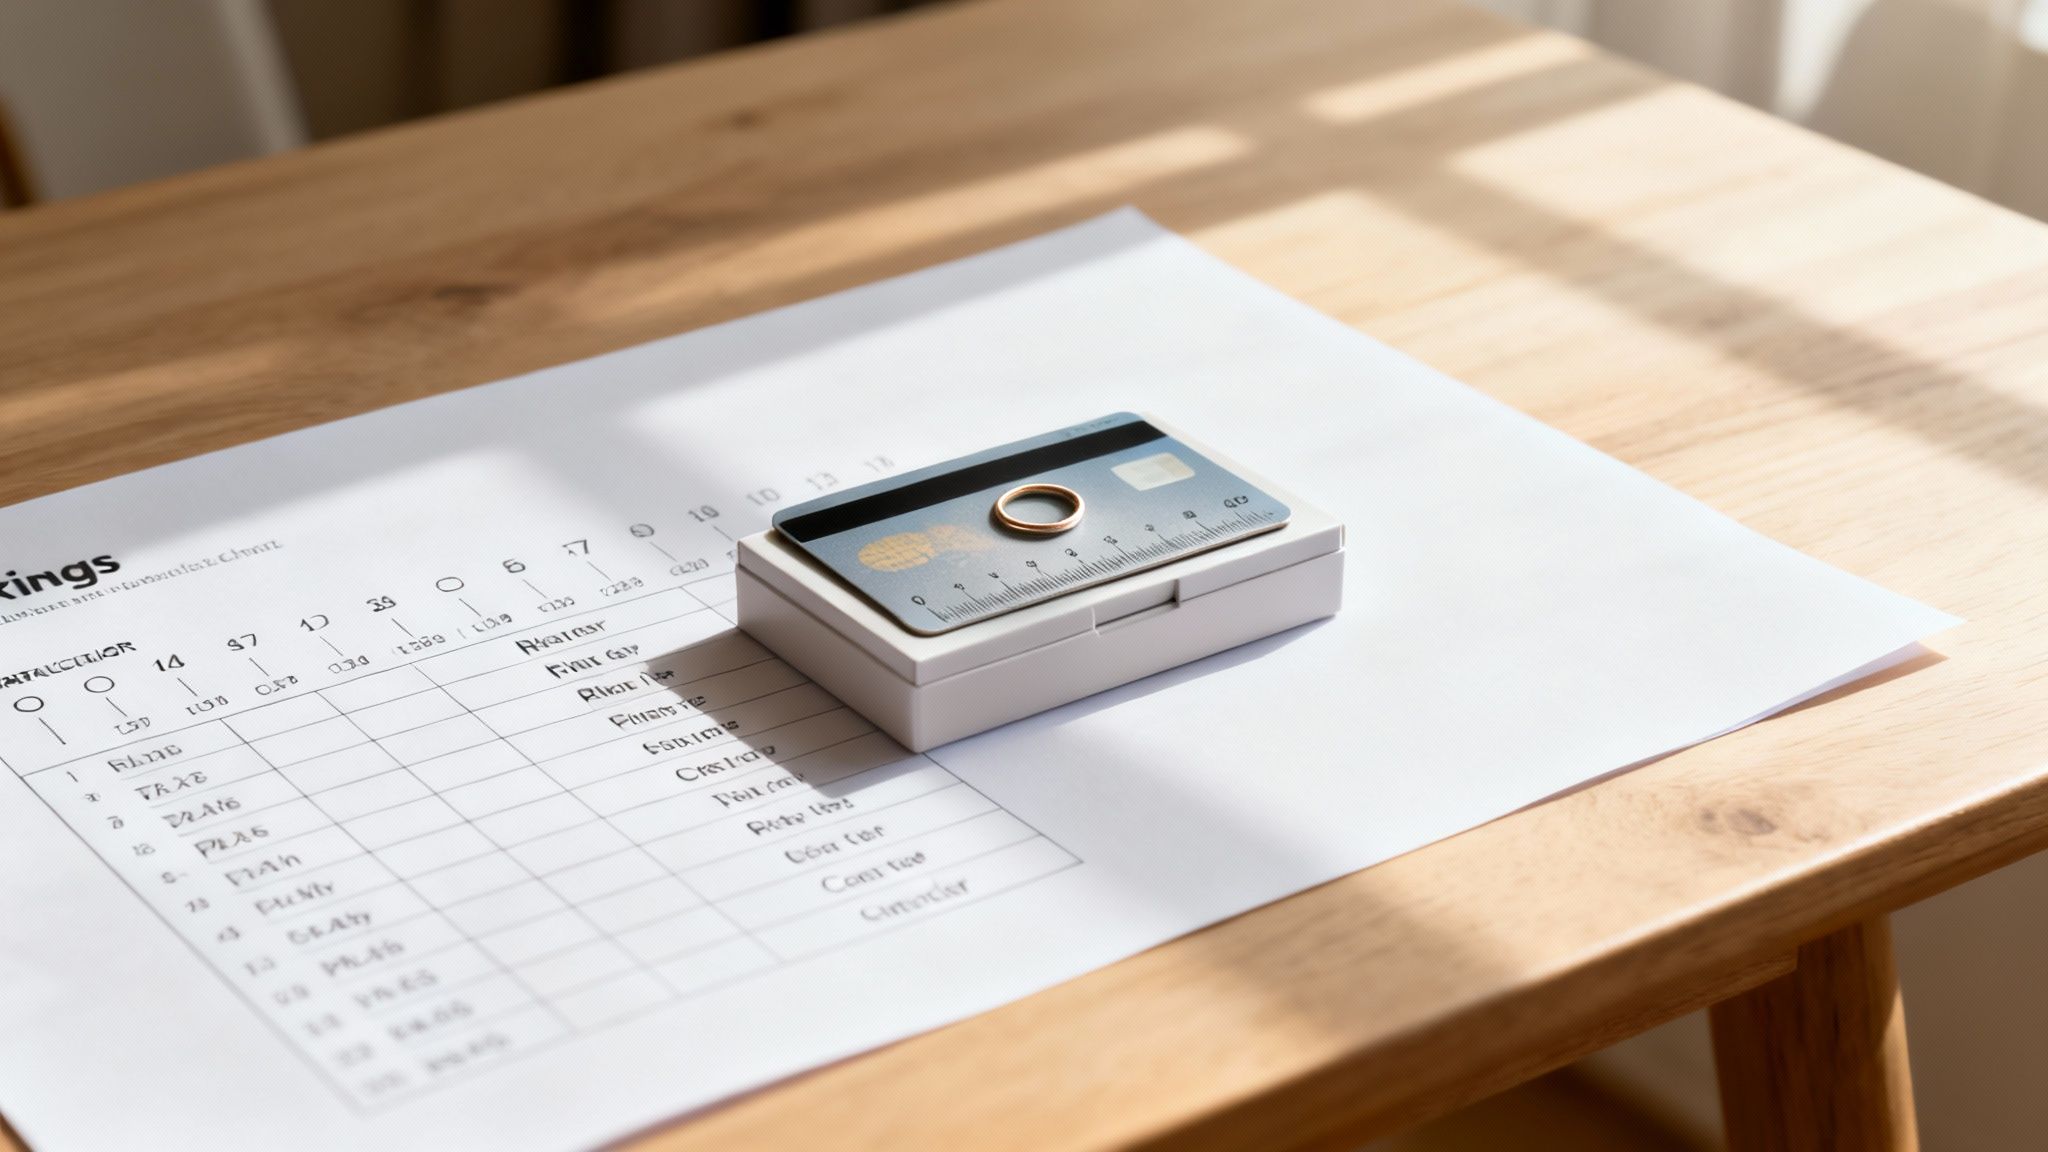
The beauty is in its simplicity. All you need is a printer and a standard credit card to check the scale, and you’ve got a reliable sizing tool. We'll walk you through every step to get a precise measurement.
How It Changed Online Shopping
Printable charts were a total game-changer for online jewelry stores and their customers. Since the e-commerce boom took off around 2010, these simple tools have seriously cut down on returns from sizing mistakes—by an estimated 35-50% in major markets.
This shift doesn't just save you the hassle of sending something back; it builds trust and makes buying beautiful jewelry online feel a lot less like a gamble.
Key Takeaway: The single most important step is checking the scale. Seriously. Use a credit card to make sure your printout is accurate. This one move prevents the most common sizing error right from the start.
Two Foolproof Methods at Your Fingertips
So, how does it work? Our chart gives you two different ways to find your size, depending on your situation. Knowing both helps you pick the best approach.
Not sure which method is right for you? Here's a quick breakdown to help you decide.
Choosing Your At-Home Sizing Method
Method | Best For | What You Need |
|---|---|---|
The Paper Strip Method | Measuring a finger directly when you don't have a ring that already fits. | Printer, scissors, your finger. |
The Ring Matching Method | Finding the size of a ring that already fits you perfectly. Also great for secret gift-giving! | Printer, a well-fitting ring. |
Both options are solid, but picking the right one from the start makes the process even smoother.
The Paper Strip Method: This is your go-to if you're starting from scratch. You just cut out the sizer, wrap it snugly around the base of your finger, and read the number. Easy.
The Ring Matching Method: Perfect if you already have a ring that fits that exact finger like a dream. You simply place your ring over the circles on the chart until you find the one that lines up perfectly with the inside edge.
While both methods are effective, they have their own little quirks. For a deeper look at different at-home techniques, check out our full guide on how to size a ring finger at home the right way.
With these tips, you'll have everything you need to measure accurately and make sure the ring you order from Panther De Luxe is the one.
How to Print Your Ring Sizer Chart for Accurate Results
Getting a precise ring measurement at home all comes down to one thing: printing our chart correctly. Even a tiny error in scale can throw your reading off by a full size or more, leaving you with a ring that’s too tight or, even worse, at risk of slipping right off your finger.
The good news? Nailing the perfect print is simple once you know which settings to check. The goal is to print our downloadable PDF at its actual size—not scaled up or down to fit the paper. This is the only way to ensure the dimensions on the page perfectly match the real-world dimensions of our rings.
Dialing in Your Printer Settings
First things first, download the Panther De Luxe printable ring sizer and open the PDF. When you go to print, pause before you hit that final button and look for the scaling options. Every printer is a little different, but they all have a setting that does the same job.
You'll want to find and select one of the following options:
Actual Size
Scale 100%
No Scaling
This command tells your printer to ignore any automatic resizing it might try to do. What you absolutely want to avoid are settings like "Fit to Page," "Scale to Fit," or "Shrink to Fit." These will resize the chart and make it completely useless for measurement.
Pro Tip: Make sure you're printing on standard 8.5" x 11" (US Letter) or A4 paper. Using a different size can sometimes trigger automatic resizing, even if you’ve already selected the right scale setting.
The Essential Calibration Check
So, how do you know for sure that your printed chart is perfectly scaled? This is where the calibration check comes in, and trust us, it’s a non-negotiable step. Our chart includes a ruler guide that you need to verify before you measure anything else.
The most reliable tool for this is right in your wallet: a standard credit card, debit card, or driver's license. These cards are made to internationally standardized dimensions (85.60 mm × 53.98 mm), making them the perfect reference object.
Just place your card directly on top of the printed calibration guide. The edges of the card should line up perfectly with the lines on the chart. If it’s a perfect match, you’re good to go.
Troubleshooting Common Printing Problems
What if the credit card doesn't line up? Don't sweat it. This almost always points to a simple settings issue that’s quick to fix.
If the printed guide is too small:
This usually means your printer defaulted to a "Shrink to Fit" setting. Head back to your print options and double-check that the scale is set to 100% or "Actual Size."
Sometimes, printing directly from a web browser can cause scaling issues. Try downloading the file to your computer first, then open and print it from a dedicated PDF reader like Adobe Acrobat Reader.
If the printed guide is too large:
This is less common, but it can happen if a setting like "Fit to Printable Area" is turned on. Once again, the fix is to make sure your scale is locked in at exactly 100%.
For a deeper dive, there are some great external resources that outline the key steps to ensuring a perfect print every time, which is vital for this process. Taking a moment to get this right saves a ton of hassle later. Once your chart is calibrated, you’ve got a reliable tool ready for a perfect measurement.
Measuring Your Finger Size with the Paper Strip Method
Alright, your printable sizer is printed, calibrated, and ready to go. Now for the most important part—getting an accurate measurement of your finger. We’re using the paper strip method, a simple and surprisingly reliable way to find your perfect fit right from home.
The goal here is a snug fit. It should feel comfortable enough for everyday wear but secure enough that it won’t go flying off when your hands are cold or you’re washing them.
First things first, carefully cut out the paper sizer from the chart. You'll see a small slit on one end. The pointed end of the strip feeds through this slit, creating a tiny paper loop that acts like a mini belt for your finger.

This simple flow—download, print, calibrate—is the foundation for an accurate measurement. Don't skip that credit card check!
Getting the Perfect Snug Fit
Slide the paper loop onto the finger you plan to wear the ring on. Gently pull the pointed end until it fits snugly around the base of your finger. It shouldn't be so tight that it’s digging into your skin or feels constricting.
A good rule of thumb? It should be tight enough not to spin around freely but just loose enough to slide over your knuckle with a little bit of effort.
Once you’ve found that sweet spot, the number that lines up perfectly with the arrow is your ring size. It’s always a good idea to measure two or three times just to be sure you’re getting a consistent number. If you land between two sizes, jot them both down for now.
Insider Tip: No scissors handy? You can get the same result with a piece of non-stretchy string or even dental floss. Just wrap it around your finger, mark where the ends overlap with a pen, and then lay it flat against the ruler on your printable chart to find the size.
Tackling the Knuckle Challenge
For a lot of us, the real challenge isn't the base of the finger—it's the knuckle. If your knuckle is noticeably wider than the base of your finger, a ring that fits the base perfectly won't even slide on. It’s a super common issue and one of the biggest sizing mistakes people make.
The fix is easy. Just take two separate measurements:
Measure the base of your finger using the paper strip as described above. Write that size down.
Measure your knuckle by sliding the paper sizer up to the widest part of your knuckle. This number will likely be a bit larger.
When you have both numbers, always choose the larger size. It might feel a touch loose at the base, but this guarantees the ring will slide on and off comfortably. Trust us, trying to force a ring over your knuckle every day is a recipe for irritation.
Common Scenarios and How to Handle Them
Every hand is different, and real-world factors can definitely affect your measurement. Here’s how to navigate the most common ones.
You're between sizes: If you’re measuring something like a 7.25, think about the style of ring you want. For a thin, delicate band from Panther De Luxe, we often suggest sizing down for a secure fit. But for a wider, bolder band (anything over 5mm), you should always size up to the next half size to give your finger some breathing room.
Your fingers swell: This is totally normal! To get the most accurate reading, try measuring at the end of the day when your fingers are at their largest. Avoid doing it first thing in the morning or right after you've been out in the cold.
Dominant vs. Non-Dominant Hand: Did you know the fingers on your dominant hand are often a little larger? Always measure the exact finger on the exact hand where you plan to wear your new ring.
By taking a few extra moments to measure carefully and account for your unique finger shape (especially those knuckles!), you can use this paper sizer with total confidence. It’s the best way to ensure the Panther De Luxe ring you choose not only looks amazing but feels like it was made just for you.
Using an Existing Ring to Determine Your Size
If you're planning a surprise or just happen to have a ring that already fits perfectly, you're in luck. Using it to find your size is one of the fastest and most reliable ways to get it right. Instead of measuring your finger, you’ll simply match the ring you have to the circles on our printable ring sizer chart. It’s a smart shortcut that sidesteps tricky variables like finger swelling or wide knuckles.
Of course, the key is choosing the right ring for the job. It needs to be one that you (or the person you're buying for) already wears comfortably on the correct finger. Don't forget, a ring that fits your right index finger probably won't fit your left ring finger, so be specific!

Finding the Perfect Match on the Chart
Once you've got your reference ring and your accurately printed chart, the rest is easy. Just lay the chart down on a flat, well-lit surface. Start by placing your ring over the printed circles, beginning with a size you think is a close match.
The goal is to find the circle where the black outline is just barely visible along the entire inside edge of your ring. You shouldn't see any white space between your ring and the circle, but you also don't want the ring to cover the black line. When it lines up perfectly, you've found your size.
Crucial Tip: If you're having trouble seeing the outline clearly, hold the ring and chart up to a light source. The backlight makes it so much easier to spot a perfect match versus one that's a hair too big or small.
Common Pitfalls to Avoid
This method is super reliable, but only if you sidestep a few common mistakes. The shape and style of the ring you're using as a reference really matter.
Be mindful of these factors:
Wide Bands: Rings with a very wide band (think over 6mm) tend to fit much more snugly than thinner ones. If you use a wide ring as your guide for a new, slimmer band, you might end up ordering a size that’s way too loose.
Comfort-Fit Bands: These rings have a rounded interior, which makes them feel looser and slide on more easily. Measuring a comfort-fit band against a standard chart can give you a reading that's about a half-size smaller than your actual standard-fit size.
Warped or Damaged Rings: An old favorite that's been bent out of shape over the years won't give you an accurate measurement. Make sure the ring you're using is still perfectly round.
For the most accurate result, try to use a simple, standard-width ring that doesn’t have a comfort-fit design.
Sizing Guidance for Gift Givers
So, what if you're buying a gift and can't exactly ask for their ring size? Knowing the average sizes can turn a shot in the dark into a pretty educated guess.
For women, the average ring size in the US, Europe, and Australia is between a size 3 and a size 9, but the most common purchases fall between size 5 and 7. For men, the range is typically larger, from size 6 to 13, with the sweet spot being sizes 8 to 10.5. The single most popular men's size is a 9. You can explore more insights about average ring sizes to help guide your choice.
This info is a great sanity check. If you're secretly borrowing a ring from someone with delicate hands and it measures as a size 10, it's a good idea to double-check you grabbed one they actually wear on the correct finger.
Ultimately, using a ring you already own is an excellent way to use the printable sizer with confidence. Just pick the right reference ring, match it up carefully, and you'll be one step closer to finding that perfect piece from Panther De Luxe.
Jeweler's Tips for a Flawless Measurement
Using a printable ring sizer chart is a fantastic start, but as any seasoned jeweler will tell you, a flawless fit goes way beyond the numbers on a piece of paper. Your finger size isn't a static, unchanging figure. It's a dynamic measurement that reacts to your body, your habits, and your environment.
Understanding these subtle shifts is the real secret to finding a ring that feels like it was made just for you, all day, every day.
The most common mistake we see? Measuring at the wrong time of day. Your fingers naturally swell and shrink, so for the most accurate reading, always measure your finger at the end of the day, preferably in the evening.
This is when your fingers are at their largest, giving you a measurement that will still feel comfortable after a long day of work or a salty dinner. Measuring first thing in the morning often leads to picking a size that feels great at 8 AM but uncomfortably tight by 5 PM.
Timing and Temperature Are Everything
Your body's internal thermostat plays a huge role in your ring size. When you're cold, your fingers shrink. It’s simple biology. Measuring in this state is a recipe for a ring that’s too loose and at risk of slipping right off.
On the other hand, things like heat, humidity, or even a tough workout cause your fingers to swell up. A measurement taken right after a hot shower or on a humid summer day might lead you to choose a size that feels loose and spins around your finger the moment you step into an air-conditioned office.
Jeweler's Insight: For the most reliable result, measure when your body temperature is stable in a comfortable, room-temperature environment. Avoid measuring right after exercising, coming in from the cold, or after a big salty meal—all of these can cause temporary swelling and throw off your measurement.
The Critical Role of Band Width
Not all rings are created equal, and the width of the band dramatically impacts its fit. A wide, chunky sneaker needs more room than a delicate sandal, right? The same principle applies here.
A narrow band only touches a small part of your finger, so it generally fits true to your measured size. A wider band, however, covers a lot more skin. This creates more friction and a much snugger feel, almost like it's gripping your finger.
For narrow bands (under 5mm): Your measurement from the printable sizer should be spot-on.
For wide bands (6mm or more): It's standard practice to go up at least a half-size. This extra room makes up for the band's width, ensuring it can slide over your knuckle and sit comfortably without feeling restrictive.
Ignoring band width is one of the most frequent reasons people end up with a poor fit, especially with bolder, statement-making rings.
Accounting for Your Unique Finger Shape
Finally, take a good look at your finger. Is your knuckle significantly larger than the base where the ring will actually sit? This is incredibly common and needs a special approach.
If you only measure the base of your finger, you might pick a size that fits perfectly there but is impossible to get over your knuckle. In this case, your knuckle is the true size you need to accommodate.
The solution is to measure both spots—the base and the knuckle. The right ring size is the one that's just large enough to slide over the knuckle with a gentle twist. Sure, it might feel a touch loose at the base, but that’s much better than a ring you can't get on or off. While sizing mistakes can sometimes be fixed, it's a tricky process. You can learn more by reading our guide that explains how jewelers resize rings.
By applying these pro tips, you're moving beyond a simple measurement and toward finding a size that truly fits your life.
Navigating International Ring Size Conversions
Shopping for jewelry online opens up a world of beautiful designs, but it also introduces different sizing systems. A size 7 in the US isn't the same as a 7 in Europe, and that can feel confusing when you're trying to find the perfect fit.
The good news is, it's actually pretty simple once you know what to look for. The most common systems you’ll run into are from the United States, the United Kingdom/Australia, and Europe. Each uses a unique scale.
United States/Canada: Uses a straightforward numerical scale, often including half and quarter sizes for a precise fit (like 6, 6.5, 6.75).
United Kingdom/Australia: Opts for an alphabetical system where each letter represents a size (e.g., L, M, N). Half-sizes are also common here.
Europe (ISO 8653): This system is the most direct. The size is simply the ring's inner circumference measured in millimeters (e.g., 54, 55). So, a size 54 ring has a 54 mm circumference.
Making Sense of the Systems
The key is knowing how these different measurements relate to each other. For instance, a US size 7 is the same as a size N in the UK/Australia and roughly a 54 in Europe. This is why our printable sizer is so handy—once you find your US size, you can instantly convert it.
A Quick Word of Advice: Don't try to guess or eyeball conversions. The difference between one size and the next is just a few millimeters, but that’s all it takes for a ring to feel way too tight or frustratingly loose. Always use a conversion chart.
International Ring Size Conversion Chart
To make it even easier, here’s a quick-reference chart to help you switch between the major sizing systems. Once you have your US size from our printable sizer, just find it in the first column to see its international equivalents.
USA/Canada | UK/Australia | Europe (ISO) | Diameter (mm) |
|---|---|---|---|
3 | F | 44 | 14.1 |
3.5 | G | 45 | 14.5 |
4 | H | 47 | 14.9 |
4.5 | I | 48 | 15.3 |
5 | J | 49 | 15.7 |
5.5 | K | 51 | 16.1 |
6 | L | 52 | 16.5 |
6.5 | M | 53 | 16.9 |
7 | N | 54 | 17.3 |
7.5 | O | 56 | 17.7 |
8 | P | 57 | 18.2 |
8.5 | Q | 58 | 18.6 |
9 | R | 60 | 19.0 |
9.5 | S | 61 | 19.4 |
10 | T | 62 | 19.8 |
10.5 | U | 64 | 20.2 |
11 | V | 65 | 20.6 |
11.5 | W | 66 | 21.0 |
12 | X | 67 | 21.4 |
12.5 | Y | 69 | 21.8 |
13 | Z | 70 | 22.2 |
This chart is your best friend for confident online shopping. For an even more detailed breakdown, our complete guide on how to convert your ring size for global shopping has everything you need. With your accurate measurement in hand, you can find your perfect Panther De Luxe piece, no matter where it's sized.
Still Have Questions? Let's Clear Them Up
Even with the best tools, sizing your finger can bring up a few tricky questions. Don't worry, it happens all the time. To make sure you get this right, we've put together answers to the most common sizing dilemmas we see at Panther De Luxe.
What Should I Do If I Am Between Two Sizes?
Landing between two sizes is incredibly common, so you're not alone. The right call usually depends on the style of the ring you've got your eye on and even the shape of your own finger.
Here's the rule of thumb we've relied on for years:
For thin bands (under 5mm): Lean towards the smaller size. A delicate ring needs a snug fit to keep it from spinning around or feeling loose.
For wider bands (6mm or more): Definitely go with the larger size. That extra width covers more of your finger, which creates a tighter feel. You'll need that little bit of extra room for it to be comfortable.
One more thing to consider is your knuckle. If your knuckle is noticeably larger than the base of your finger, choosing the larger size will make all the difference when sliding the ring on and off. No one wants a daily struggle.
How Much Do Temperature and Time of Day Really Matter?
Honestly? A lot more than you'd think. Your fingers can actually fluctuate by up to half a size during the day. Things like heat, cold, hydration levels, and even a salty meal can cause them to swell or shrink. This is precisely why a single measurement can sometimes lead you astray.
Get the most accurate reading by measuring your finger 2-3 times on different days, ideally in the evening. Your fingers are typically at their largest at the end of the day. And a crucial tip: never measure when your hands are cold. You'll almost always end up with a size that's too small.
Does This Chart Work for Comfort-Fit Rings?
Our printable sizer gives you a standard ring measurement, which is the industry baseline. Comfort-fit rings, with their slightly rounded interior, feel a little different—that domed shape often makes them feel looser than a standard-fit band of the exact same size.
While you should always start with your standard size from our chart, some people find they prefer going down a half-size for a comfort-fit style to get that perfect, secure feel. Just be mindful if you're using an existing comfort-fit ring to find your size on our chart—it might not translate into a perfectly accurate standard size.
Ready to match that perfect size with the perfect piece? Explore the full collection at Panther De Luxe Shop and find a ring you can wear with total confidence. https://www.pantherdeluxe.com
This guide is incredibly helpful for getting the perfect ring size at home love the credit card calibration tip and detailed steps! Thanks for sharing such a practical printable chart. By the way, if anyone needs assistance In diploma help service for academic credentials or assignments, reliable options are available online.