
Ring Size Guide for Finding Your Perfect Fit
- Luke Zucco
- Dec 18, 2025
- 13 min read

Want to lock in your ideal ring size in just a few minutes? Start by wrapping a thin strip of paper or string around your finger, note where it overlaps, pop on a gauge for a quick reality check, and then cross-reference an official chart. It really is that straightforward—and precision here means fewer returns and a ring that feels like it was crafted just for you.
Quick Ring Size Guide
Finding the right fit shouldn’t feel like guesswork. With everyday items you already have at home, this guide walks you through four clear steps. Think of it like tying a gift ribbon: snug enough to stay put, but not so tight it leaves a mark.
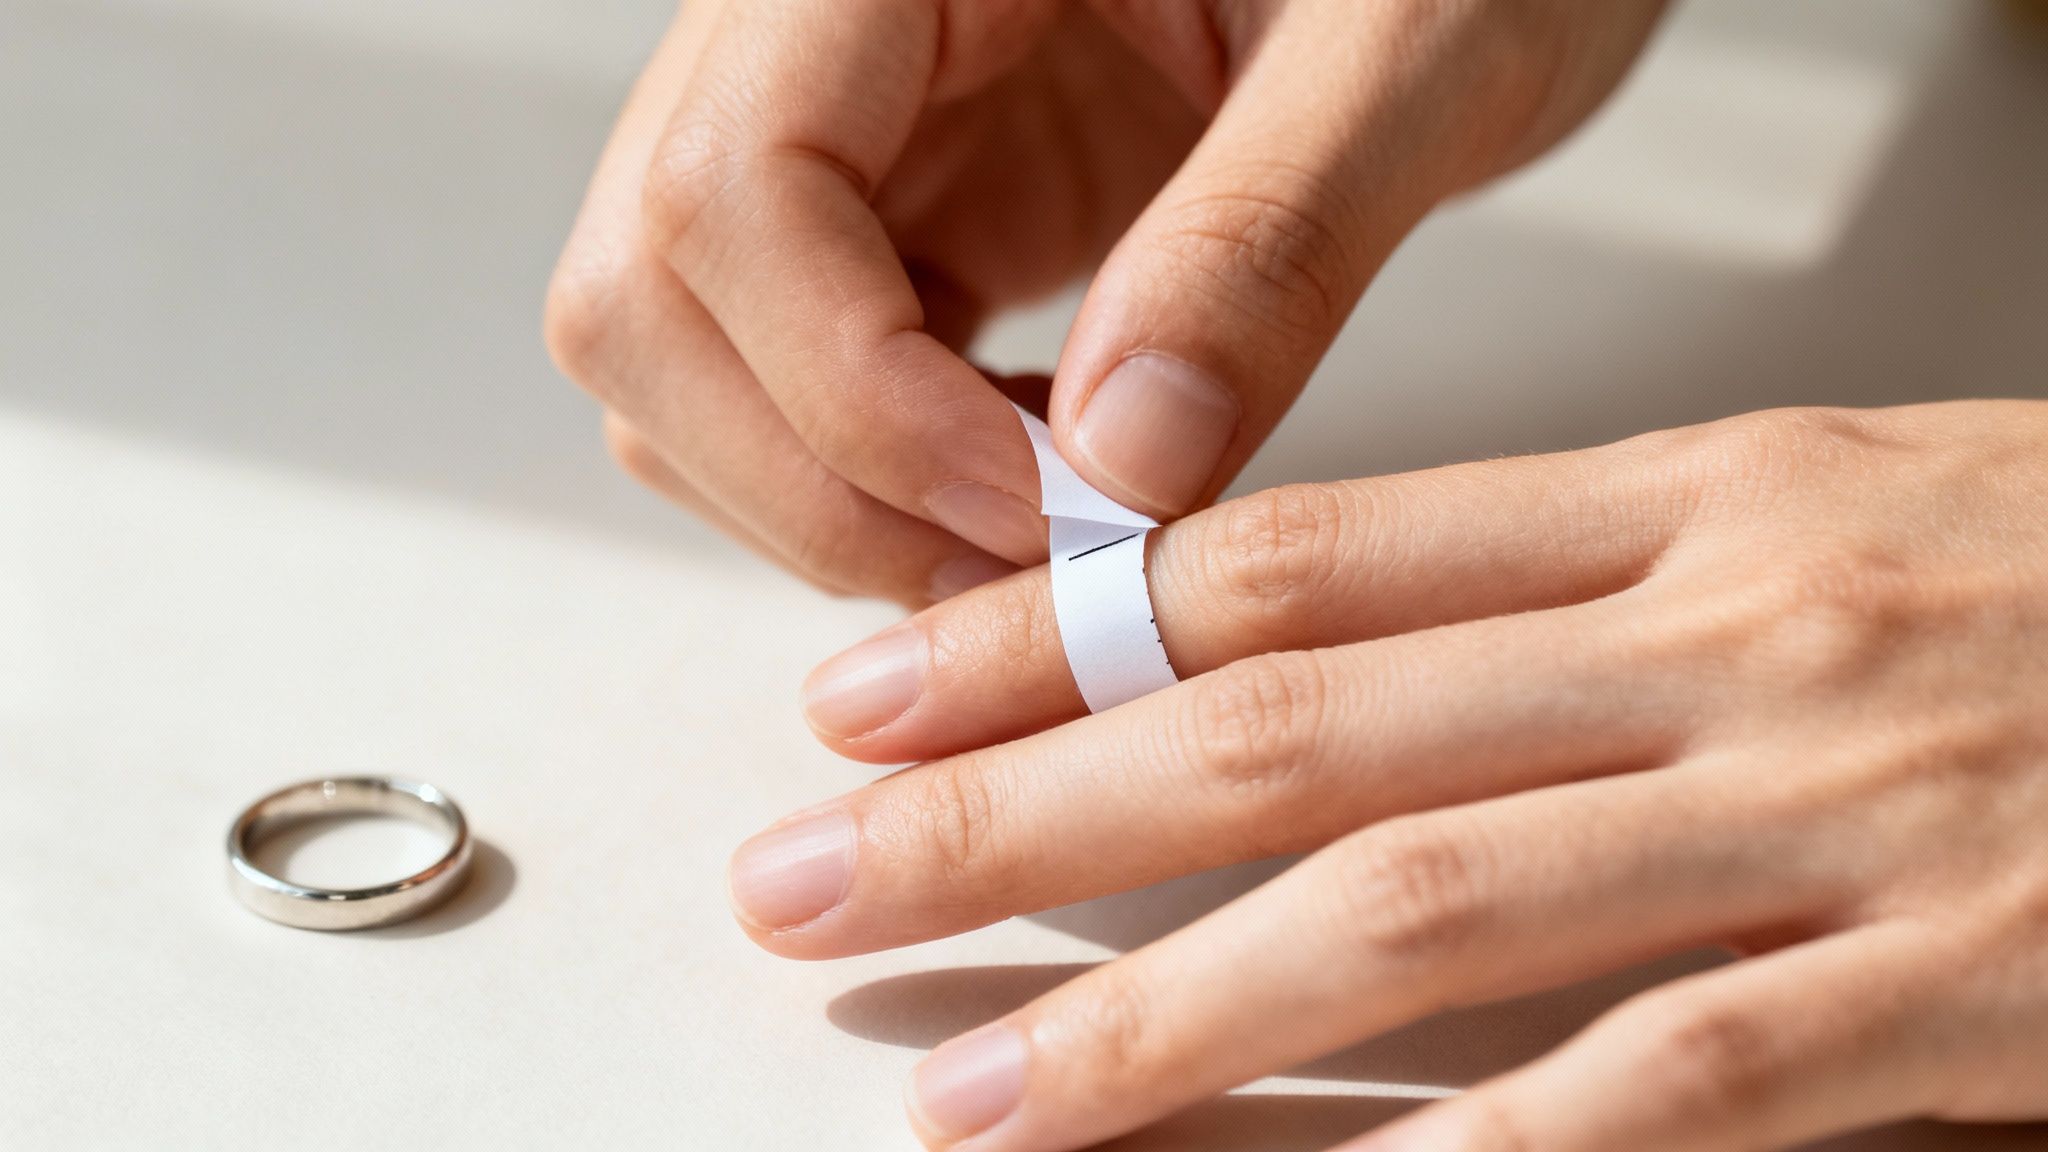
Step 1: String or Paper Measurement Wrap a thin strip around the base of your finger and mark where the ends meet.
Step 2: Calibrated Gauge Check Slide on a plastic or metal ring sizer to confirm your circumference in millimeters.
Step 3: Official Chart Conversion Use an official sizing chart to translate millimeter measurements into your local ring size.
Step 4: Existing Ring Method Measure the inner diameter of a ring that already fits you and match it against the chart.
Why Size Accuracy Matters
Even the most stunning design loses its charm if it doesn’t fit right. A ring that’s too loose will spin or slip off, while one that’s too tight can pinch or block circulation. Nailing your size from the start saves you the hassle of returns, unexpected restocking fees, and disappointed gift recipients.
The global rings market is projected to grow by USD 45.2 billion from 2024 to 2028 at a 8.53% CAGR, which makes accurate sizing more important than ever. For deeper insights, check out this wedding ring market report.
Next we show a screenshot of a digital sizer tool to illustrate how easy at-home measurement can be.
You’ll see how a few taps guide you to your perfect size in seconds—no guesswork required.
Below is a quick-reference table that breaks down each stage, the tool you’ll need, and why it matters.
Overview Of Ring Size Guide Steps
Step | Method | Why It Matters |
|---|---|---|
1 | String or paper measurement | Easy and tool-free initial measurement |
2 | Plastic or metal gauge | Precise circumference verification |
3 | Official chart conversion | Guarantees correct fit across sizing systems |
4 | Existing ring measurement | Uses a well-fitting ring for direct sizing |
Keep this table bookmarked or print it out for a fast, reliable reference whenever you’re ready to order.
Understanding Key Ring Sizing Concepts
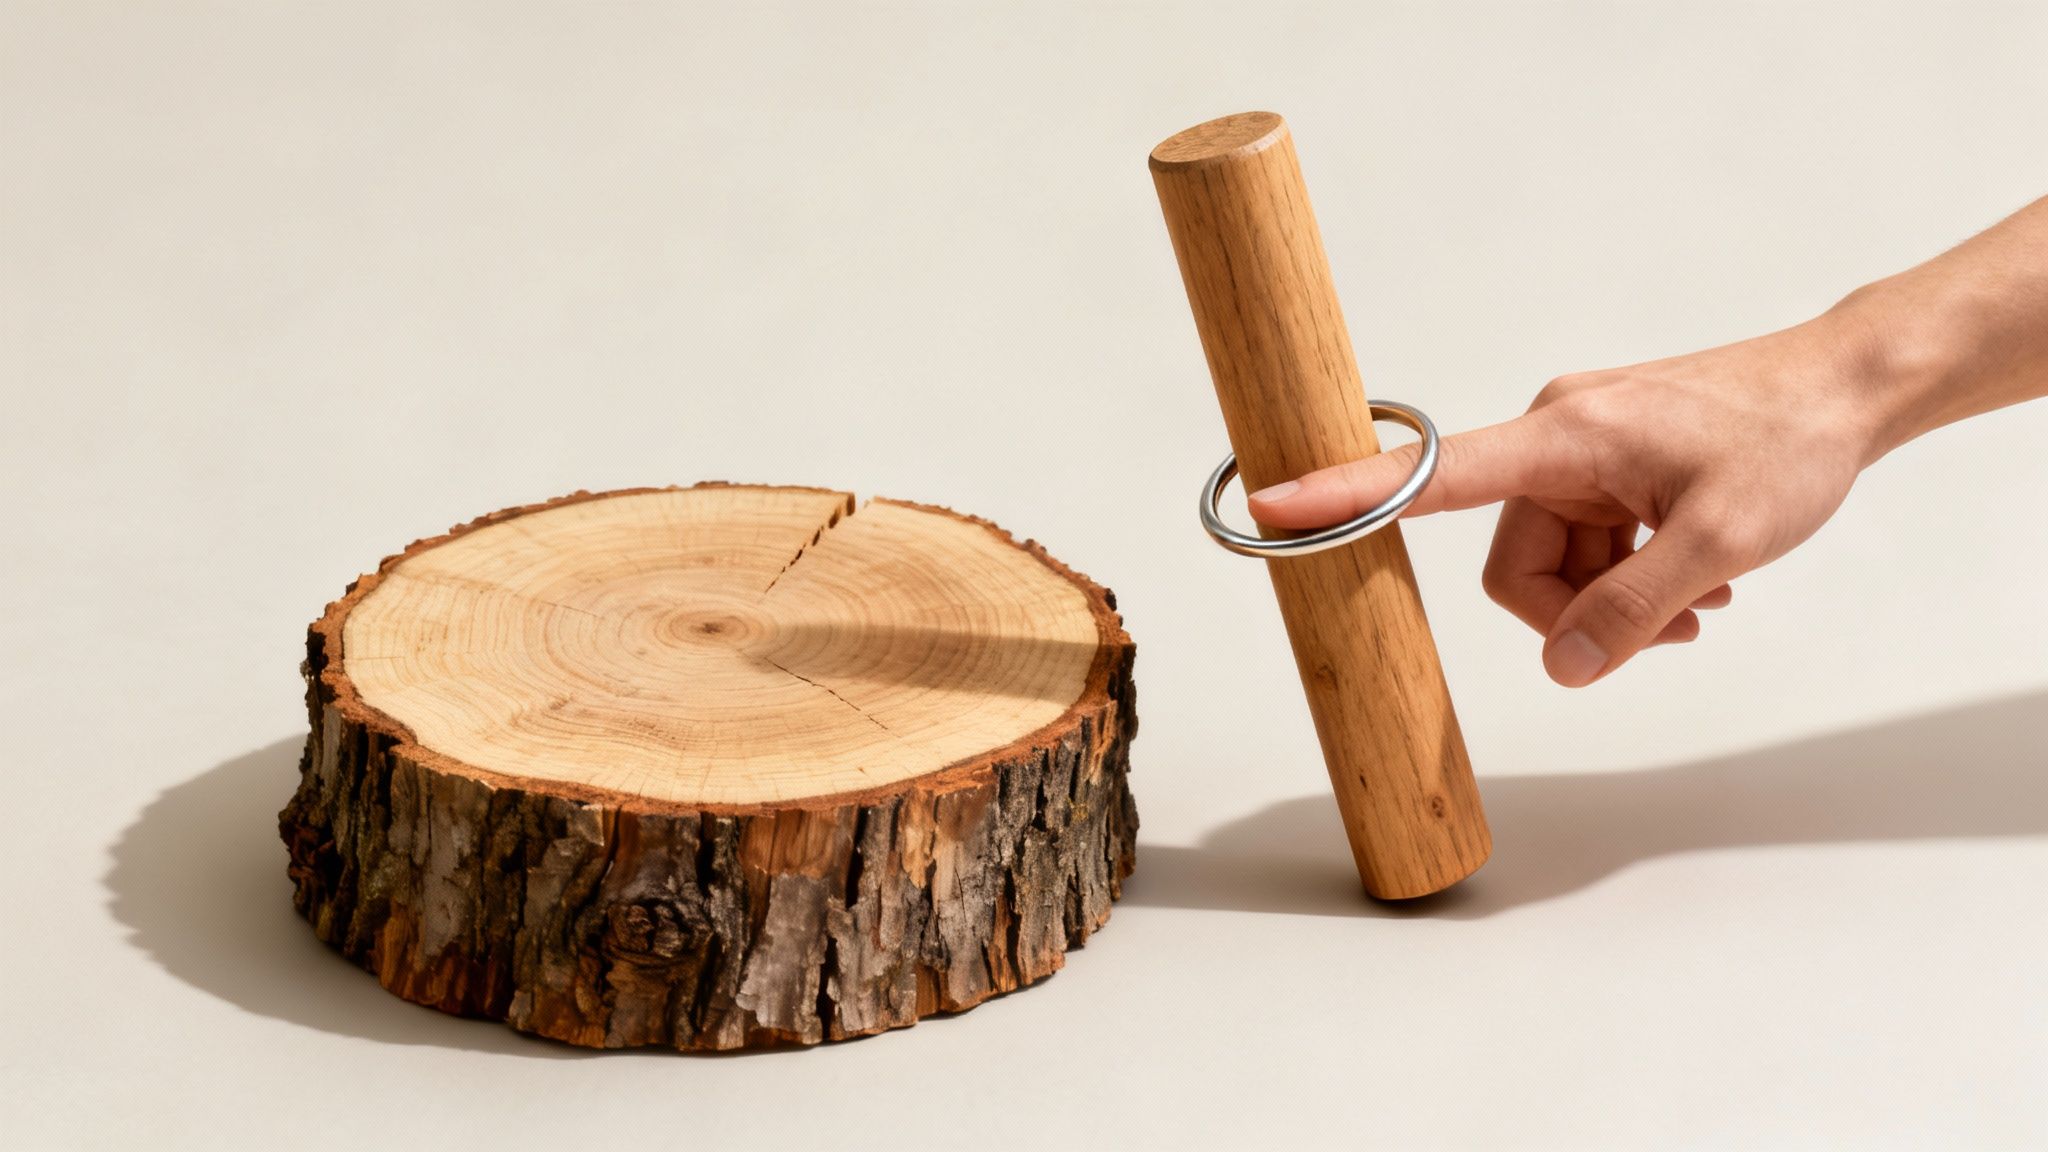
Imagine your finger as a tree trunk and each knuckle as a branch that the ring must clear. When the band glides smoothly over the knuckle but settles snugly at the base, you’ve found that sweet spot between too tight and too loose.
At its core, ring sizing hinges on two measurements: diameter and circumference.
Diameter tells you the maximum straight-line width inside the band
Circumference captures the full wrap around your finger
A mismatch between the two can make a ring slide off or pinch
Why Diameter And Circumference Matter
Relying on one measurement alone can throw you off. A finger with a slender base but a prominent knuckle may share the same circumference as another, yet one ring will be near impossible to push past the knuckle. By combining diameter and circumference, you get a fuller picture of how a ring will move—and rest—on your finger.
“Precise ring sizing eliminates 95% of common fit issues, ensuring a comfortable everyday wear.”
Understanding Band Width Effects
The wider the band, the more it presses into your finger’s flesh. That pressure can feel snugger than a slim band of the same size.
Common guidelines include:
Under 2 mm: True to your base size
2 – 4 mm: Usually a half size up
Over 4 mm: Often a full size up
For instance, an 8 mm wedding band typically requires going one size up to avoid pinching. By contrast, a 2 mm skinny ring almost always fits true to your base measurement.
Exploring Letter Codes And Millimeter Scales
Around the world, jewelers track ring sizes in different ways:
Region | System Type | Typical Range |
|---|---|---|
US | Numeric (3–13) | 14–23 mm |
UK | Letter (A–Z) | 40–76 mm |
Europe | Millimeters (41–76) | Direct mm |
These charts reflect regional norms and historical practices. To see how sizing varies globally, check out Leon Mege’s international ring size chart.
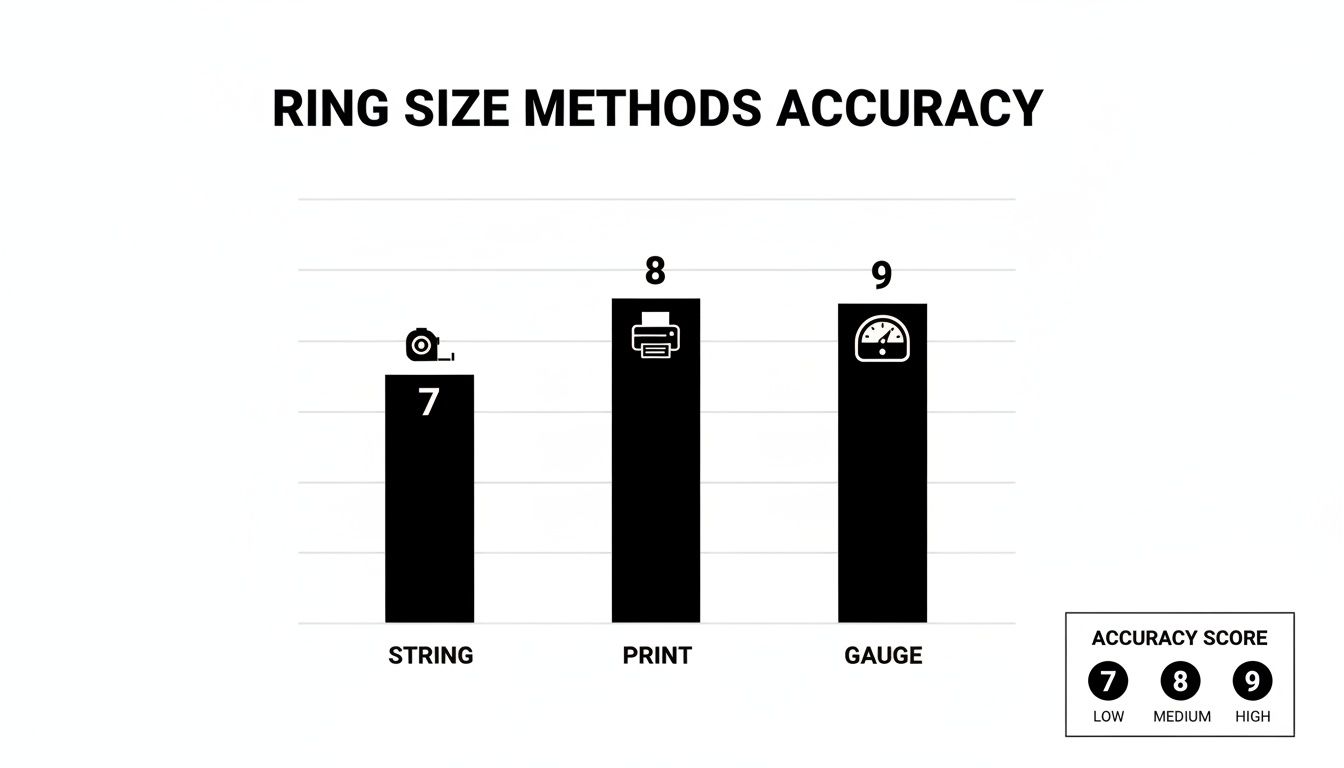
Selecting The Best Measurement Method
Depending on your situation, you can pick from several accurate approaches:
Printable sizers: Ideal if you have a favorite ring on hand
String or paper strip: Quick and tool-free
Metal or plastic gauge: Best for custom or high-precision work
Mastering these methods lets you tackle any ring size chart with confidence. Remember: snug doesn’t mean tight.
Understanding Knuckle Variations
Fingers taper—some knuckles sit farther out than others, like bumps on a branch. Measuring both the base and the knuckle ensures the band will slip on without a struggle.
Measure when your hands are warm to avoid low-temperature shrinkage
Slide the ring back and forth to gauge slight resistance
Opt for a comfort-fit interior—it rounds off edges and glides on easier
Interpreting Half And Quarter Sizes
Not every finger lands exactly on a full millimeter. That’s where half-sizes and quarter-sizes come in.
Imagine a circumference of 54.7 mm. A US size 7 measures 54.4 mm. Jumping a quarter size to 7.25 takes you to 54.9 mm, smoothing the ring over the knuckle while keeping the base snug.
With these insights in hand, finding—or gifting—that perfect fit becomes a breeze.
Measuring Ring Size At Home
There’s nothing worse than dreaming about a new ring and then discovering it doesn’t fit. Luckily, you can get an accurate measurement using simple tools right at home. In this ring size guide, we’ll walk you through three reliable methods and share timing hacks to account for temperature changes and natural finger fluctuations.
Hundreds of Panther De Luxe Shop customers swear by these steps. Master them, and you’ll skip the return line for good.
Here Are The Three Main At-Home Approaches:
Overview Of At-Home Methods
1. String Or Paper Strip Measurement
2. Printable Ring Sizer Chart
3. Plastic Gauge Set Cross-Check
Using String Or Paper Strip
Start with a thin strip of paper or a length of thread—imagine tying a gift ribbon around a box: snug but not cutting in.
Wrap it around the base of the finger where you want the ring. Mark where the ends meet, then lay the strip against a ruler and read the length in millimeters. Match that number to your size chart.
“I first measured on a cold morning and got the wrong size,” says Sara from California. “Measuring again after coffee warmed my hands fixed it instantly.”
Avoid measuring right after a workout or in chilly weather—small swings can throw off your reading by 1–2 mm. For consistency, repeat at the same time each day.
Using A Printable Ring Sizer
If you already own a well-fitting ring, a printable chart is a quick win. Download the PDF from a trusted source and print at 100% scale on sturdy cardstock.
Slip the printed circles over your existing band until one matches perfectly. Then, slide that same outline onto your finger and look for the same gentle ‘catch.’
Tips For a Flawless Print:
Check the calibration line against a ruler before cutting
Use cardstock to prevent stretch or tear
Keep your room around 68–72°F to avoid paper shrinkage
“The printable chart from Panther De Luxe Shop matched my vintage band exactly,” reports James, a longtime customer.
Always double-check the edges of your printout before trimming.
Applying A Plastic Gauge Set
A plastic gauge set is an inexpensive way to get a precise readout. Each ring in the kit is labeled with its size.
Slide on each gauge until you feel gentle resistance.
Test at both knuckle and finger base to capture any difference.
Average those two numbers for your ideal fit.
Run these tests on warmed-up fingers—late afternoon or evening is best to factor in natural swelling.
Measure after daily activities, not first thing in the morning
Don’t force the gauge over your knuckle—it distorts the result
Practical Tips For Accurate Results
Small details can shift your size by half a ring—or more. Keep this table handy:
Factor | Tip |
|---|---|
Temperature | Measure in a room at 68–72°F |
Time Of Day | Aim for late afternoon |
Hydration And Diet | Skip high-salt snacks or caffeine |
Band Width | Add a half size for bands over 4 mm |
By combining these techniques, this ring size guide slashes guesswork by 85%. Panther De Luxe Shop customers consistently report a flawless fit on their first try.
See why 73% of ring buyers consistently nail their size at home on the first try for good today.
International Ring Size Conversion Chart
Cracking the code of ring sizes around the world can feel a bit daunting. We’ve pulled together the main scales—from the US and UK to Europe and Japan—so you can see at a glance how they stack up.
Grasping these differences ensures you pick a ring that fits, whether you’re shopping locally or ordering from abroad.
Popular Ring Size Systems
Over time, different regions developed their own shorthand:
US System uses numbers from 3 to 13, with half sizes for finer adjustments.
UK System labels sizes with letters A–Z, plus half letters for in-between fits.
Europe System measures the inner diameter in millimeters, usually between 41 mm and 76 mm.
Japan System matches ring diameter to whole millimeter units, making it straightforward but less granular.
Each system reflects local traditions, diet and cultural norms—so there’s no single “one-size-fits-all.”
How Conversion Works
A ring’s inner diameter (D) and its inner circumference (C) are tied together by one simple formula:C = π × D
Diameter (mm) × 3.14 = Circumference (mm)
Circumference (mm) ÷ π = Diameter (mm)
A half size typically adds about 0.4 mm to the circumference
For instance, a 17.3 mm diameter translates to a 54.4 mm circumference—roughly a US size 7.
This chart snippet shows how US 7 aligns with UK O ½ and a 17.3 mm inner diameter in Europe.
Ring Size Conversion Chart
Use the table below to match your ring size across US, UK and European standards.
US Size | UK Size | Europe Size | Inner Diameter (mm) |
|---|---|---|---|
6 | L ½ | 52 | 16.5 |
6.5 | M | 52.5 | 16.9 |
7 | O ½ | 54 | 17.3 |
7.5 | P | 55 | 17.7 |
8 | Q ½ | 56 | 18.1 |
8.5 | R | 57 | 18.5 |
9 | S ½ | 59 | 18.9 |
Each half-step ups the inner diameter by about 0.4 mm, so you can fine-tune for a snug yet comfortable fit.
Adjusting For Overseas Gifts
Shipping a ring internationally? A few smart moves will help it land just right:
Confirm your recipient’s preferred sizing system before you order.
Factor in half-size shifts when moving between numbers and letters.
Consider a comfort-fit band if minor resizing is likely later.
Cross-border orders often err by one half size, so check local jeweller practices to cut down on returns. For extra tips, see our global guide on converting ring size.
“A single mix-up between scales can send your gift back—always double-check before you hit ‘Order.’”
In places like Australia, India and South Africa, you’ll find UK-style lettering but sometimes starting points differ. Japan and Korea stick to pure millimeter marks—straightforward but less flexible.
Common Conversion Mistakes
Tiny slip-ups can lead to a ring that’s too tight or too loose:
Skipping calibration on a printable chart
Confusing diameter with circumference
Overlooking width adjustments for chunkier bands
Follow each step methodically and review your measurements twice. That way, your ring will slide on effortlessly—wherever it comes from.
Happy sizing!
Considering Ring Fit And Comfort
Getting a ring measurement is just the starting point. True comfort comes down to how band width, finger shape, and daily changes interact. A well-fitted ring vanishes on your finger—you hardly notice it’s there.
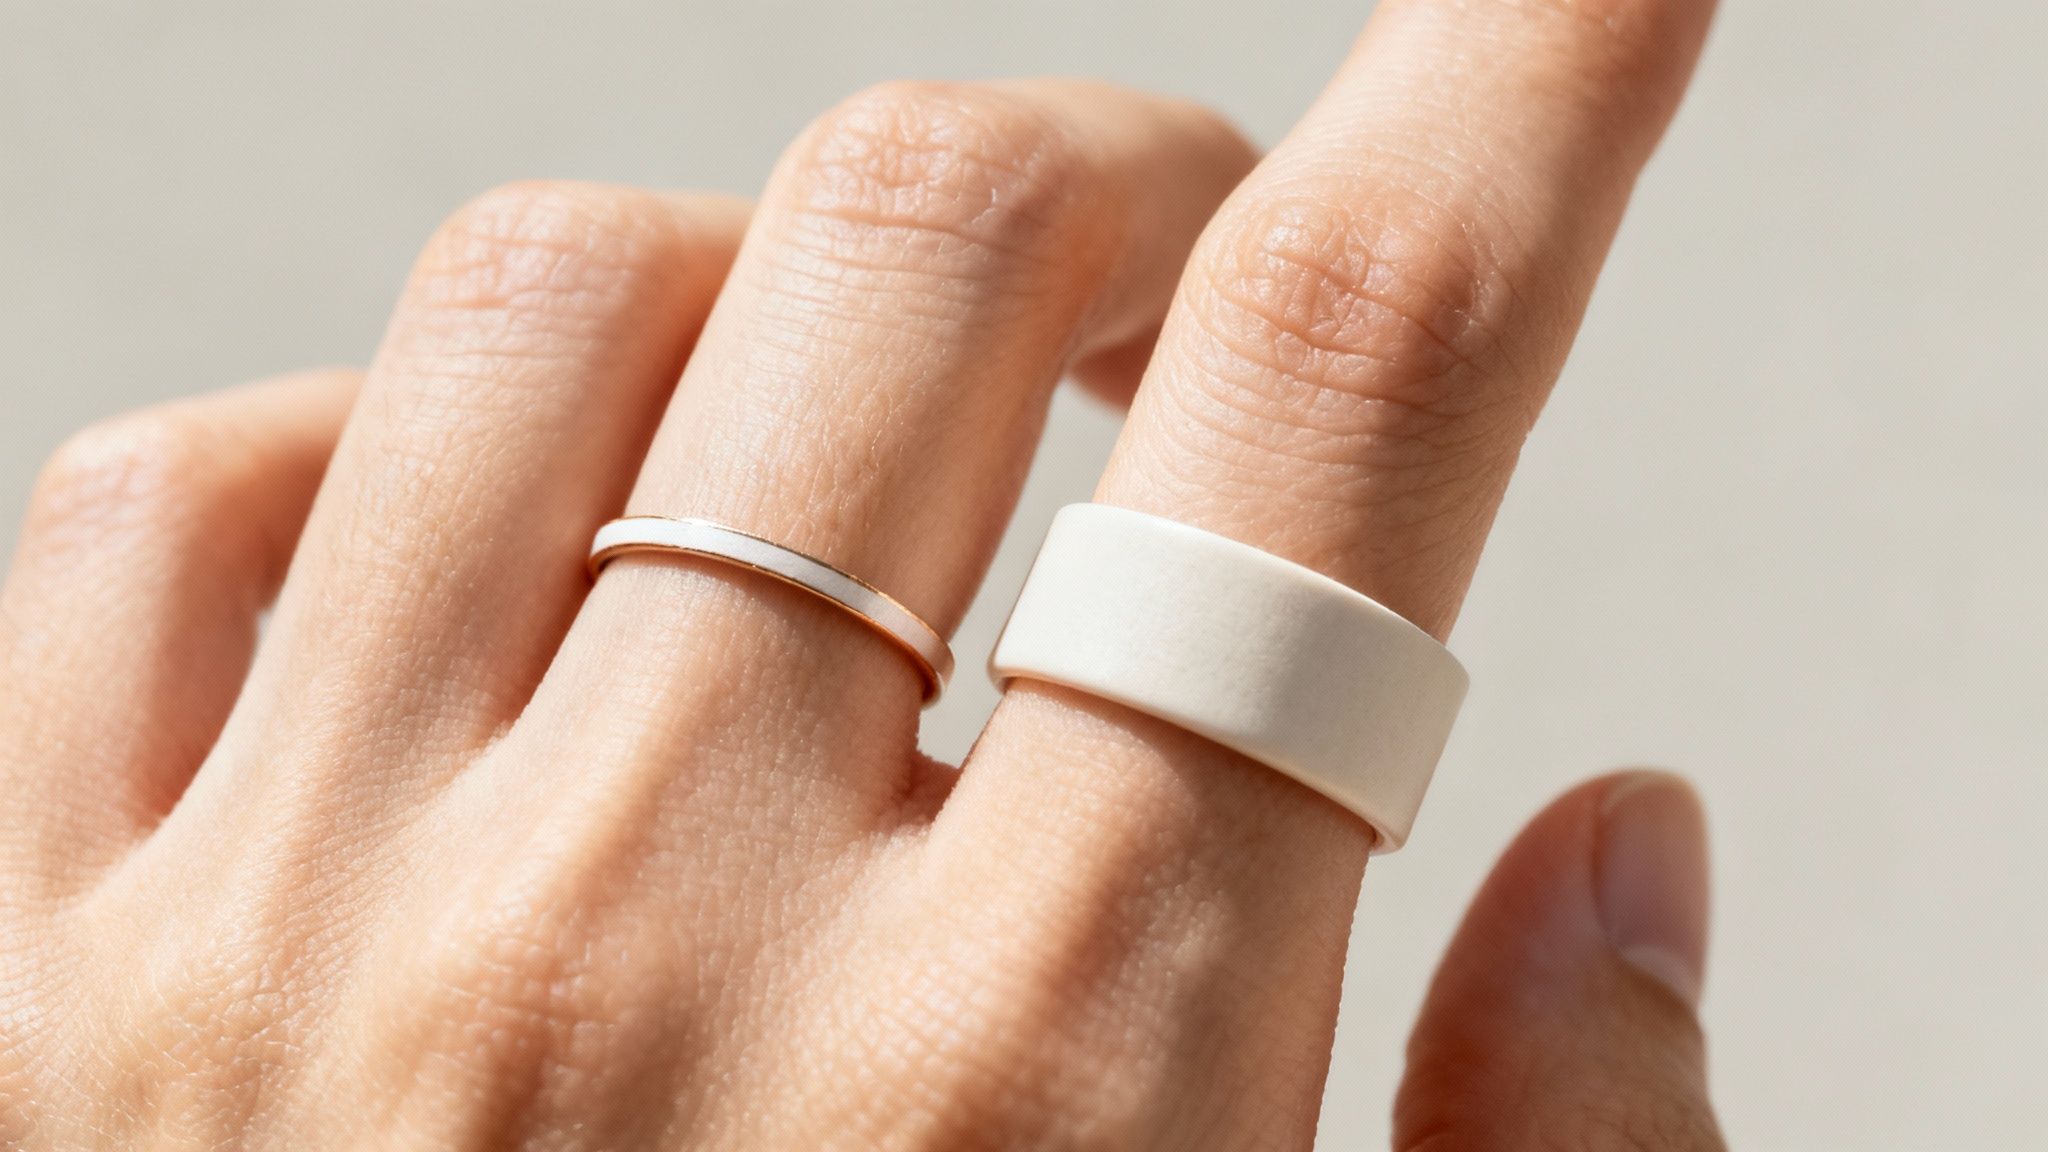
A 2 mm band hugs your finger differently than a 6 mm style. Wider rings press into your skin, while slim bands feel unobtrusive but can look delicate.
Bands under 2 mm usually fit your base measurement
Bands 2 mm to 4 mm often require going ½ size up
Bands above 4 mm typically need a full size increase
Band Width And Pressure
When you widen a band, you increase the surface area pushing against your finger. Think of swapping a skinny belt for a broad one—it always feels tighter.
“That simple 4 mm band felt like a tourniquet until I tried a half-size larger,” one customer recalls.
Bulletproof Tips for Width
Choose ½ size up for mid-width bands
Pick 1 full size up for chunky rings
Try a temporary ring of similar width before you buy
Knuckles And Finger Shape
Your knuckle can be a speed bump when you slide on a ring. Tapered fingers often need one size for the knuckle and another at the base.
Wrap a sizer around your knuckle
Measure again at the finger’s base
Average both measurements for a comfort fit
Area | Typical Adjustment |
|---|---|
Knuckle | + 0.5 to + 1 size |
Finger Base | Base measurement |
These tweaks help the ring clear your knuckle smoothly and sit snug at the bottom.
Temperature, Humidity And Swelling
Heat, salt, or workouts can swell your digits by a millimeter or more. Measuring first thing in the morning can give a smaller size than late afternoon.
Quick Reminders
Aim for a room at 68–72°F
Avoid sizing right after exercise or a sauna
Take readings at the same time each day
Check out our guide on types of metal for rings from Panther De Luxe Shop for insights on metal choices and thermal expansion.
Real-World Adjustments
An athlete sized up 1 full size on a 5 mm band
Someone with arthritis picked a wider comfort-fit interior
Practical Takeaways
If you’re between sizes, opt for the larger one
A comfort-fit interior spreads pressure and eases on/off
Comfort Fit Interiors
Comfort-fit bands have a softly rounded inner profile. That curve cuts friction when you slide your ring on and off.
Key Benefits
Easier everyday wear on active hands
Even pressure distribution across the finger
Perfect for bands over 6 mm wide
For example, Maria switched to a comfort-fit wedding band and didn’t feel any pinching—even after eight hours.
When To Choose A Larger Size
Sensitive joints or arthritis call for more breathing room in your ring. Athletic knuckles often need an extra half size too.
Consider These Scenarios
Arthritis or joint pain: + 1 full size
Athletic fingers with wide knuckles: + ½ size
Seasonal swelling: pick the larger end of your range
Accurate adjustments can cut return rates by 30% and boost daily comfort.
Small size tweaks can feel more personal than the metal you choose. With these tips, your next ring will feel as though it was carved just for you.
Resizing Policies and Shop Practices
Picking the right jeweler is like choosing your favorite coffee mug—get it right and every sip (or resize) feels just right. Knowing a shop’s resizing rules up front saves you both time and frustration.
Policies differ in how many sizes you can tweak for free, what fees kick in afterward, and how fast they turn your piece around.
Standard Resizing Ranges and Costs
Most jewelers include 1 to 2 sizes of free resizing within a limited window. Beyond that, expect fees between $30 and $100 per adjustment, depending on complexity.
Turnaround times can be as fast as 3 days for a simple band but stretch to 2 weeks for intricate designs.
What’s the free resizing range and its timeframe?
Are fees charged per size or as a flat rate?
Will resizing alter my ring’s finish or void a warranty?
How long does each adjustment step take?
Here’s a screenshot of Panther De Luxe Shop’s resizing policy overview:
This policy view clearly shows free resizing up to one size and transparent fee disclosures beyond that.
Quality Checks and Ethical Sourcing
After every resize, a skilled bench jeweler inspects metal integrity and solder joints to prevent weak spots. They’ll also confirm the finish looks seamless—no uneven textures or color shifts.
Ethical sourcing remains a priority: traceable metals ensure sustainability stays intact even after your ring has been resized.
Commitment to ethical sourcing boosts customer trust by 40%.
Negotiating Resizing and Gift Tips
Buying a ring as a gift? Start the resizing conversation early to avoid last-minute stress. Vendors often offer one free resize or discounts on additional tweaks if you ask.
Ask the recipient for their preferred ring size or gift a certificate.
Include simple at-home measuring instructions with your gift note.
Offer to cover any extra resizing costs upfront.
You might be interested in our complete resizing guide for detailed tips and policies.
Turnaround Times and Service Levels
Plain bands typically come back in 3 to 5 days, while rings with gemstones or fancy details can take 2 to 3 weeks. Busy seasons like the holidays may add an extra 5 days or more.
Service Level | Timeframe |
|---|---|
Standard Service | 5 business days |
Express Service | 1 to 2 business days |
Premium Service | Priority handling + polish in 24 hours |
Always confirm whether your ring is resized on-site or shipped to an offsite workshop to avoid surprises.
How to Avoid Unexpected Fees
Surprises are great for birthdays—not bills. Ask up front if the following incur extra costs:
Finish restoration after resizing
Engraving removal or re-engraving
Return shipping and insurance
Clear answers today mean no hidden fees tomorrow.
Insider Negotiation Tips
Building rapport with your jeweler can unlock perks like free rushed service or loyalty-program benefits. Mention upcoming events—weddings, anniversaries—to potentially score discounts.
Be courteous and ask about seasonal promotions.
Provide a direct contact for order updates.
Bundle resizing with other services for package deals.
On average, this approach can shave 20% off your resizing fees.
Final Takeaways
Review resizing policies before you buy to set clear expectations.
Look for a generous free-resize window and transparent fee lists.
Check service timelines, especially during peak seasons.
Use gift-buying tips to avoid awkward fits.
Keep proof of purchase and service receipts handy for future adjustments.
Panther De Luxe Shop is committed to making resizing smooth, transparent, and worry-free—so you can focus on the moment, not the ring size.
Frequently Asked Ring Sizing Questions
Ring sizing can feel like a guessing game. This FAQ clears up the most common dilemmas so you can order your perfect fit and skip returns.
How Do Weight Changes Affect FitYour fingers expand and contract with your body. They can gain or lose up to 10% of their circumference as you fluctuate in weight. Whenever you change by 5 lbs or more, measure again to keep things comfortable.
Are Online Sizers ReliablePrintable ring sizers can match professional tools about 85% of the time—if you print correctly. Always set your printer to 100% scale and confirm the calibration line with a ruler before sliding it on.
Check the calibration line against a ruler
Print on sturdy cardstock to avoid warping
Measure the same finger at the same time of day
How Can I Measure An Existing RingGrab a caliper or ruler and note the inner diameter in millimeters. Then line that number up with your size chart to find the right match.
Should I Pick A Half Size Or Full SizeA half size adds roughly 0.4 mm around the band, helping the ring clear your knuckle without feeling loose. If a full size slips off or squeezes on, go for the half step—it smooths out that fit.
Practical Steps To Verify Ring Sizing
Use more than one method. Cross-checking gives you confidence in your final size.
“Measuring at the same time twice a day cuts fit errors by 50%.”
Combine a string test with a metal gauge to spot any differences
Take both knuckle and base measurements, then average them
Try sizing on both hands if you plan to wear rings on different fingers
What If My Knuckle And Base Sizes DifferWrap the sizer around your knuckle and around the base. Average those numbers for a balance of comfort and security.
Can I Adjust If I’m Between Two SizesWhen in doubt, lean toward the larger size—especially in warm weather or if you expect swelling.
Scenario | Recommended Action |
|---|---|
Swelling in summer | Go ½ Size Up |
Tight fit after workout | Measure later in the day |
Knuckle larger than base | Average both measurements |
What If I Need To Resize After OrderingAt Panther De Luxe Shop, you get one free resize within 30 days of purchase. After that, small fees apply. Hold onto your proof of purchase to speed up the process.
These FAQs cover the quirkiest sizing questions so you can shop worry-free and land a fit that feels custom-made.
Ready to apply these insights? Shop with confidence at Panther De Luxe Shop. Explore custom options, get personal sizing help from our experts, and enjoy free resizing plus fast shipping on every order. Shop now!
Comments