
How to Untangle Chain Necklaces Without Breaking Them
- Luke Zucco
- Aug 17, 2025
- 9 min read

We've all been there: you're getting ready to go out, reach for your favorite necklace, and find it's a knotted mess. It's one of those uniquely frustrating moments. But don't give up and toss it back in the drawer. The secret to untangling even the most stubborn chains is surprisingly simple: a bit of lubricant to reduce friction and a fine-tipped tool to carefully work the links apart. More often than not, a drop of baby oil and a sewing needle are all you need to solve the puzzle.
Your Guide to Fixing Tangled Necklaces
Before you start picking at the knot, take a moment to set yourself up for success. Getting the right tools and workspace ready is half the battle. You'll want to work on a flat, well-lit surface. A plain white sheet of paper is perfect—it creates a high-contrast background that makes it much easier to see the tiny, intricate links you're working with.
This setup is exactly what you need to tackle those tangles without straining your eyes.

Trust me, having your lubricant, tools, and a clear workspace ready from the start makes the whole process go much more smoothly.
Untangling Methods at a Glance
Not all tangles—or necklaces—are created equal. A delicate snake chain needs a much gentler touch than a sturdy box chain, so one method won't work for everything. To help you pick the right approach, here's a quick comparison of the most common techniques.
Method | Required Tools | Best For | Key Benefit |
|---|---|---|---|
Lubricant & Pin | Baby oil, sewing needle, pin, or tweezers | Fine, delicate chains (e.g., snake, rope) | Reduces friction, preventing breakage on fragile links. |
Powder Method | Baby powder or cornstarch, pin | Most chain types, especially minor tangles | Absorbs oils and loosens knots without liquid residue. |
Soapy Water Soak | Mild dish soap, warm water, bowl | Sturdy chains with stubborn or complex knots | Relaxes metal and lubricates multiple tangles at once. |
Screwdriver Method | Tiny flathead screwdriver (from an eyeglass kit) | Medium to thick chains with a clear central knot | Provides gentle, consistent pressure to pry open the knot. |
Choosing the right technique for your specific necklace is the key. Once you've got your plan, you're ready to get to work.
Getting Your Toolkit Ready
Before you even think about tackling that tangled mess of a necklace, let's talk about setting yourself up for success. We've all been there—trying to fix it on the couch, only to make things worse. A little prep work makes all the difference.
First, find a good workspace. A clean, flat surface like a table or a desk is perfect. You'll also need excellent lighting, so work under a bright lamp or near a window. To really see what you're doing, lay the necklace on something that provides contrast. A plain white piece of paper or a light-colored placemat works wonders for making those tiny, twisted links pop.
The Right Tools for the Job
Your fingers are too big for this delicate work; trying to pull the knot apart by hand will only tighten it into a tiny metal ball. You need something fine-tipped to get in there and gently persuade the links to separate.
Here's what I usually reach for:
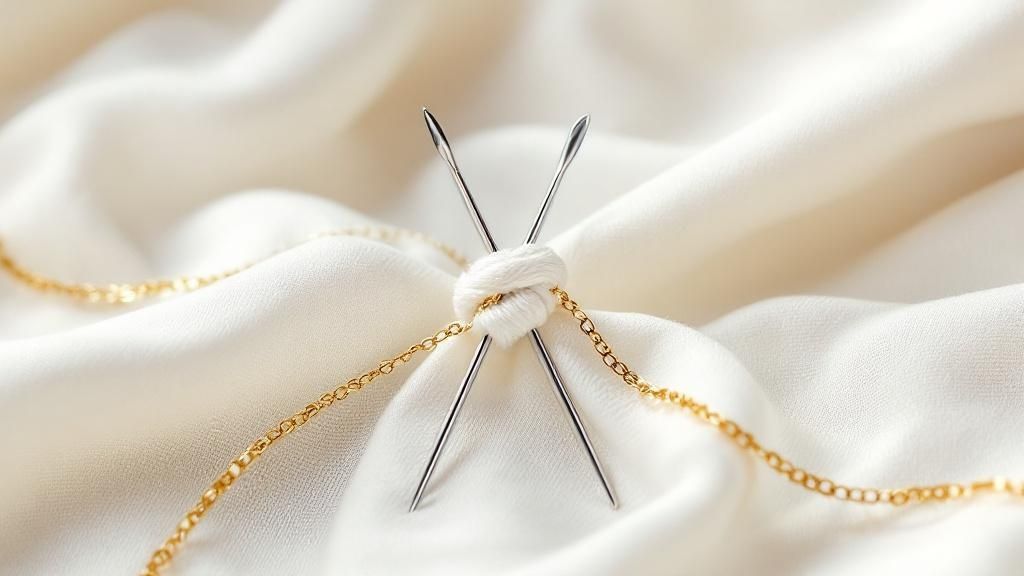
A pair of needles or straight pins: Having one in each hand gives you incredible control. You can use them to work from the middle of the knot outwards, carefully wiggling things loose.
A safety pin: If you can't find needles, a safety pin is a great substitute.
Fine-point tweezers: These are fantastic for grabbing a specific chain once you've managed to create a tiny bit of space in the knot.
Don't Forget the Lubricant
This is the game-changer. A little bit of lubricant helps the metal links glide past each other instead of grinding together and getting stuck. You probably have something perfect in your house already.
Making the chains slippery is key. It can reduce the risk of snapping a delicate link by up to 65% compared to trying to untangle it dry.
Baby oil is a popular go-to, but a dab of olive oil works just as well. You could even use a bit of window cleaner or a specialized jewelry cleaning solution. This simple step turns a frustrating knot into a much more solvable puzzle.
For Stubborn Knots, Bring in Some Lubricant
We've all been there: a knot so tight it seems like a permanent fixture. When you hit this point, brute force is your enemy. Trying to pull it apart will only make it tighter and risk snapping a delicate link. This is where a little lubricant becomes your best friend.
Think of it like wiggling a stuck ring off your finger—a little soap or oil makes it slide right off. The same principle applies here. The goal is to reduce friction so the tiny metal links can glide past each other instead of grinding into a tighter mess.

You don't need to buy anything special for this. A quick look around your house will probably turn up the perfect solution. A drop of baby oil is the classic go-to, but olive oil, a bit of hair conditioner, or even some window cleaner can work wonders.
Just apply a single drop right into the heart of the tangle. Give it a minute or two to seep in and coat all the links hidden inside the knot.
The Gentle Teasing Technique
Now that the knot is slick and ready, it’s time for the delicate part. Grab your two finest-tipped tools—sewing needles or pins are ideal because they give you the most precision.
Carefully insert the tips of both needles into the very center of the knot. The key here is to avoid pulling outwards. Instead, gently wiggle the needles back and forth. You're just trying to create a tiny bit of space in the middle, nudging the chains apart rather than prying them. Once you've opened up a small gap, you can start working your way outward, slowly teasing individual loops free one at a time.
Patience is everything here. If you rush, you'll likely tighten the knot and could damage your necklace. Work slowly, use minimal pressure, and let the lubricant do the heavy lifting.
Jewelers will tell you that this approach is essential, especially for slender chains like rope or snake styles which are notorious for tangling. In fact, using a simple lubricant like baby oil can make the process up to 65% more effective than trying to untangle a dry chain. The reduced friction makes all the difference.
Once your necklace is finally free, you'll need to clean off that oily residue. To get it looking brilliant again without causing any harm, take a look at our guide on how to clean gold jewelry for a stunning shine. This last step ensures your piece is not just tangle-free, but also sparkling and ready to be worn.
Advanced Techniques for Difficult Tangles
We've all been there. You've tried a little oil, you've patiently poked at the knot with a pin, and it's still a tangled, frustrating mess. For those truly monstrous knots—the ones that look like they have a personal vendetta against you—it's time to bring out the secret weapon: a full-on soak.
When you're dealing with a dense, tight ball of chains, a simple drop of lubricant just can't penetrate deep enough. Soaking the entire necklace is a different story.
This approach works because it completely lubricates every single link from every possible angle. The warm water also encourages the metal to relax just a tiny bit, which can make the whole knot surprisingly more cooperative.
The Soapy Water Soak Method
Think of this as your go-to strategy when dry methods just aren't cutting it, especially for those awful tangles involving several necklaces or one very fine, very knotted chain.
Grab a small bowl and fill it with warm water. Be careful not to make it hot, as you don't want to risk damaging delicate metals or gemstones. Stir in a few drops of a mild dish soap until you have a gentle, sudsy solution. This simple mixture is a fantastic lubricant, cutting down on the friction that’s holding your necklace hostage.
Let the tangled part of your necklace sit fully submerged in the bowl for about 5 to 10 minutes. This little bath is crucial; it allows the soapy water to work its way into the very heart of the knot, loosening it from the inside.
Once the time is up, carefully lift the necklace out and place it on your work surface. You should immediately feel a difference—the knot will be much looser and more pliable. Now, go back in with your pins or tweezers. You’ll find that the links slide apart much more easily. As explained in one helpful guide, the reason this works so well is that the entire knot gets lubricated at once, which is a total game-changer. You can read more about this effective untangling method on icecartel.com.
If that knot still refuses to surrender, don't lose hope. Our post on how to get knots out of necklaces fast has a few more tricks up its sleeve.
Just remember, after your necklace is finally free, give it a good rinse with clean water and pat it completely dry with a soft cloth to prevent any water spots or damage.
Don't Just Untangle—Prevent Tangles From Happening
Now that you know how to rescue a knotted chain, let's talk about avoiding the mess in the first place. Honestly, the number one reason necklaces get tangled is how we store them. Tossing a chain into a jewelry box is practically asking for a knotted-up headache later on.
A few seconds of care when you take off your jewelry can save you a ton of frustration. Always, always clasp your necklaces before putting them away. A closed loop is so much less likely to snag on its neighbors. It's a tiny habit that makes a huge difference.
Rethink Your Jewelry Storage
The right storage system is your best defense. A consumer survey actually found that simply dropping necklaces into a box is responsible for over 80% of tangling incidents. On the flip side, storing them individually was shown to slash tangles by a whopping 75%, according to jewelry care findings on craftdlondon.com.
Here are a few of my go-to solutions that really work:
Necklace Trees: Hanging your chains lets gravity do the work, keeping them straight and separated. It's simple and effective.
Individual Pouches: Soft fabric pouches are great because they stop chains from rubbing and scratching each other while preventing tangles.
The Straw Trick: This is a classic for a reason, especially for travel. Just thread a delicate chain through a regular drinking straw and clasp it. The straw acts as a perfect little protective sleeve.
The big idea here is simple: separation is key. Whether you hang them, bag them, or use a box with dividers, the goal is to stop your chains from piling on top of one another.
Making these small changes will keep your collection pristine and ready to wear at a moment's notice. For even more great ideas, take a look at our guide on the best way to store necklaces with 7 tangle-free tips.
Your Top Necklace-Untangling Questions, Answered
Even when you know the steps, actually sitting down to untangle a delicate chain can feel a bit daunting. A few common questions pop up time and time again, especially when you hit a snag. Let's tackle them.
What Can I Use Instead of Baby Oil?
Great question. You don't need to run out and buy baby oil if you don't have any. The whole point is to use a lubricant that helps the metal links glide past each other instead of gripping.
You probably have a few perfect substitutes in your house right now:
A drop of olive oil or another light cooking oil works beautifully.
Window cleaner can be surprisingly effective because it’s so thin and can get right into the heart of a knot. Just make sure it’s an ammonia-free version.
Even a tiny dab of hair conditioner can provide enough slip to loosen things up.
No matter what you use, make sure to clean your necklace afterward. A little mild soap, warm water, and a soft cloth will do the trick. Pat it completely dry to avoid any lingering residue or water spots.
Help! I’m Making the Knot Even Tighter!
This is the most common pitfall, and the solution is simple: stop pulling. The second you feel the knot constricting, freeze. Pulling is a natural instinct, but it’s the absolute worst thing you can do.
Take a moment. Put the necklace down, maybe even walk away for a minute. When you come back, add another touch of your lubricant and look at the knot from a new angle.
Instead of pulling the ends of the chain, focus on wiggling the links inside the knot with the tip of your pin. Your goal is to create a tiny bit of space, not to yank it apart.
It's a cliché for a reason: patience really is key here. Rushing is the number one cause of a tighter knot or a snapped chain.
If you're working with a super fine chain, the stakes are higher. Make sure you're on a flat, well-lit surface with a piece of white paper underneath to create contrast. Use the thinnest needles you have and be liberal with the lubricant. Think of it as gently coaxing the links apart rather than forcing them. If at any point it feels like you're about to do more harm than good, it's time to let a jeweler take over.
Comments