
How to Figure Out Ring Size Accurately at Home
- Luke Zucco
- Nov 24, 2025
- 14 min read

Finding your perfect ring starts with one crucial detail: its size. The easiest way to figure out ring size at home is to wrap a piece of string or paper around your finger, mark where the ends meet, and measure that length against a sizing chart. It's a simple trick, but it gives you a solid starting point for finding a comfortable, secure fit.
Your Guide to a Perfect Ring Fit
A ring that’s too tight is a constant annoyance, while one that’s too loose is a recipe for heartbreak. This guide is here to cut through the guesswork, giving you reliable ways to find your ring size without leaving your house. We'll walk you through a few tried-and-true techniques using items you already have and even show you how to use an existing ring for a spot-on measurement.
But a perfect fit goes beyond a simple number on a chart. We'll also get into the little details that jewelers always consider—like how your fingers swell in the heat, why it’s best to measure in the evening, and how the width of the ring's band can completely change the size you need.
Beyond the Basics of Sizing
Think of this as your personal consultation for finding a ring that feels like it was made just for you. Getting these nuances right is the difference between a ring that fits okay and one that feels truly perfect. It’s what makes a piece of jewelry something you wear occasionally versus something that becomes a part of your everyday story.
Here's what we'll cover:
Practical At-Home Methods: We'll break down the string, paper, and existing ring methods with clear, step-by-step instructions.
Critical Fit Factors: You'll learn how your knuckle shape, finger swelling, and even the ring’s design can affect your ideal size.
Common Sizing Pitfalls: We'll point out the most frequent mistakes people make and show you exactly how to avoid them for an accurate measurement.
Once you have a better feel for your size, you can confidently explore beautiful pieces like The Icon Statement Ring. A well-sized ring doesn’t just feel better—it lets the design shine exactly as it was meant to.
A proper fit ensures both comfort and security, preventing the anxiety of a lost treasure or the irritation of a ring that pinches. It's the essential first step to enjoying your jewelry for years to come.
Ultimately, our goal is to give you the confidence to make the right choice, whether you're buying for yourself or as a gift. The process to figure out ring size doesn't have to be a mystery. With a few simple tools and a little bit of insight, you’ll be ready to find that flawless fit. Let’s get started.
Measure Your Ring Size with DIY Methods
You don’t always need a trip to the jeweler to figure out your ring size. With a few things you probably already have lying around the house, you can get a surprisingly accurate measurement right at home. These DIY methods are perfect for planning a surprise or just getting a good starting point before you shop.
The secret to getting it right at home is precision. Even a millimeter can make a difference in ring size, so take your time and measure carefully. Let's walk through three of the most reliable ways to do it yourself.
The Paper or String Method
This is the classic, go-to method for a reason—it’s incredibly simple and uses materials you definitely have. All you need is a piece of string that doesn't stretch (dental floss works great), a thin strip of paper, a pen, and a ruler.
First, wrap the string or paper around the base of the finger you want to measure. You’re looking for a snug fit. It should be tight enough not to fall off, but still loose enough to slide over your knuckle without a struggle. This is where most people go wrong—if you pull it too tight, you’ll end up with a ring you can't get on.
Once you’ve found that sweet spot, use a pen to mark exactly where the string or paper overlaps to form a full circle. Then, unwrap it and lay it flat against a ruler. Measure the length from the end to your mark in millimeters.
That number is your finger's circumference, and it’s what you’ll use to find your size. You can easily compare it to a ring size conversion chart. For example, a circumference of around 54 mm usually translates to a US size 7. For more tips on this technique, check out this helpful guide on bluenile.com.
Using a Ring You Already Own
If you have a ring that already fits the right finger perfectly, you're in luck. This is often more accurate than the string method because you’re working with the true dimensions of a ring, which removes a lot of the guesswork.
There are a couple of ways to do this. The first is to measure the internal diameter of the ring. Just lay the ring on a flat surface and use a ruler to measure the distance straight across the inside, from one edge to the other. Make sure you’re measuring the widest point of the circle and use millimeters for the best results. With that measurement, you can look up your size on an online conversion chart.
Another option is to use a printable ring sizing chart that has circles for each size. You can print one out (just make sure it’s printed at 100% scale) and place your ring over the circles. You’ve found your match when the black outline of a circle is perfectly visible just inside your ring.
Pro Tip: Try to use a ring with a similar band width to the style you want to buy. A wider band feels much snugger than a thin one of the same size, so matching the style will give you a far more accurate measurement.
This simple process of measuring, comparing, and fitting is all it takes.
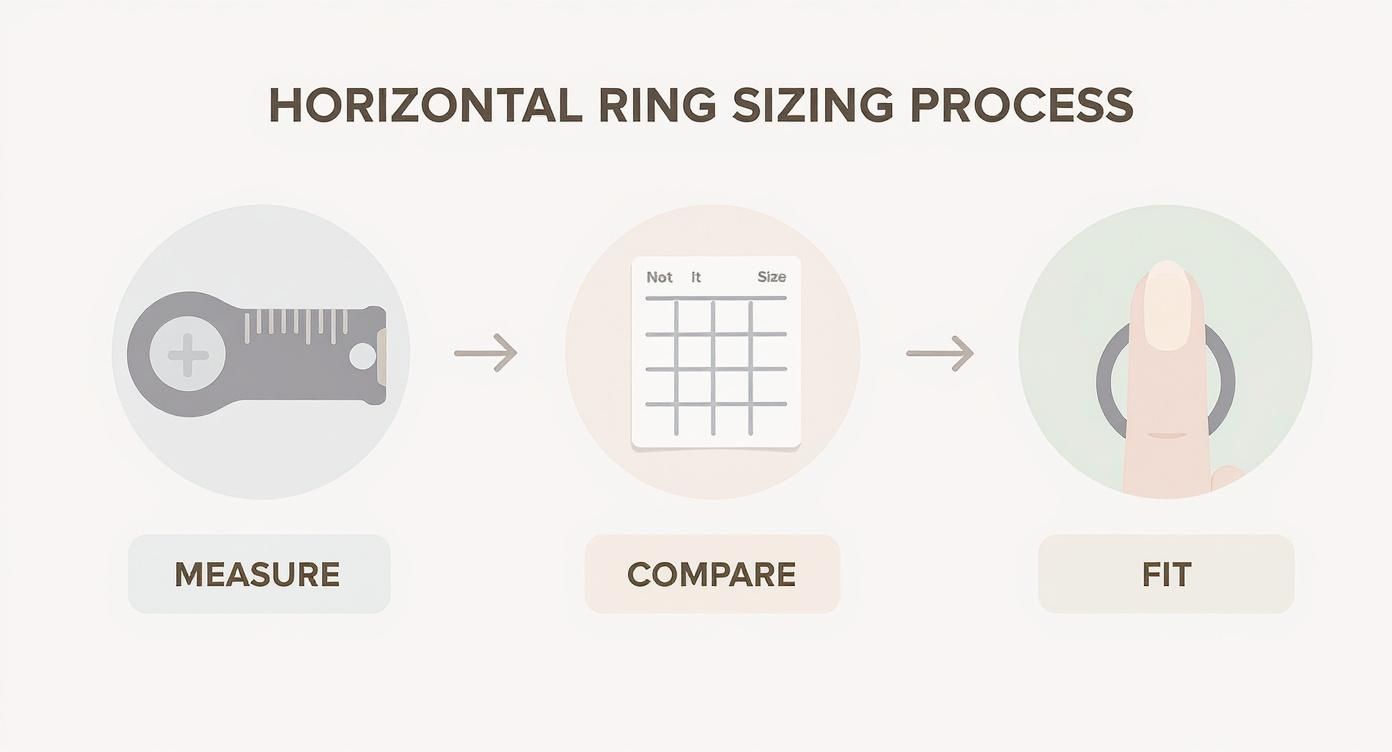
As this visual guide shows, finding your size is a straightforward journey from a quick measurement to a comfortable, perfect fit.
The Printable Ring Sizer Tool
A third popular DIY tool is a printable ring sizer, which works like a tiny, disposable measuring tape for your finger. You can find these online with a quick search. They look like a little paper ruler with a slit at one end.
Before you start, make sure you print it to the correct scale. Most printable sizers will have a reference line (like a one-inch mark) that you should double-check with a real ruler. If it doesn’t line up, your sizing will be off.
Once you’ve confirmed the scale is right, cut out the sizer and the slit. Wrap it around your finger with the numbers facing out, and then slide the pointed end through the slit.
Pull it until it's snug at the base of your finger, but can still slip back over your knuckle. The number that lines up with the slit is your ring size. It’s a direct measurement that doesn’t require a separate conversion chart.
For the most accurate read, try measuring your finger three or four times throughout the day. Our fingers can swell or shrink slightly with temperature changes, so taking an average will help you nail down the most reliable size.
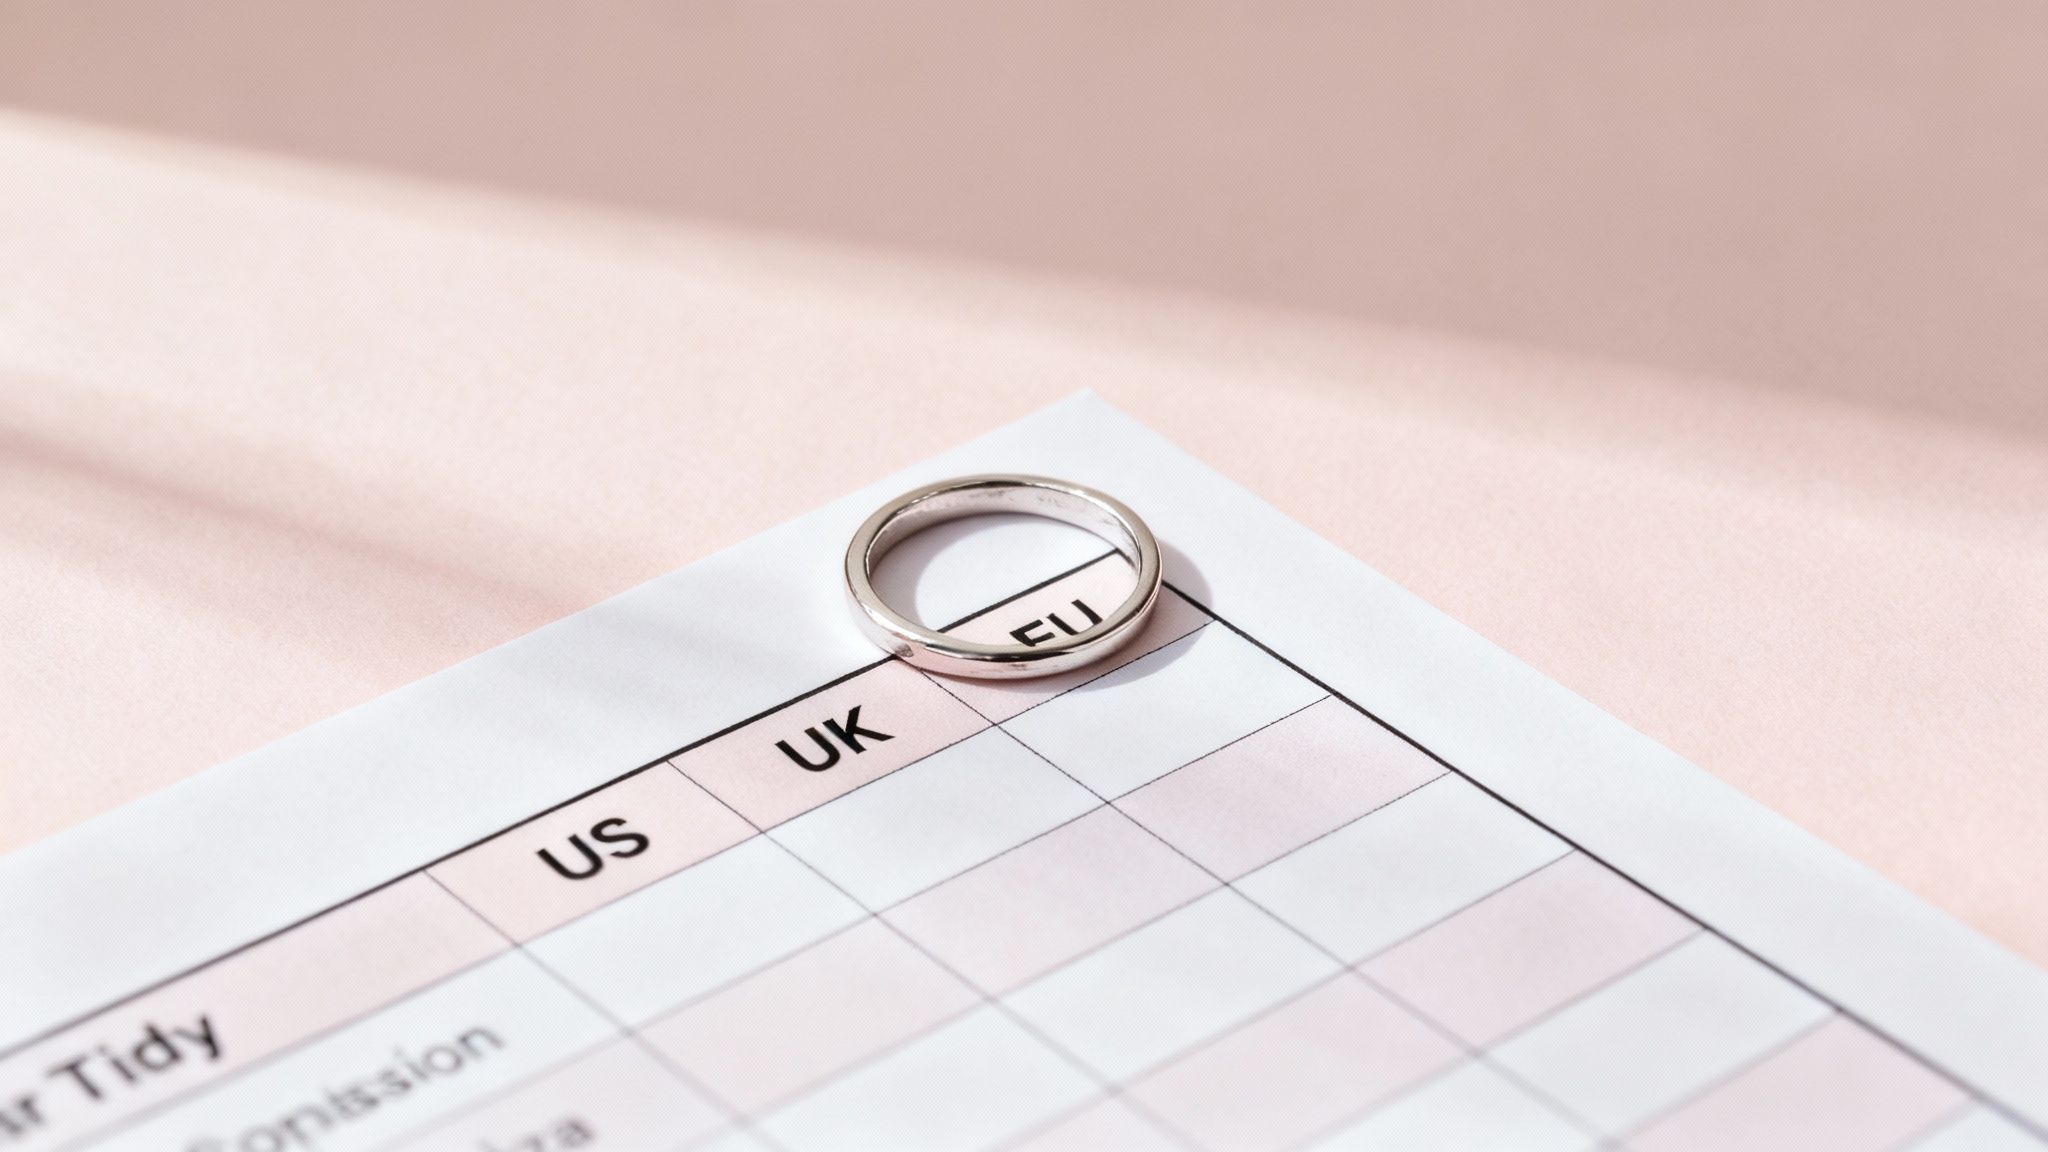
Understanding International Ring Size Charts
Shopping for a beautiful ring online or while traveling abroad can feel like a gamble. You might know you're a perfect size 7 in the US, but what does that mean when you're looking at a ring from the UK, Japan, or Germany?
Suddenly, you're faced with letters, larger numbers, and completely different scales. It’s enough to make anyone second-guess their purchase.
This is where getting comfortable with global sizing systems is a game-changer. Unlike shoes or clothing, there isn't one universal standard for ring sizes. Instead, different regions developed their own methods over time, and knowing how to translate between them is the key to buying with confidence.
Why Ring Sizing Systems Differ
The main reason for the confusion comes down to what's being measured: some systems are based on a ring's inner circumference, while others use its diameter. This fundamental difference is why a simple "plus or minus" conversion doesn't work and a dedicated chart is your best friend.
Here’s a quick breakdown of the systems you'll run into most often:
North America (US & Canada): This is the numerical scale you’re likely familiar with, usually starting around size 3. It often includes half and even quarter sizes for a really precise fit.
United Kingdom, Australia & Ireland: These countries use an alphabetical system, starting with 'A' and moving up. You'll also see half sizes here.
Europe (ISO 8653): Many European countries, like France and Germany, follow a standard set by the International Organization for Standardization (ISO). This one is super straightforward—the size is simply the ring's inner circumference in millimeters. A size 54 means the circumference is 54 mm.
Japan & China: These regions use another numerical system, but it doesn't line up with the US scale. It starts at size 1 and increases from there.
Because these systems are so different, a conversion chart isn't just a suggestion—it's essential for getting it right. For a deeper dive, our detailed global guide to convert ring sizes offers an in-depth look at ensuring a perfect fit, no matter where you're shopping.
How To Use a Conversion Chart
Think of a conversion chart as your universal translator for jewelry. Once you have an accurate measurement for your finger—either its circumference or the diameter of a ring you already own—you can easily find your size in any other system.
Let's say you used the string method and found your finger's circumference is 57 mm. A quick look at a conversion chart would show you this measurement translates to:
A US size 8
A UK size P ½
A Japanese size 16
This simple cross-reference takes all the guesswork out of the process, empowering you to shop from international jewelers and cool boutique brands without worrying about a sizing mistake.
Keep in mind that conversion charts are excellent guides, but tiny variations can exist between jewelers. If you can, always double-check if the brand you're buying from has its own sizing chart.
The table below is a clear, easy-to-use reference to help you translate your size across the most common international systems. It’s a great tool to keep handy for your next jewelry hunt.
International Ring Size Conversion Chart
US/Canada | UK/Australia | Europe (ISO) | Japan | Diameter (mm) |
|---|---|---|---|---|
5 | J ½ | 49.3 | 9 | 15.7 |
6 | L ½ | 51.9 | 11 | 16.5 |
7 | N ½ | 54.4 | 14 | 17.3 |
8 | P ½ | 57.0 | 16 | 18.1 |
9 | R ½ | 59.5 | 18 | 19.0 |
10 | T ½ | 62.1 | 20 | 19.8 |
11 | V ½ | 64.6 | 23 | 20.6 |
12 | Y | 67.2 | 25 | 21.4 |
With this chart, you can quickly figure out your ring size no matter where the piece is from, ensuring your final choice is always a perfect fit.
Key Factors That Influence Your Ring Fit
You'd think figuring out your ring size would be simple, but it's rarely a static number. Your fingers are dynamic, changing size throughout the day and from one season to the next. The secret to finding a ring that feels incredible all the time—not just for the five minutes you try it on—is understanding these subtle shifts.
A perfect fit is a delicate dance. You want it snug enough that it won’t fly off when your hands are cold or wet, but loose enough to slide over your knuckle without a fight. Getting this just right means looking beyond a single measurement.
Temperature and Time of Day
Ever notice your rings feeling tight in the summer or after a workout? That’s not your imagination. Heat causes your blood vessels to expand, which leads to slight swelling in your fingers. It’s one of the biggest reasons for size fluctuation.
On the flip side, when you’re cold, your fingers can shrink by as much as half a size. Measuring your finger first thing on a chilly winter morning is a classic mistake that can lead to a ring that’s painfully tight once summer hits.
To nail the most accurate measurement:
Measure your finger at the end of the day, when it’s naturally at its largest.
Make sure you’re at a comfortable, neutral room temperature.
Don’t measure right after a hot shower, an intense workout, or coming in from the cold.
Your ideal ring size should accommodate these small daily fluctuations. The best time to figure out ring size is in the evening, when your body temperature is stable and your finger is at its most typical size for daily wear.
The Knuckle Challenge
For many of us, the knuckle is the widest part of the finger. This can create a bit of a puzzle: a ring that fits perfectly at the base might be impossible to get on in the first place.
If this sounds like you, the goal is to find the smallest size that can comfortably slide on. It might feel a little loose once it’s in place, especially when it's cold, and that's okay. A good test is to push the ring up from the underside of your finger—there should be a small gap, but not so much that it spins freely or slips off with a gentle shake.
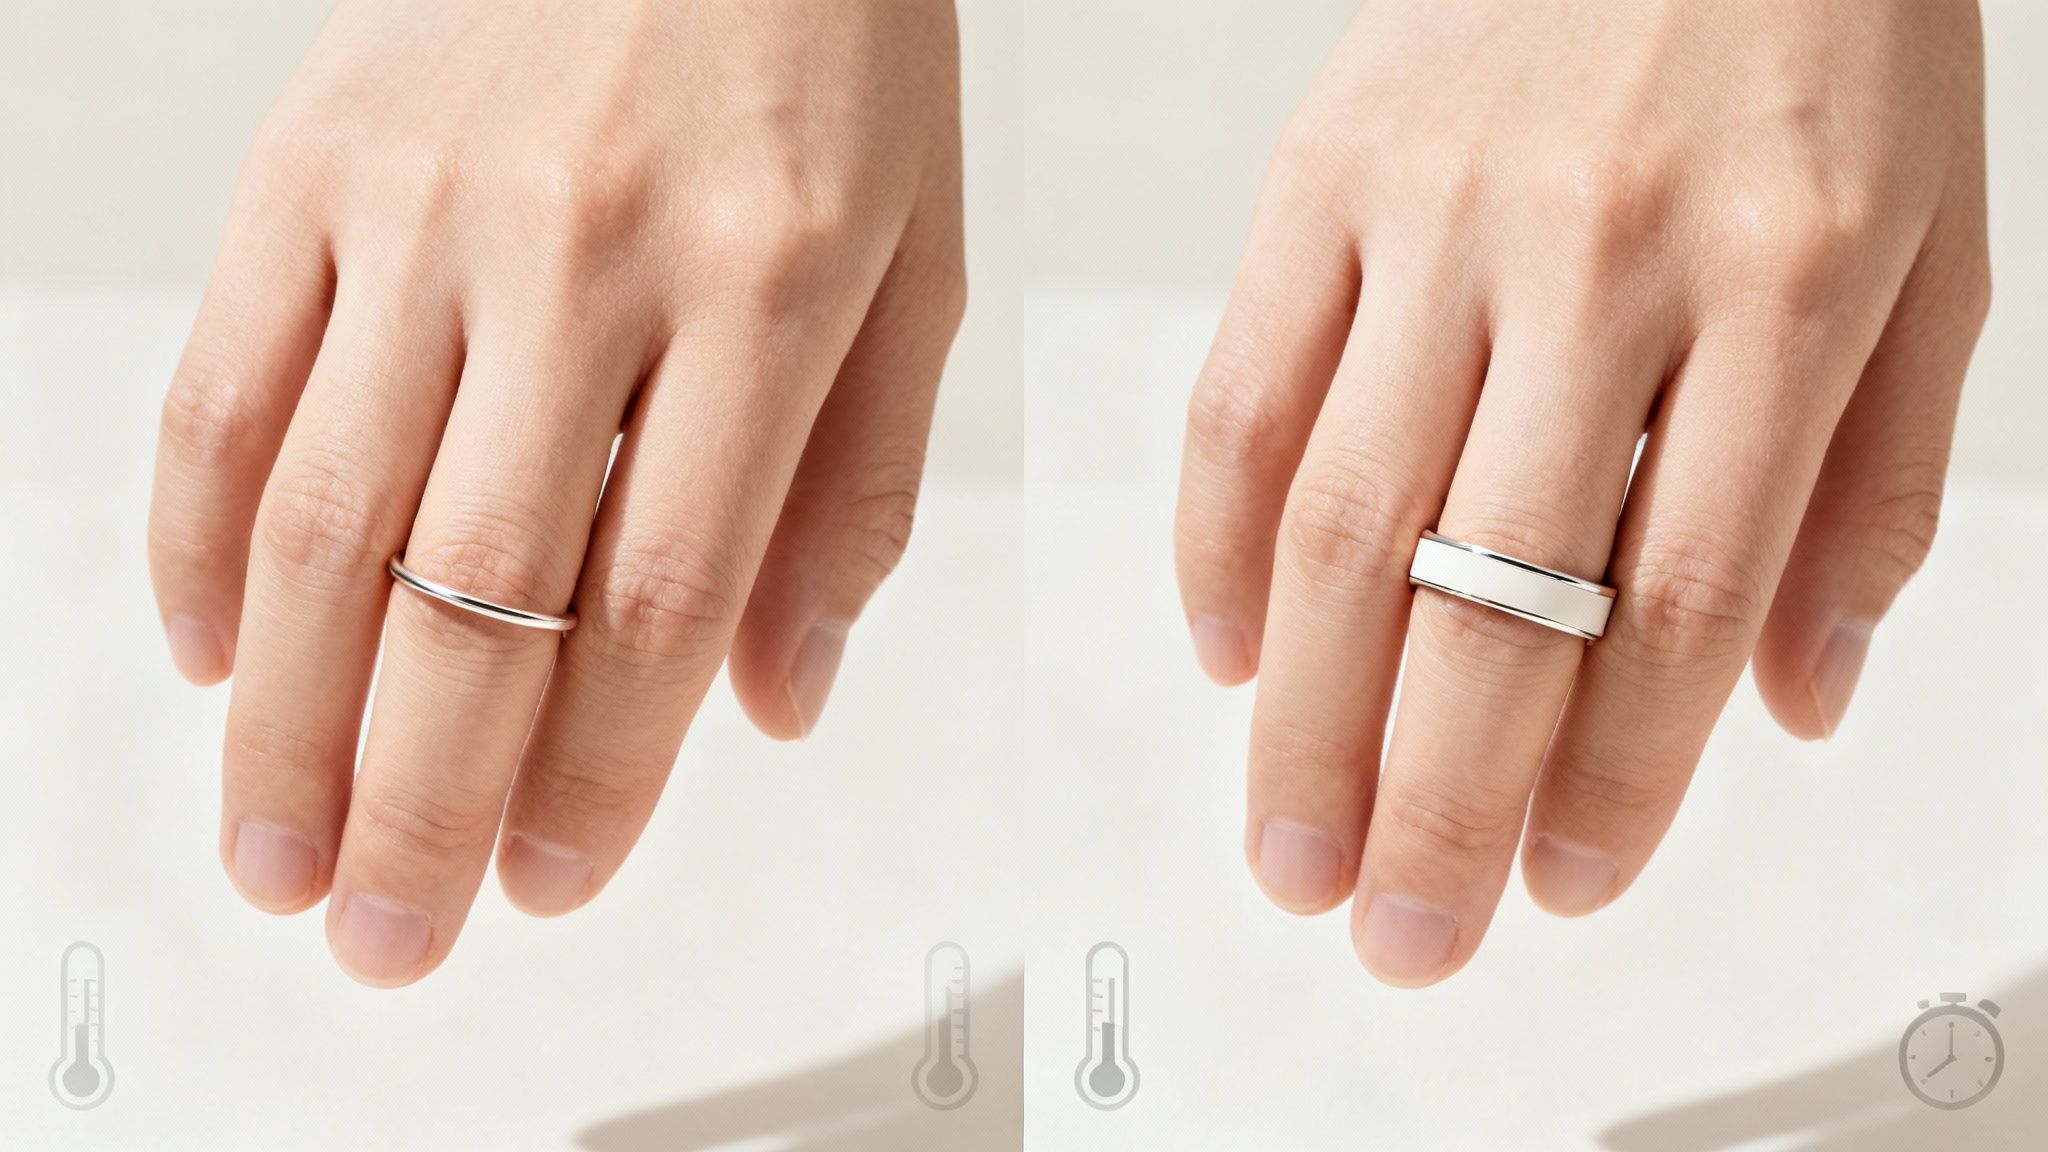
How a Ring's Width Changes Everything
This is probably the most overlooked factor in finding the right size. The width of the band dramatically impacts how a ring fits. Think of it like a shoe—a wide boot feels much tighter than a delicate sandal, even if they're the same size.
A wide band covers more skin, displacing more of your finger and creating a much snugger feel. A thin, delicate band has less contact and will feel looser by comparison.
Here’s a rule of thumb we often use in the industry:
For bands wider than 6 mm, you should think about going up a half-size from your normal measurement.
For very wide bands (8 mm or more), you might even need to go up a full size to keep it comfortable.
This is especially critical when you're stacking multiple rings together, since a stack essentially acts like one very wide band. The material also plays a role in how a ring feels and wears over time, which you can learn more about in our guide to the types of jewelry metals. Keep these factors in mind, and you'll move beyond a simple number to find a truly perfect, comfortable fit.
Common Sizing Mistakes and How to Avoid Them
Getting your ring size right at home is totally doable, but it's also surprisingly easy to get wrong. A tiny miscalculation can be the difference between a ring that’s uncomfortably tight and one that’s dangerously loose.
Knowing the common pitfalls ahead of time is the best way to make sure your first measurement is the only one you'll need.
Using the Wrong Tools
One of the most frequent mistakes is grabbing the wrong tool for the job. A stretchy piece of yarn or a rubber band might seem like a quick fix, but they'll almost always lead to an incorrect measurement. When you pull them snug, they stretch, making your finger seem smaller than it really is.
Always stick to something with no give, like a crisp strip of paper or even a piece of dental floss.
Ignoring Your Body's Natural Rhythms
Another classic error? Measuring your fingers when they’re cold. Your fingers can actually shrink by up to half a size in chilly temperatures. Sizing them then could leave you with a ring that becomes painfully tight once you warm up.
For the most reliable result, always measure when your hands are at a comfortable, neutral temperature.
It’s also a mistake to measure just once and call it a day. Your finger size changes throughout the day based on what you eat, how much water you've had, and your activity level. To find a true average that works all day, every day, measure your finger three or four times on different days and at different times—evenings are often best.
Forgetting About Knuckles and Fit
It’s easy to get hyper-focused on the base of your finger and completely forget about your knuckle. If your knuckle is larger than the base of your finger (and for many of us, it is), you have to size the ring to fit over it.
Sure, the ring might feel a little loose once it’s on, but that’s a whole lot better than not being able to wear it at all.
Pulling your measuring tool too tight is another common slip-up. The measurement should be snug, but not constricting—it should feel exactly like a well-fitting ring would. If the paper or string leaves a dent in your skin, you’ve pulled way too tight, which can lead to a size that uncomfortably pinches you.
Crucial Takeaway: The goal isn't the tightest possible fit; it’s the most comfortable and secure one. Your ring should slide over your knuckle with minimal fuss and sit at the base without spinning like a top.
Finally, ending up with a beautiful ring that doesn’t quite fit isn’t the end of the world. In many cases, a professional jeweler can make it work. If you find yourself with a sizing error despite your best efforts, it's worth exploring your options. You can learn all about it in our complete guide on how to get a ring resized, which breaks down what’s possible for different styles.
Answering Your Lingering Sizing Questions
Even with the best at-home methods, a few questions always pop up. Let's clear up those last bits of confusion so you can feel totally confident in your choice.
Getting the size right is more than just a number—it’s about comfort, security, and making sure your new favorite piece feels like it was made just for you.
What’s the Average Ring Size for Men and Women?
Knowing the averages can be a huge help, especially if you’re buying a gift and have to make an educated guess. In the U.S. and Canada, the average woman’s ring size is somewhere between a size 6 and a 7. For men, it’s usually between a size 9 and 11.
Keep in mind that each full-size jump equals about 2-3 millimeters in the ring’s inner circumference. While individual sizes vary wildly, most women's rings sold fall between sizes 4 and 10. You can dive deeper into these sizing statistics at The Giving Tree Gallery if you’re curious.
How Tight Should a Ring Actually Be?
This is the golden question. The answer lies in a delicate balance: a ring should be snug enough that it won't fly off during your daily routine, but loose enough to slide over your knuckle with just a little bit of effort.
Here's a quick check: put the ring on and give your hand a gentle shake. It should feel secure, not like it's about to launch across the room. On the flip side, you shouldn't need soap and a prayer to get it off.
A perfectly fitted ring is one you can wear all day without really noticing it’s there. If it’s pinching your finger, cutting off circulation, or constantly spinning around, the size isn't quite right.
Should I Size Up for a Wide Band?
Absolutely. This is probably the most common sizing mistake people make. A wider band—think anything over 6mm—covers more of your finger. That extra surface area creates more friction and displaces more skin, making it feel much tighter than a thin ring of the exact same size.
Here's a solid rule of thumb:
For bands between 6mm and 8mm wide, go up at least a half size.
For bands wider than 8mm, you might need to go up a full size.
It's always a good idea to check the jeweler’s specific advice, though, as some brands already account for this in their sizing.
Can My Ring Size Change Over Time?
Yes, and it's totally normal. Your ring size isn't set in stone. It can fluctuate throughout your life—and even throughout a single day.
A few common culprits behind finger size changes include:
Weight Fluctuations: Gaining or losing even a small amount of weight can affect how your rings fit.
Pregnancy: Swelling is a common side effect and can temporarily increase your ring size.
Aging: Over time, some people find their knuckles get larger, which means they need a bigger size to get the ring on comfortably.
Temperature and Diet: As we’ve mentioned, things like a hot day or a salty meal can cause temporary swelling.
Because of these fluctuations, it’s smart to re-measure your finger every few years, especially if you haven't bought a new ring in a while.
Once you’ve nailed down that perfect fit, keeping your jewelry looking its best is the next step. Simple care routines, like knowing how to polish a gold ring, can make all the difference in preserving its shine for years to come.
At Panther De Luxe Shop, we believe finding the perfect piece of jewelry should be exciting, not stressful. Now that you have all the tools to figure out your ring size, explore our collections to find a ring that truly speaks to you.
Comments