
Easy Friendship Bracelet Patterns | Simple & Stylish Ideas
- seanmawhinney
- May 30, 2025
- 16 min read
Dive into DIY: Crafting Friendship Bracelets Made Easy
Want to learn how to make friendship bracelets? This listicle presents six easy friendship bracelet patterns, perfect for beginners and experienced crafters alike. Master simple techniques like the candy stripe, chevron, double chevron, spiral/twist, diamond, and braid. These easy friendship bracelet patterns are a fun way to create personalized gifts or add a handmade touch to your own style. Follow our step-by-step instructions and start crafting beautiful friendship bracelets today!
1. Candy Stripe (Basic Diagonal Stripes)
The Candy Stripe friendship bracelet pattern is a classic for a reason. It's the perfect entry point into the world of friendship bracelet making, earning its spot at the top of our "friendship bracelet patterns easy" list. Using just one simple knotting technique – the forward knot – you can create vibrant diagonal stripes that look impressive but are surprisingly easy to achieve. This pattern is so straightforward that it’s an excellent choice for beginners, allowing you to grasp the fundamental principles of friendship bracelet creation before moving on to more complex designs. Whether you're a complete novice or a seasoned crafter looking for a quick and satisfying project, the Candy Stripe pattern offers a versatile and enjoyable crafting experience.

The magic of the Candy Stripe pattern lies in its simplicity. You start by arranging your chosen embroidery floss colors in the order you want them to appear as stripes. The leftmost color will be the first diagonal stripe, and the process continues sequentially across your chosen threads. Secure the threads with a knot or tape, and then, working from left to right, you’ll create a series of forward knots with each individual strand. A forward knot involves looping a thread over the adjacent thread, forming a small knot. Repeating this knotting process with each color across the row creates the signature diagonal stripe effect. As you continue row after row, the colorful stripes will emerge, transforming simple threads into a beautiful piece of wearable art.
One of the biggest advantages of the Candy Stripe pattern is its self-adjusting tension. Because each knot is individually tied and pulled snug, the bracelet naturally maintains an even tension throughout, making it less prone to warping or becoming too tight. This feature is particularly helpful for beginners who are still developing their knotting consistency. Furthermore, the pattern can be customized with any number of strings (though a minimum of three is recommended), and the color combinations are limitless.
Examples of Candy Stripe bracelets abound, highlighting the pattern's versatility. Show your support by creating pride flag bracelets with rainbow colors, or demonstrate your school spirit with team colors. The pattern also lends itself beautifully to seasonal themes, like red and green for Christmas or orange and black for Halloween. The possibilities are truly endless!
Pros:
Perfect for absolute beginners: Only one knot type is required.
Requires only one knot type: The forward knot is easy to learn and master.
Quick to complete: The repetitive nature of the pattern allows for quick progress.
Hard to make mistakes: The simple design minimizes the risk of errors.
Uses minimal materials: Just embroidery floss, scissors, and tape are needed.
Cons:
Limited pattern complexity: The design is inherently simple.
Can become repetitive: The same knot is repeated throughout.
May appear too simple for advanced crafters: Experienced bracelet makers may prefer more challenging patterns.
Tips for Success:
Start small: For your first attempt, begin with 3-4 colors to get a feel for the technique.
Maintain consistent tension: Even tension is key to a neat and polished bracelet.
Secure your work: Tape the starting loop to a flat surface like a table or clipboard to provide stability while knotting.
Choose contrasting colors: Contrasting colors will make your stripes more vibrant and noticeable.
Practice makes perfect: Before starting your bracelet, practice making forward knots on a piece of scrap thread to build confidence and consistency.
The Candy Stripe pattern is an excellent starting point for anyone interested in making friendship bracelets. Its ease of execution, combined with its visually appealing results, makes it a rewarding project for crafters of all levels. By mastering this basic pattern, you’ll gain the foundational skills and confidence needed to explore more complex designs in the future. So, grab your embroidery floss and give it a try – you’ll be surprised at how quickly you can create your own beautiful Candy Stripe friendship bracelet!
2. Chevron (V-Pattern)
The Chevron, also known as the V-pattern, is a classic friendship bracelet pattern that offers a satisfying step up in complexity from simple stripes while remaining firmly within the "friendship bracelet patterns easy" category. It's characterized by distinctive V-shaped or arrow-like designs that point towards the center of the bracelet, creating a dynamic and visually appealing zigzag. This pattern earns its place on our list because it strikes a perfect balance between simplicity and visual interest, making it a rewarding project for both beginners and more experienced bracelet makers.

The Chevron pattern utilizes both forward and backward knots, introducing a new level of technique to your bracelet making repertoire. Forward knots (typically represented as "4" in patterns) slant the knot to the right, while backward knots (represented as "3") slant the knot to the left. This combination of knots is what creates the distinctive V-shapes. The pattern requires an even number of strings, arranged in a mirror-image color pattern to ensure symmetry. For example, if you're using four strings – two blue and two red – you would arrange them as blue, red, red, blue. This mirrored setup is key to the chevron’s self-centering design.
The beauty of the Chevron pattern lies in its versatility. While it’s a fantastic way to learn backward knots, the inherent symmetry of the design is quite forgiving of minor inconsistencies in knot tension, making it an ideal choice for beginners. It also works beautifully with a wide range of color combinations. Consider two-color chevrons to represent school colors or favorite sports teams. Rainbow chevrons are a vibrant choice for pride celebrations or simply adding a burst of color to your wrist. An ombre chevron using gradient colors creates a subtle and sophisticated look. And for more formal occasions, try incorporating metallic thread for a touch of sparkle.
Here's a more detailed breakdown of how the chevron pattern works: Each row of knots contributes to forming the V-shape. You’ll start from the outermost string on one side and work your way towards the center, creating a half-V. Then, you'll repeat the process on the other side, mirroring the knotting direction to complete the V. This process of working outwards-in, outwards-in continues throughout the bracelet.
Pros:
Visually striking and popular: The Chevron is a recognizable and beloved pattern, making it a great conversation starter.
Great introduction to backward knots: Mastering the backward knot opens up a world of more complex friendship bracelet patterns.
Symmetrical design is forgiving: Minor inconsistencies in knot tension are less noticeable, making it beginner-friendly.
Works well with many color combinations: From simple two-color designs to vibrant rainbows, the possibilities are endless.
Classic friendship bracelet look: The Chevron pattern is a timeless choice that never goes out of style.
Cons:
Requires learning two knot types: While both forward and backward knots are relatively easy to learn, it does require a little more effort than just using one type.
Must use an even number of strings: This is a requirement for the pattern to work correctly.
Takes longer than basic stripe patterns: Due to the alternating knot types, the Chevron takes a little more time to complete.
Tips for Success:
Start with just 2 colors (4 strings total): This simplifies the process and helps you get comfortable with the knotting technique.
Keep string pairs symmetrical in arrangement: This is crucial for the pattern to form correctly.
Work from outside toward the center for each row: This creates the distinct V-shapes.
Maintain consistent knot tension: This ensures a neat and even finished product.
Use a safety pin to secure work to clothing while knotting: This helps keep your strings organized and prevents tangling.
The Chevron pattern, popularized through summer camp traditions and the 1970s friendship bracelet revival, remains a staple in the world of friendship bracelet making. It’s a testament to the fact that even simple techniques can produce stunning results. So grab your embroidery floss, choose your colors, and start creating your own Chevron masterpiece – you’ll be surprised at how easy it is to achieve this impressive friendship bracelet pattern.
3. Double Chevron
Looking for friendship bracelet patterns easy enough to learn but with a bit more flair than the basic chevron? The double chevron friendship bracelet is a fantastic next step in your bracelet-making journey. This pattern builds upon the foundational chevron (sometimes called the fishtail) by incorporating two V-shapes or arrow points per row instead of one. This seemingly small change results in a significantly more intricate and visually dense pattern, giving your bracelets a more complex and impressive look. Even better, it utilizes the same forward and backward knots as the regular chevron, making it a relatively easy transition for beginners looking to level up their skills.
The magic of the double chevron lies in its symmetrical construction. While the basic chevron uses a multiple of 2 strings, the double chevron requires a multiple of 4. This allows for the creation of mirrored chevron points within each row. The knotting process remains familiar: you'll still be using forward and backward knots, the building blocks of many friendship bracelet patterns. However, the arrangement and order of knotting change to accommodate the double points, creating a visually appealing, textured effect. This more dense pattern coverage also means that the bracelet grows in length faster than a single chevron, offering a quicker sense of accomplishment.
The double chevron offers incredible versatility in terms of color combinations. You can use a multitude of colors to create vibrant, eye-catching designs or stick to a more sophisticated palette for a subtler look. Consider creating wedding party bracelets with elegant color schemes, friendship sets with coordinating colors reflecting each friend's personality, or even bold, bright combinations for festival wear.
This pattern earns its place on our “friendship bracelet patterns easy” list because while it offers a step up in complexity and visual appeal, the core knotting techniques remain manageable for beginners. It bridges the gap between simple patterns and more advanced ones beautifully. The double chevron offers a taste of intricate design without overwhelming the maker with complicated new knots.
Pros:
More visually complex than the basic chevron, offering a more intricate and appealing design.
Still utilizes familiar forward and backward knotting techniques.
Creates impressive results with relatively little effort.
Serves as a good transition to more advanced friendship bracelet patterns.
Offers versatile color possibilities, allowing for a range of creative expressions.
Cons:
Takes significantly longer to complete compared to a basic chevron due to the doubled knots.
Requires more concentration and precision to maintain the correct string arrangement.
Uses more thread due to the increased knotting and denser pattern.
More complex string arrangement initially, requiring careful setup.
Tips for Success:
Master the regular chevron first: A solid understanding of the basic chevron will make learning the double chevron much easier.
Start with 8 strings: For your first attempt, 8 strings offer a good balance between manageability and showcasing the double chevron pattern effectively.
Mark your pattern on paper: Creating a visual guide on paper, especially when starting, can help you keep track of the knotting sequence and avoid mistakes.
Take breaks: The repetitive knotting can cause hand fatigue. Take regular breaks to rest your hands and avoid strain.
Use a thread organizer or clipboard: Keeping your strings organized and taut is essential for maintaining a neat and even pattern. A thread organizer, clipboard, or even a piece of cardboard can help manage your strings effectively.
Thinking about how to style your finished bracelet? Learn more about Double Chevron for some fashion inspiration. With practice and patience, you'll be creating stunning double chevron friendship bracelets in no time!
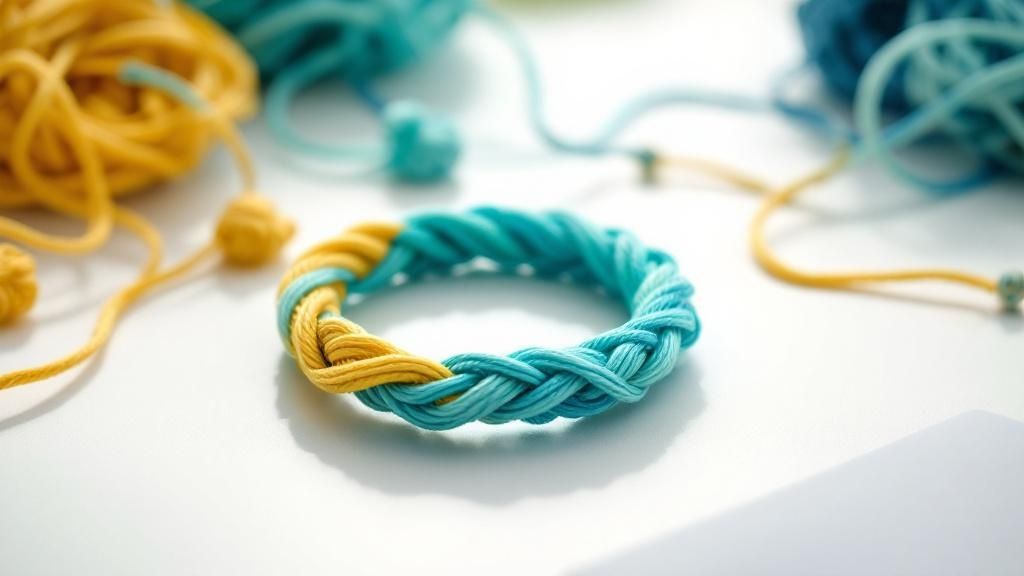
4. Spiral/Twist Pattern
The Spiral/Twist pattern earns its spot on this list of easy friendship bracelet patterns because it offers a unique, three-dimensional look with surprising simplicity. Unlike many friendship bracelet patterns that require mastering multiple knot types, the Spiral/Twist relies on just one: the forward knot. This makes it an excellent choice for beginners or anyone looking for a quick and satisfying project. By using a single leading string that continuously creates forward knots around the other strings, you achieve a beautiful spiral effect that naturally twists the bracelet. This inherent twisting motion gives the finished bracelet a rope-like texture, distinct from the flatter, more traditional friendship bracelet styles. This pattern offers a fresh take on the classic craft, making it perfect for those who want to experiment with different textures and appearances.
The technique is refreshingly straightforward. Choose your desired number of strings – the Spiral/Twist pattern works with any number, offering flexibility for your design. Designate one string as your "leader" and ensure it is significantly longer (2-3 times) than the other strings, as it will be used throughout the entire bracelet. The leading string is then used to create a forward knot around each of the other strings, one by one, moving consistently in the same direction. As you repeat this process, the leading string spirals around the others, and the bracelet begins to twist organically. This natural twisting is a key feature of the pattern, creating its characteristic three-dimensional appearance.
The Spiral/Twist pattern's simplicity offers several advantages. The single-knot technique is easy to learn and quick to master, allowing you to establish a rhythm and create the bracelet quickly. It is also a remarkably forgiving pattern; variations in knot tension are less noticeable due to the overall twisted texture, making it ideal for beginners still developing their knotting consistency. The resulting bracelet is undeniably eye-catching, offering a unique textural element that sets it apart from more traditional friendship bracelets.
This unique pattern lends itself beautifully to a variety of applications beyond the classic wrist adornment. Imagine vibrant ankle bracelets with beachy color combinations, adding a touch of bohemian flair to summer outfits. The spiral pattern also looks stunning when layered, particularly using metallic threads for a touch of glamour. Consider using this technique for pet collar accessories, creating a stylish and personalized touch. Even something as simple as a bookmark can be elevated with a Spiral/Twist pattern and some decorative end beads.
While the Spiral/Twist pattern offers many benefits, it also has a few considerations. The most significant is that the leading string is consumed much faster than the other strings due to its continuous use. Therefore, the initial length adjustment is crucial. The natural twisting, while beautiful, can sometimes be challenging to control, especially for beginners. It might take a few tries to get the hang of maintaining even tension and preventing over-twisting. Finally, the Spiral/Twist pattern results in a look that deviates from the traditional flat friendship bracelet aesthetic. This can be a pro or a con depending on your desired outcome.
To ensure success with this pattern, keep the following tips in mind: Start with a leading string that is at least two to three times longer than the other strings. Allow the natural twisting to occur; trying to fight it will only complicate the process. Use contrasting colors for a dramatic effect that highlights the spiral. Pinning your work frequently to a stable surface will help maintain control and prevent tangling. Finally, consider adding beads to further enhance the texture and personalize your creation. This simple yet effective technique allows for a unique and stylish friendship bracelet that's easy to create and fun to wear. The Spiral/Twist pattern offers a delightful twist (literally!) on a classic craft, making it a worthy addition to any friendship bracelet maker’s repertoire.
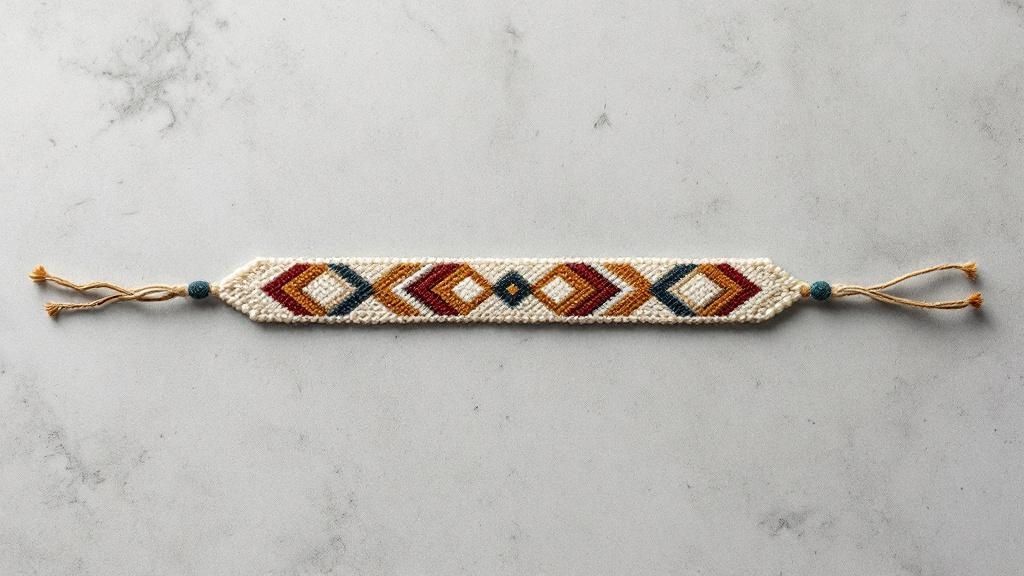
5. Diamond Pattern
Looking for friendship bracelet patterns easy enough for beginners but with a result that looks intricate and impressive? The Diamond Pattern is an excellent choice. While requiring a bit more concentration than basic braids or stripes, it's a fantastic way to level up your friendship bracelet game and learn fundamental pattern-making skills. This pattern deserves its place on this list because it bridges the gap between simple knots and more complex designs, offering a visually stunning result without being overwhelmingly difficult.
The Diamond Pattern, as the name suggests, creates repeating diamond shapes across the bracelet. These geometric formations are achieved through a clever combination of forward and backward knots, coupled with strategic color placement. Essentially, you're creating inverted "V" shapes that nest together to form the diamonds. The direction of your knots and the order of your colored threads determine the diamonds' size, shape, and overall appearance.
This method works by assigning specific knots and thread positions within the pattern. You’ll typically start with a center thread and work outwards, creating the sides of the diamond with carefully placed forward and backward knots. The key is to consistently maintain the correct knot direction and thread order for each row, which can be challenging initially. A clear understanding of how these knotting techniques influence the final pattern is crucial for success.
Here are some examples of how the Diamond Pattern can be implemented:
Aztec-inspired designs with earth tones: These often incorporate multiple diamonds of varying sizes and use browns, greens, and oranges to create a rustic, natural look.
Modern geometric bracelets with monochrome colors: Black and white, or shades of grey, can be used to create sleek, minimalist diamond patterns.
Traditional friendship bracelets with bright primary colors: Using vibrant reds, blues, and yellows creates a classic, playful feel, perfect for showcasing the diamond's geometric beauty.
Bohemian-style bracelets with jewel tones: Deep purples, emerald greens, and sapphire blues add a touch of elegance and richness to the diamond pattern.
While visually striking, the Diamond Pattern does come with its challenges:
Pros:
Stunning geometric appearance: The interlocking diamonds create a visually appealing and intricate design.
Good introduction to pattern following: It's a perfect stepping stone to more complex friendship bracelet patterns.
Impressive finished result: The effort pays off with a bracelet that looks far more complicated than it actually is.
Teaches color management skills: Strategic color placement is key to achieving well-defined diamond shapes.
Versatile sizing options: The pattern can be adapted to create bracelets of varying widths and lengths.
Cons:
Requires pattern chart or memory: Keeping track of knot direction and thread placement can be tricky.
Easy to lose track of position: Especially for beginners, maintaining the correct sequence is crucial.
More time-consuming: Compared to simpler patterns, the Diamond Pattern requires more patience and focus.
Requires precise color placement: The diamonds' clarity depends heavily on accurate color changes.
To make the process smoother, consider these helpful tips:
Draw out pattern on graph paper first: Visualizing the pattern beforehand can greatly simplify the knotting process.
Use row counter or tick marks: This helps to keep track of your progress and ensures accuracy.
Start with simple 2-color diamonds: Mastering the basic technique with fewer colors will make it easier to tackle more complex designs later on.
Keep pattern chart handy while working: Having a visual guide reduces the risk of errors and keeps you on track.
Mark center of bracelet for symmetry reference: This is especially helpful for more complex diamond variations.
The Diamond Pattern's popularity in friendship bracelets can be attributed to various influences, including Native American beadwork, known for its intricate geometric designs, and the broader Geometric Art movement, which emphasizes clean lines and shapes. Learn more about Diamond Pattern This pattern offers a wonderful blend of achievable complexity and visual appeal, making it a worthwhile addition to any friendship bracelet maker's repertoire. So, if you're looking for easy friendship bracelet patterns that deliver impressive results, give the Diamond Pattern a try. You might just be surprised at what you can create.
6. Braided Friendship Bracelet
Looking for easy friendship bracelet patterns? The braided friendship bracelet is a fantastic option, especially if you're new to bracelet making or want a quick and satisfying project. This method offers a simple, no-fuss approach that utilizes the familiar technique of braiding to create beautiful, personalized friendship jewelry. While it may deviate slightly from the traditional knotted friendship bracelet styles, the braided bracelet's speed and ease make it a worthy contender on this list of easy friendship bracelet patterns.
The core of this method lies in its simplicity. Instead of learning intricate knotting techniques, you simply braid strands of embroidery floss or other suitable cord together. This makes it an ideal starting point for children or anyone unfamiliar with friendship bracelet making. The basic three-strand braid forms the foundation of this pattern, but you can easily elevate the design by incorporating multiple colors or using bundles of floss to achieve varying thicknesses. This adaptability allows for creativity within the simplicity of the technique.
Want a thick, bohemian-style bracelet? Simply group multiple strands of embroidery floss together in each section of your braid. Prefer a more subtle, everyday look? Use fewer strands in neutral colors. The possibilities are endless, and the ability to customize the thickness and color combinations allows you to create truly personalized gifts. This technique is also perfect for creating children's first friendship bracelets, as the familiar braiding motion is easy to grasp and offers a quick sense of accomplishment. Need to make bracelets for a large group quickly? The braided friendship bracelet is your answer.
One of the biggest advantages of this method is that there are no new techniques to learn. Most people are already familiar with basic braiding, making this a remarkably accessible friendship bracelet pattern. It's incredibly quick to complete, especially compared to more complex knotted patterns, allowing you to create a beautiful piece of jewelry in minutes. The simple nature of braiding also makes it difficult to make mistakes, ensuring a satisfying crafting experience even for beginners.
However, the braided friendship bracelet does have a few drawbacks. Its appearance is less traditional than knotted friendship bracelets, which might not appeal to purists. The design possibilities are somewhat limited compared to the intricate patterns achievable with knotting techniques. Some experienced crafters might also find this method too simple and prefer a more challenging project. Finally, braided bracelets can unravel more easily than knotted bracelets, so securing the ends properly is crucial.
Here are some tips to maximize your success with braided friendship bracelets:
Thickness Control: Use 6-12 strands per braiding section for a full, substantial bracelet. For a thinner bracelet, use fewer strands.
Secure Ends: Tie tight knots at the ends of your braid, or use crimp beads for a more professional finish.
Add Beads: Thread beads onto your strands before braiding to incorporate decorative elements into your design.
Four-Strand Braiding: For a slightly different look, try four-strand braiding. There are numerous tutorials available online to guide you through this technique.
Texture Variety: Experiment with different textures of thread or cord, like cotton, silk, or metallic floss, to add visual interest to your bracelets.
When deciding if the braided friendship bracelet is the right pattern for you, consider your skill level, the desired aesthetic, and the time you have available. This method is perfect for beginners, those looking for quick projects, or anyone who appreciates the simple elegance of a braided design. While it may not offer the complexity of other friendship bracelet patterns, its ease and speed make it a valuable addition to any crafter's repertoire. If you’re looking for inspiration beyond embroidery floss, you might find the elegant design of this braided bracelet intriguing: Learn more about Braided Friendship Bracelet. This easy friendship bracelet pattern provides a fulfilling crafting experience and results in a beautiful, personalized piece of jewelry.
6 Easy Friendship Bracelet Patterns Comparison
Pattern | 🔄 Implementation Complexity | 💡 Resource Requirements | ⭐ Expected Outcomes | 📊 Ideal Use Cases | ⚡ Key Advantages |
|---|---|---|---|---|---|
Candy Stripe (Basic Diagonal Stripes) | Very Low (one knot type) | Minimal (few strings, simple tools) | Clean diagonal stripes, consistent tension | Beginners, simple colorful bracelets | Quick, easy, minimal mistakes |
Chevron (V-Pattern) | Low-Medium (forward & backward knots) | Moderate (even number of strings) | Symmetrical V-shaped zigzag pattern | Beginners wanting classic look | Visually striking, introduces new knots |
Double Chevron | Medium (more strings, complex arrangement) | Higher (multiple of 4 strings) | Dense, intricate double V patterns | Intermediate beginners, detailed designs | Impressive results, advanced step-up |
Spiral/Twist Pattern | Low (one knot type, single leading string) | Minimal (any number of strings) | Twisted 3D spiral texture | Beginner fun projects, bracelets & accessories | Unique texture, fast once practiced |
Diamond Pattern | Medium-High (pattern tracking required) | Moderate-High (careful color placement) | Geometric diamond shapes, complex visuals | Intermediate crafters, geometric design lovers | Teaches pattern skills, impressive finish |
Braided Friendship Bracelet | Very Low (traditional braiding) | Minimal (multiple strands per section) | Thick, textured braided bracelet | Complete beginners, quick gifts | Very fast, easy, familiar technique |
Level Up Your Bracelet Game: Explore More with Panther De Luxe
From classic candy stripes to intricate diamond patterns, this article has equipped you with six easy friendship bracelet patterns to kickstart your crafting journey. Mastering these fundamental techniques opens up a world of creative possibilities. Remember, the key takeaway is that even the most complex-looking designs are built upon simple knots and repetitions. As you become more comfortable with these friendship bracelet patterns easy to learn, don't be afraid to personalize your creations with different color combinations, beads, or charms, letting your unique style shine through. The ability to create something beautiful with your own hands is incredibly rewarding, and these bracelets become even more special when shared with friends and loved ones.
Looking for a truly unique piece or some inspiration for even more elaborate designs? The Panther De Luxe Shop offers handcrafted bracelets and jewelry that perfectly complement the skills you're developing, providing a touch of luxury and sophistication. Visit Panther De Luxe Shop today and discover exquisite pieces that elevate your style while celebrating the art of handcrafted jewelry.
Comments