
Fix Broken Necklace Chain: Complete DIY Repair Guide
- seanmawhinney
- Jun 4, 2025
- 11 min read
Understanding Your Chain Break: What You're Really Dealing With
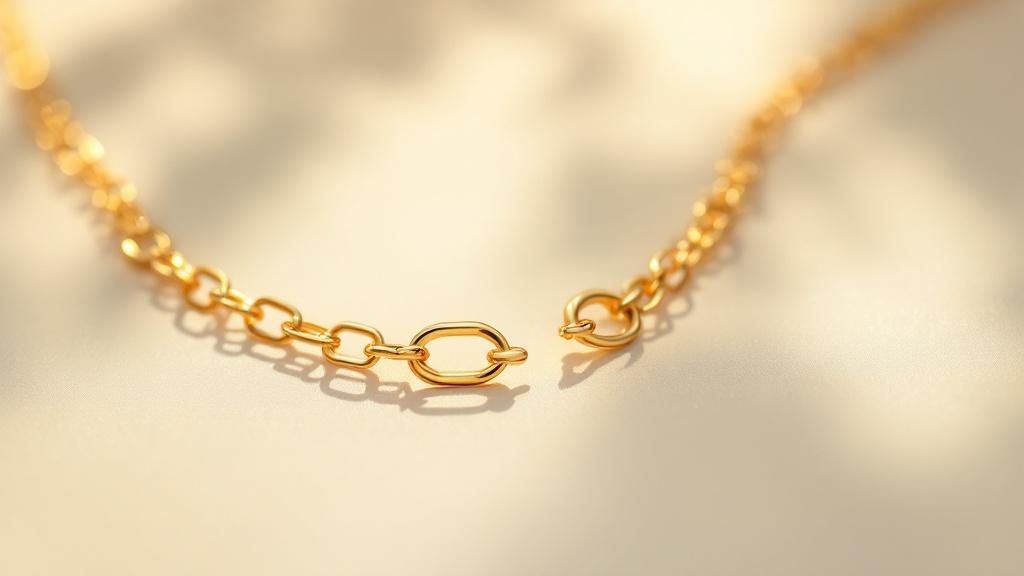
Not all broken necklace chains are created equal. The first step to a successful repair is identifying the specific type of damage. This involves understanding the anatomy of the chain and the various ways a break can occur, as well as how those breaks affect the overall structure. For instance, a delicate box chain will react to stress differently than a more robust rope chain. That's why assessing the break is so important before attempting any repair.
Common Types of Chain Breaks
Several types of breaks frequently occur in necklace chains. Recognizing these breaks will help you determine the best way to fix your broken necklace. Some breaks are simple to fix, while others require specialized tools and more advanced techniques.
Separated Links: This is often the easiest break to fix, typically involving two links that have simply disconnected.
Worn Jump Rings: Jump rings are the small, circular links that connect other components of the chain. Over time, these can wear down and eventually break.
Clasp Malfunction: Clasp issues can vary, ranging from a loose mechanism to a complete break.
Stretched Metal: This happens when the metal of the chain weakens and elongates, often near the clasp due to repeated stress.
Chain Anatomy and Its Impact on Repairs
The style of your chain plays a significant role in the repair process. Delicate chains like snake chains or herringbone chains require careful handling due to their intricate design. Sturdier chains, such as curb chains or figaro chains, offer more durability and may be easier to repair. The chain's material also matters. Gold and silver have distinct properties that affect how they respond to manipulation during repair.
Understanding these nuances is key to preventing further damage during the repair process. Recognizing the chain’s anatomy helps you choose the right tools and techniques. Interestingly, the global jewelry repair market is experiencing a CAGR of around 5%, indicating increased demand for jewelry maintenance and restoration. You can find more detailed statistics here: Learn more about the growing jewelry repair market. This growth suggests that learning to fix broken necklace chains yourself is a valuable and increasingly relevant skill.
Your DIY Chain Repair Toolkit: What Actually Works
Having the right tools can make all the difference when repairing a broken necklace chain. A well-equipped toolkit can transform a frustrating experience into a satisfying accomplishment. This section covers the essential tools you'll need, from simple household items for quick fixes to specialized jewelry tools for more complex repairs. We'll explore effective solutions for fixing broken chains and help you build a practical and budget-friendly toolkit.
Basic Tools for Simple Repairs
For minor chain issues, like separated links, a few basic tools can often do the trick:
Needle-nose pliers: Essential for gripping and manipulating small chain links. Look for pliers with a fine tip for optimal precision.
Tweezers: Useful for holding jump rings and other small components steady.
Magnifying glass: A magnifying glass helps you clearly see the intricate details of the chain and the specific area of the break.
Household glue (Emergency Use): Cyanoacrylate-based glue (super glue) can provide a temporary fix in emergencies. Keep in mind that it's not a long-term solution and isn't suitable for all materials.
Advanced Tools for Complex Repairs
More intricate chain repairs, like replacing jump rings or working with delicate chains, may require specialized jewelry tools:
Chain-nose pliers: These pliers have flat, rounded jaws designed for smoothly opening and closing jump rings without damaging the metal.
Jump rings: It's helpful to keep an assortment of jump rings in various sizes and metal types on hand. This ensures you have the right jump ring to match the chain you are repairing.
Soldering iron & supplies: A soldering iron is used for permanently joining metal components. This is a more advanced technique and requires practice and appropriate safety precautions. Soldering Iron
Jewelry saw: A jewelry saw is used for cutting through metal links or shortening a chain. This is another advanced technique requiring patience and skill. Jewelry Saw
To understand how to care for your jewelry and prevent future breaks, you might find this article helpful: How to master jewelry cleaning at home.
Before we discuss choosing the right tools, let's take a look at a comparison of basic and professional options.
To help you decide which tools are best for your needs, we've compiled a comparison table outlining the essential chain repair tools.
Essential Chain Repair Tools Comparison
Tool Type | Basic Option | Professional Option | Best For | Approximate Cost |
|---|---|---|---|---|
Pliers | Needle-nose pliers | Chain-nose pliers | Gripping and manipulating links/jump rings | $5-$20 |
Magnification | Household magnifying glass | Jeweler's loupe | Viewing intricate details | $10-$50 |
Joining Materials | Household glue (temporary) | Soldering iron & supplies | Permanent repairs | $20-$100+ |
Cutting Tools | - | Jewelry saw | Shortening chains, removing damaged links | $30-$100+ |
As you can see, basic tools are suitable for simple repairs and are generally less expensive. Professional tools provide more precision and control and are necessary for more complex repairs, but they come at a higher cost.
Choosing the Right Tools for the Job
The right tools for the job depend on several factors, including the chain material, the type of break, and your skill level. For instance, delicate gold chains require finer tools and a gentler touch than more robust silver chains. While investing in quality tools can save you money on repairs in the long run, some repairs—like complex clasp replacements or soldering—are often best left to professional jewelers. Understanding when to seek professional assistance is just as important as having the right tools.
Step-By-Step Chain Repair: From Broken To Beautiful
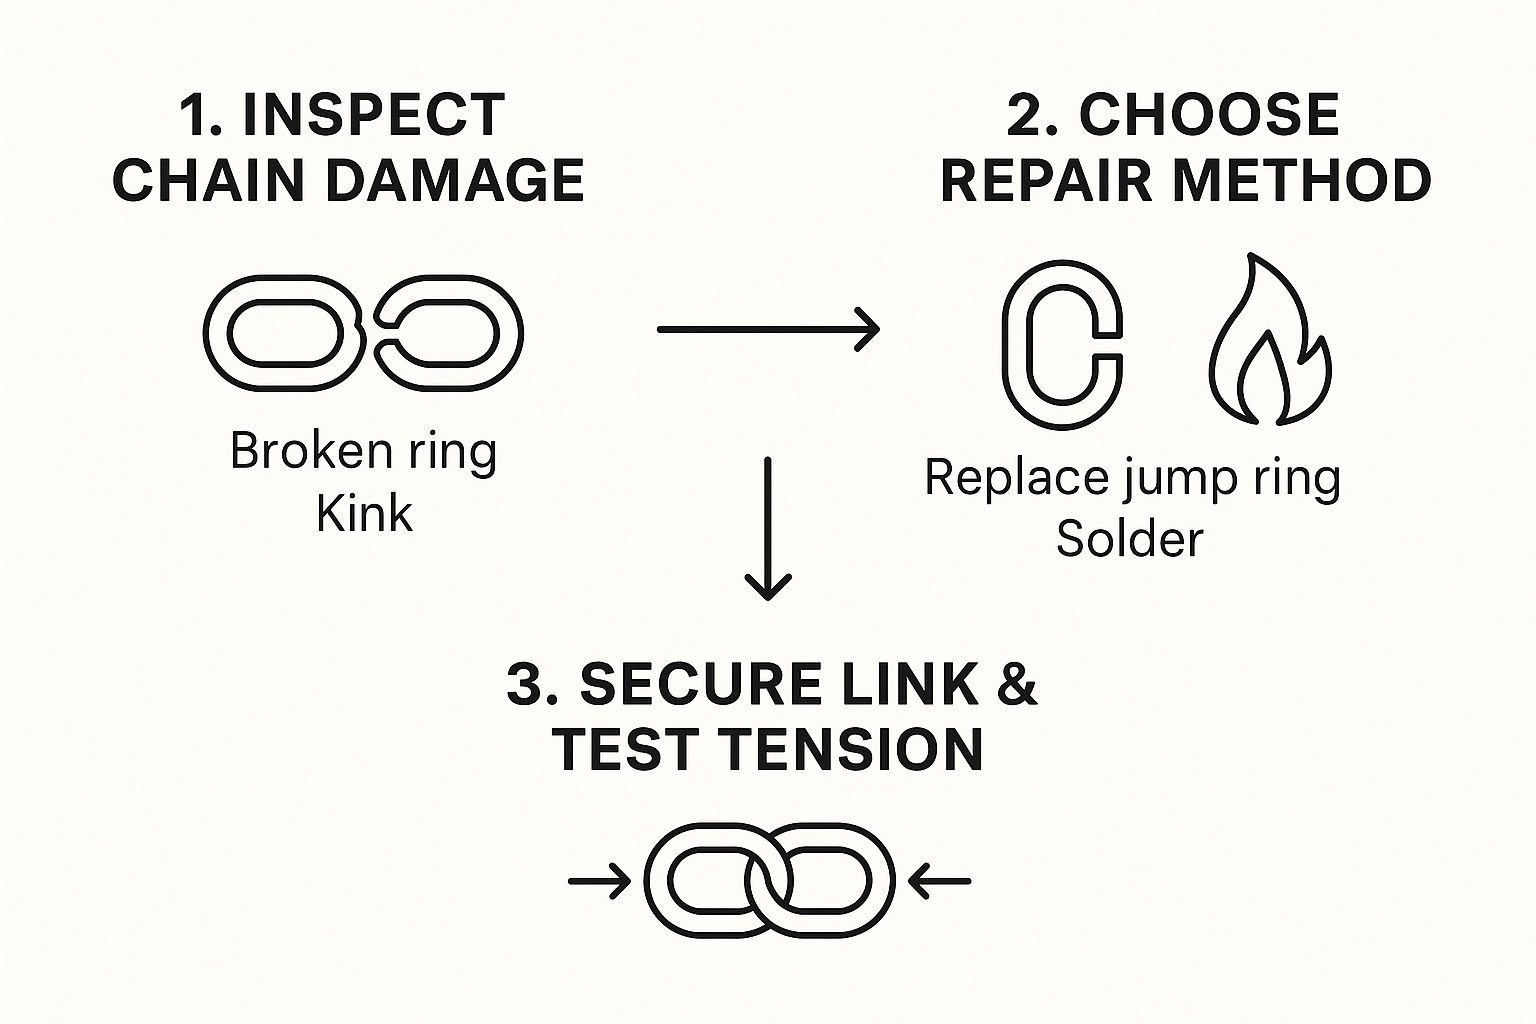
This infographic illustrates the three key steps to fixing a broken necklace chain: inspection, selecting the right repair method, and securing the link while checking the tension. The process starts with a thorough examination of the broken chain and then progresses to applying the correct technique to restore it. Having visualized the overall process, let's explore each stage in more detail.
Inspecting the Damage
Before starting any fix broken necklace chain project, carefully examine the damage. Pinpoint exactly where the chain broke and assess the extent of the problem. Is it a simple disconnect between links, a broken jump ring, or a more complicated issue such as a stretched or bent chain? A clean break between links, for example, is much simpler to repair than a damaged jump ring. This initial evaluation will determine the necessary tools and methods for the repair.
Choosing Your Repair Method: Jump Rings or Soldering
After identifying the damage, you can select the best repair method. For simple link separations, jump rings are often the easiest and most practical solution. A jump ring is a small metal ring used to connect different jewelry components. They are widely available in various sizes and metals, making them a versatile tool for numerous repairs. For a more permanent solution, especially for jewelry made of precious metals, soldering is an alternative. However, soldering demands specialized equipment and a higher level of skill, making it a better choice for experienced jewelry makers.
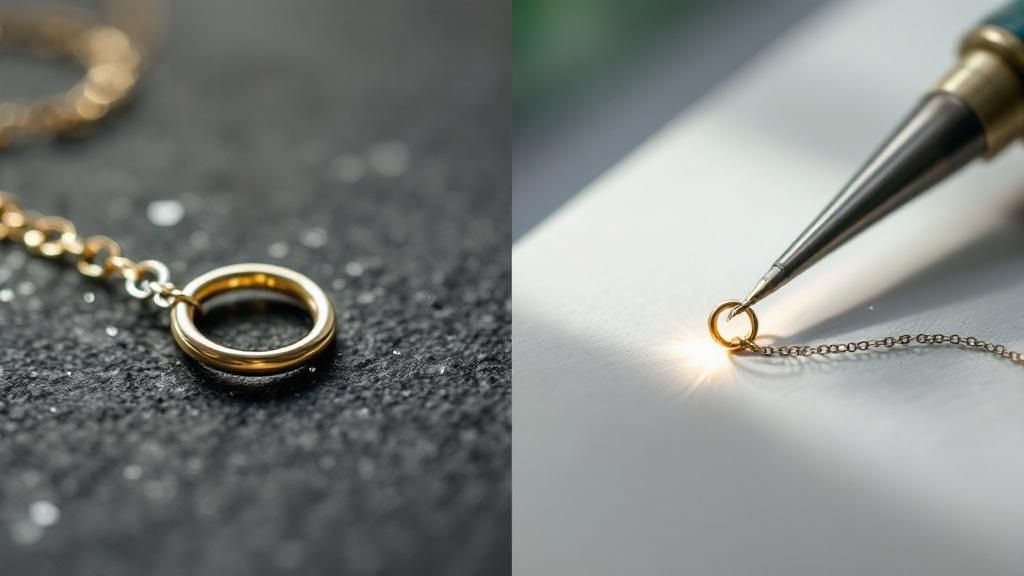
Reconnecting a Broken Chain With Jump Rings
This method is perfect for reconnecting separated links. First, carefully open a jump ring using two pairs of needle-nose pliers. Thread the open jump ring through both ends of the separated chain links. Finally, close the jump ring, ensuring it is secure and sits flush against the chain to prevent it from catching. This straightforward approach effectively addresses broken necklace chain problems using common materials.
Repairing a Broken Jump Ring
If the jump ring itself is the problem, replacing it offers the best solution. Use pliers to remove the broken jump ring. Then, similar to the process for rejoining separated links, open a new jump ring and thread it through the now-empty link spaces. Securely close the jump ring, making sure it fits tightly. Interestingly, the increasing preference for jewelry repair over replacement reflects consumer interest in sustainability and cost-effectiveness. Learn more about the sustainable jewelry movement: Find more detailed statistics here. This shift towards conscious consumption encourages the development of DIY repair skills.
Securing the Link & Testing Tension
Once you've reconnected the chain or replaced the jump ring, gently tug on both sides of the repair to test its strength. This confirms the repair’s structural integrity. Also, examine the repair closely to ensure it blends seamlessly with the rest of the chain. For a polished, sparkling result, consult our jewelry cleaning guide: Read also: How to master jewelry polishing at home. This final step is essential for confirming the durability and overall appearance of your handiwork.
Advanced Repair Techniques For Complex Chain Damage

Going beyond the basics, this section explores advanced methods for tackling intricate chain damage. These techniques demand more skill and specialized tools, but they provide solutions for reviving even heavily damaged necklaces. By mastering these techniques, you can confidently address challenging breaks and potentially rescue cherished pieces.
Soldering for Precious Metal Chains
Soldering permanently joins metal pieces using a filler metal and heat. It's particularly effective for precious metal chains, such as gold or platinum. However, soldering requires specialized equipment like a soldering iron and solder, along with practice to achieve clean, strong joins. Precise heat control is crucial to prevent melting the chain or harming nearby links.
Repairing Delicate Chain Styles
Delicate chain styles like herringbone and omega present unique repair challenges because of their intricate designs. Their flattened, interwoven links are prone to kinking or stretching, necessitating a delicate touch. Micro-welding, a precise form of soldering using a very fine tip, is often the ideal solution. Alternatively, carefully reshaping kinked links with smooth, flat-nosed pliers can sometimes restore the chain's structure.
Handling Multiple Break Points
A chain with multiple breaks demands a systematic approach. Begin by assessing the damage to determine the optimal course of action. If the breaks are close together, replacing a small section might be more efficient than repairing each break individually. For scattered breaks, prioritize the most structurally important repairs first, then address the remaining ones. This strengthens the entire chain progressively while resolving the broken links.
Epoxy Adhesives and Wire Wrapping Techniques
Epoxy adhesives provide a less permanent but effective fix for certain chain issues. Securing loose components or reinforcing weakened links can prolong the chain's life. Wire wrapping, using thin wire to bind or reinforce chain sections, is another advanced technique. This method is particularly useful for structural repairs or when precise soldering is impractical. The jewelry repair industry is experiencing growth, with the Gems and Jewellery Market projected to reach \$608.38 million by 2030. Learn more: Discover more insights about the jewelry market.
Temporary Fixes and Recognizing DIY Limits
Temporary fixes are helpful when professional repair isn't readily available. Using a jump ring to bypass a damaged section or applying jewelry glue can temporarily restore wearability. However, it’s essential to acknowledge the limits of DIY repairs. Severely damaged or valuable chains are best left to professional jewelers. Their expertise ensures a structurally sound and aesthetically pleasing repair. Attempting overly complex repairs at home risks further damage or even irreparable harm. Knowing these limits allows you to decide when to try DIY and when to seek professional help.
Preventing Future Breaks: Smart Chain Maintenance Strategies
Necklace chains, much like any cherished piece of jewelry, require diligent care to maintain their pristine condition. This involves implementing smart maintenance strategies to prevent breaks and ensure longevity. By following a few simple yet highly effective methods, you can ensure your necklaces remain beautiful and structurally sound for many years.
Proper Storage Techniques
Proper storage is paramount in preventing damage to your necklace chains. Tangling and knotting can place undue stress on the delicate links, making them more susceptible to breakage. Therefore, proper storage is crucial for preserving the integrity of your jewelry.
Individual Storage: Store each chain separately to avoid tangles. Consider using small pouches or the individual compartments within a jewelry box.
Clasp Fastening: Always fasten the clasp before storing your necklace. This simple step helps maintain the chain's shape and prevents frustrating knots.
Hanging Storage: For longer, more delicate chains, consider hanging them vertically. This minimizes stress on individual links and helps prevent tangling.
Effective Cleaning Methods
Regular cleaning is important for removing dirt, oils, and other debris that can accumulate over time and weaken the chain. However, harsh chemicals should be avoided as they can damage delicate metals. Gentle cleaning methods are always recommended. For a more in-depth guide, take a look at our tips to clean silver jewelry at home.
Mild Soap and Water: A solution of mild soap and warm water is generally sufficient for cleaning most types of necklace chains.
Soft-Bristled Brush: A soft-bristled brush can be used to gently scrub away any stubborn dirt or grime.
Thorough Drying: After cleaning, ensure your chain is completely dry before storing it. This prevents tarnishing and helps maintain its shine.
Daily Habits to Minimize Wear and Tear
In addition to proper storage and cleaning, incorporating a few simple daily habits can significantly reduce wear and tear on your necklaces. These small adjustments can go a long way in protecting your chains.
Remove Before Bed: Take your necklace off before going to bed. This prevents accidental pulling, tangling, or damage during sleep.
Avoid Contact with Chemicals: Exposure to perfumes, lotions, and hairspray can corrode or damage certain metals. It's best to apply these products before putting on your necklace.
Careful Handling: Be mindful when handling your necklace, both when putting it on and taking it off, to avoid placing excessive force on the clasp or links.
Identifying Early Warning Signs
Regularly inspect your necklaces for any signs of potential weakness, such as thinning links, a loose clasp, or kinks in the chain. Addressing these minor issues early can prevent a complete break and the need for more extensive repairs. Consulting a professional jeweler for periodic inspections is also a good idea. They can identify potential problems before they escalate. This proactive approach helps preserve the life of your necklace chain and protect your investment. For further tips on preventing tarnish and maintaining shine, check out our guide on how to master silver jewelry care.
DIY Vs Professional: Making The Right Repair Decision
Knowing when to repair a necklace chain yourself and when to call in a professional is crucial for any jewelry owner. Several factors influence this decision, including the chain's material, its sentimental value, and the complexity of the damage. This section guides you through a cost-benefit analysis of DIY versus professional repairs, helping you make an informed choice.
Assessing the Damage and Chain Value
Start by carefully inspecting the damage. A simple disconnected link is much easier to fix than a mangled clasp or stretched metal. Next, consider the chain's monetary value. A high-value gold chain with intricate details deserves professional care. On the other hand, a less expensive chain might be a suitable candidate for a DIY fix.
Consider using a jeweler's loupe to better inspect the damage. Learn more about Jeweler's Loupes
Sentimental Value and Risk Assessment
Sentimental value plays a significant role. An irreplaceable heirloom demands the skill of a trained jeweler. A piece with less sentimental value, however, offers a lower-risk opportunity to hone your repair skills. Honestly evaluate the risk factors. Could attempting a repair potentially worsen the damage? Are specialized tools required that you don't possess? Answering these questions honestly will lead you to the best decision.
Understanding Professional Repair Approaches
Professional jewelers utilize advanced techniques such as micro-welding for delicate repairs, laser soldering for precise work, and specialized tools for complex clasp replacements. They also have access to matching components and materials, ensuring a seamless and lasting repair. Understanding their capabilities helps you determine when professional expertise is truly necessary. For instance, a jeweler can restore complex link patterns practically impossible to replicate at home.
DIY Limitations and Advantages
DIY repairs offer the satisfaction of fixing something yourself, and they can be economical for simple breaks. However, DIY has limitations. Complex repairs, like those involving numerous breaks or significantly damaged clasps, often require specialized tools and advanced skills. Moreover, incorrect techniques can cause further damage or even result in injury. Recognizing these limitations can help you avoid costly mistakes.
Warranty and Insurance Considerations
If your necklace is under warranty, attempting a DIY repair might void its coverage. Likewise, review your insurance policy before attempting a DIY fix, as some policies have specific repair requirements. These precautions protect your investment and ensure you're covered in case of additional damage.
Long-Term Durability: DIY Vs Professional
While a properly executed DIY repair can be quite durable, professionally repaired chains often demonstrate greater long-term durability. Jewelers employ stronger joining techniques, higher-quality replacement parts, and advanced finishing processes that extend the chain’s lifespan. Furthermore, professional repairs often include cleaning and polishing, restoring the necklace to its original shine.
To summarize the factors that influence your repair decision, review the following comparison:
To help you make the best decision, we've put together a helpful table comparing DIY and professional repairs:
DIY Vs Professional Repair Decision Matrix
Chain Type | Damage Level | Chain Value | DIY Recommended | Professional Recommended | Risk Level |
|---|---|---|---|---|---|
Basic chain (e.g., cable chain) | Simple separated link | Low | Yes | No | Low |
Delicate chain (e.g., snake chain) | Kinked or slightly stretched link | Moderate | Possibly (with caution) | Yes, for best results | Medium |
Intricate chain (e.g., rope chain) | Multiple breaks or damaged clasp | High | No | Yes | High |
Any chain type | Severe damage or valuable stones | Very High | No | Yes | Very High |
This matrix highlights the balance between your ability to mend a broken chain and the specialized skills of a professional. Choosing the correct approach ensures the longevity of your treasured jewelry.
Ready to explore beautiful jewelry options or find expert repair services? Visit Panther De Luxe Shop today! Discover stunning pieces and expert care at Panther De Luxe
Comments