
A Guide to Safely Cleaning Antique Jewelry
- seanmawhinney
- Jun 25, 2025
- 15 min read
Before you even think about cleaning, take a step back and really look at your jewelry. This initial inspection is, without a doubt, the most important part of the entire process. Treating every piece the same is the fastest way to damage something precious and irreplaceable.
Assessing Your Antique Jewelry: The Detective Work
Think of yourself as a detective. An Art Deco platinum ring with diamonds can handle a good cleaning, but the same method could absolutely ruin a delicate Victorian locket or a Georgian piece with foil-backed gemstones. Your first job isn't to clean; it's to investigate.
Get your piece under a bright light, and if you have one, use a jeweler's loupe or a simple magnifying glass. You're looking for more than just grime.
Check for Weak Spots and Hidden Histories
Gently tap the setting near your ear. Do you hear a faint rattle? That's a sign of a loose stone. Look closely at the prongs and bezels holding the gems in place. Are they worn down, thin, or bent? A fragile setting won't stand up to even the most careful scrubbing.
Next, figure out what you're working with. Is it sterling silver with a deep, rich patina? That dark tarnish is often a desirable part of its history and value, so you'll want to preserve it. Is the piece gold-filled or plated? Be careful here, because aggressive polishing can easily wear away that thin layer of gold, exposing the base metal underneath.
Also, keep an eye out for signs of old repairs. You might spot faint solder lines or a component that doesn't quite match the rest of the piece. These repaired areas can be weaker and might react poorly to certain cleaning solutions.
My most important piece of advice? Always do a patch test. Before you dunk the whole piece, apply a tiny amount of your chosen cleaner to an inconspicuous spot. The back of a brooch or the inside of a ring band works perfectly. Wait, watch, and see what happens. This simple step has saved me from countless potential disasters.
Know Your Materials and Their Risks
Here's a quick guide to help you gauge the cleaning risk for different materials commonly found in antique jewelry. Understanding this is key to choosing the right approach and avoiding damage.
Antique Material Cleaning Risk Assessment
Material Type | Examples | Cleaning Risk Level | Recommended Approach |
|---|---|---|---|
Durable Metals | Platinum, High-Karat Gold (18K+) | Low | Generally safe for mild soap, water, and professional ultrasonic cleaning. |
Softer Metals | Sterling Silver, Low-Karat Gold (10K-14K) | Medium | Avoid abrasive polishes that remove patina. Use soft cloths and targeted tarnish removers. |
Plated Metals | Gold-Filled, Rolled Gold, Silver Plate | High | Very gentle cleaning with a soft cloth. Avoid any polishing or chemicals. |
Hard Gemstones | Diamonds, Sapphires, Rubies | Low | Typically safe for soap and water. Ultrasonic is usually okay if settings are secure. |
Softer/Porous Stones | Opals, Pearls, Turquoise, Coral, Emeralds | Very High | Never submerge or use ultrasonic cleaners. Use a dry or barely damp soft cloth only. |
Organic Materials | Ivory, Tortoiseshell, Hair (in lockets) | Very High | Extremely sensitive to moisture and chemicals. Dust with a soft, dry brush. |
Specialty Items | Enamel, Foil-Backed Gems, Miniatures | Very High | Avoid all liquids. Dust carefully. Consult a professional conservator. |
Taking a few minutes to identify these materials and understand their specific needs is the difference between a successful cleaning and a heartbreaking mistake.
The Shift Toward Safer Cleaning
It's not just experts who are being more careful. There's been a noticeable shift among owners who want to properly maintain their valuable pieces. In fact, the global market for jewelry cleaning machines jumped from USD 500 million in 2021 to USD 550 million in 2024. You can read more about this market trend and its growth.
This data shows a clear move away from risky "all-purpose" solutions and toward more specialized, safer methods. By taking the time to assess your jewelry first, you're doing exactly what the pros—and savvy collectors—do.
Cleaning Your Sturdier Pieces: Metals and Hard Gemstones
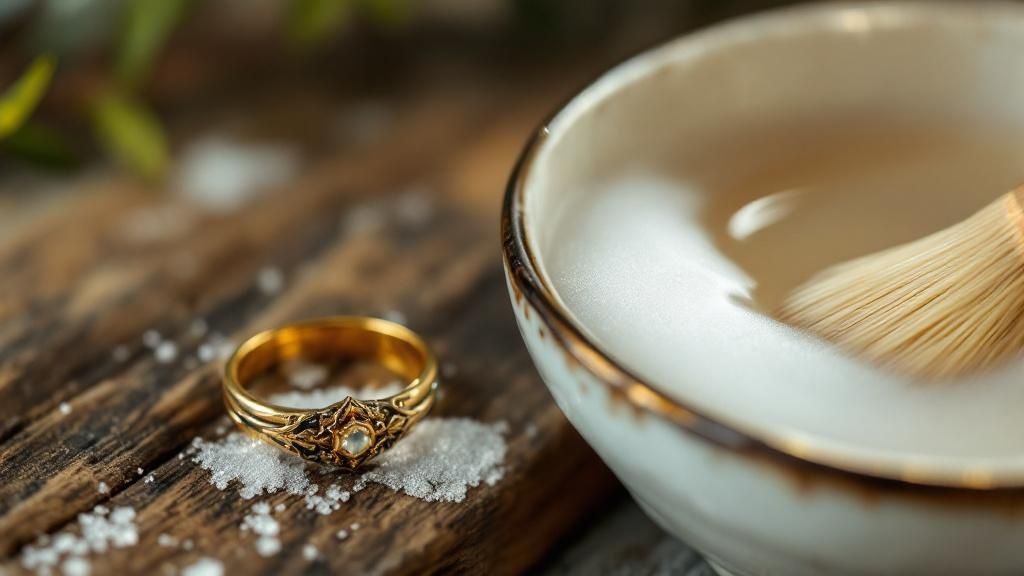
When you're dealing with the tougher stuff in your antique collection—think platinum, high-karat gold, diamonds, and sapphires—your best friend is a surprisingly simple one: a gentle soak. This is the cornerstone method for cleaning most antique jewelry, allowing you to lift away years of grime without reaching for harsh chemicals that could strip away its precious history.
First, grab a small bowl and fill it with warm water. Add just a few drops of a mild, ammonia-free dish soap. Place your jewelry inside and just let it sit for about 15 to 20 minutes. This simple bath does wonders, slowly softening and loosening the built-up oils and dirt that have dulled the piece’s shine.
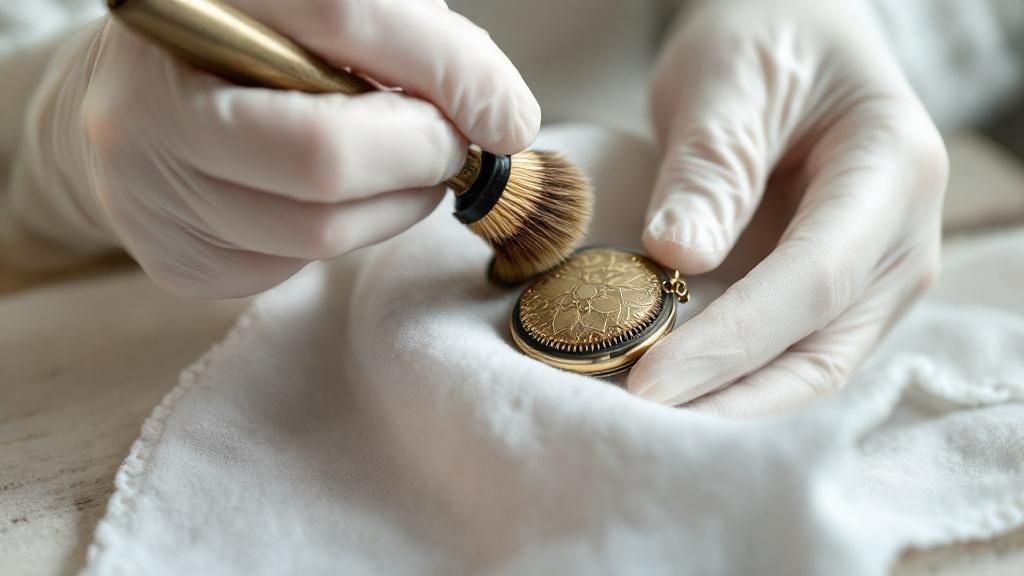
The Gentle Art of Brushing
Once your piece has had a good soak, it's time for the detailed work. The goal here is to gently nudge out any remaining dirt from those tiny, intricate spaces without causing a hint of damage. For this, you absolutely need a brush with incredibly soft bristles. A baby's toothbrush is perfect for the job, as is a dedicated, ultra-soft jewelry brush. Anything stiffer risks leaving behind fine scratches, especially on softer metals like gold.
It’s interesting to see how the growing love for antique jewelry has created a demand for better at-home care tools. The global market for jewelry brushes was valued at USD 123 million in 2024 and is on the rise, which really shows how many people are looking for safer ways to care for their treasures. You can actually read more about this trend in jewelry care if you're curious.
With your soft brush in hand, carefully work around the gemstone settings, get underneath the stones, and trace along any detailed metalwork. This delicate touch is key for pieces with fine filigree or milgrain, as those are the exact spots where dirt loves to settle in for the long haul.
A Quick Word of Warning: Please, never use common household abrasives like toothpaste or baking soda. I see this tip floating around online, but for antique jewelry, it's a disaster waiting to happen. They are far too gritty and can permanently scratch soft metals and even hard gemstones, which can seriously diminish the value and beauty of your piece.
The Final Rinse and Polish
After a gentle scrub, rinse the jewelry completely under a slow stream of lukewarm water. You want to make sure all the soap residue is gone.
For drying, skip the paper towels—they can leave behind lint or even cause tiny scratches. Instead, gently pat the piece dry with a soft, lint-free cloth, like microfiber or a well-worn cotton cloth. If you're working with a particularly complex design, a quick, careful blast from a can of compressed air can push water out of the tightest spots.
The last step is to bring back that glow. Often, all it takes is a light buff with a clean microfiber cloth to restore a beautiful, warm luster. It’s important to resist the urge to polish too aggressively. That aged patina is part of what makes an antique piece so special, and you don’t want to erase it. If you want to dive deeper into getting that perfect shine while respecting the piece's history, take a look at our guide on how to master DIY jewelry polishing at home.
By following these careful steps, you can brighten up your durable antique treasures beautifully, all while honoring the journey they’ve taken to get to you.
Caring for Porous Stones & Organic Gems
When your collection features treasures like pearls, opals, coral, or turquoise, the entire playbook for cleaning antique jewelry gets tossed out the window. These organic and porous materials are in a class of their own, requiring a much lighter touch than hard gemstones like diamonds. They're more like living history, able to absorb things from their surroundings, which makes a gentle approach absolutely essential.
One of the worst things you can do is soak these pieces in water, even for just a moment. Porous stones act like tiny sponges. Water can easily work its way deep inside, causing internal fractures, cloudiness, or permanent discoloration. Harsh chemicals, even something as seemingly innocent as mild soap, are even worse. They can strip the natural oils from pearls, deaden the fire in an opal, or make materials like amber and ivory tragically brittle.
The Only Safe Cleaning Method
For these delicate beauties, the professional standard is surprisingly simple: a soft, dry, clean cloth is your best friend. I always reach for a microfiber or velvet jewelry cloth. All you need to do is gently wipe the surface to lift away dust, fingerprints, and skin oils.
If you come across a stubborn bit of dirt, you can very slightly dampen a corner of your cloth with clean, lukewarm water. When I say slightly, I mean it should feel barely moist, never wet. Lightly dab only the dirty spot, then immediately buff it dry with a clean, dry part of the cloth.
Expert Tip: When it comes to porous and organic gems, less is always more. You're aiming for a gentle surface wipe, not a deep scrub. Getting aggressive is the quickest route to irreversible damage.
Special Considerations for Specific Materials
Different porous materials have their own unique quirks and vulnerabilities. Knowing what makes them special is key to preserving them for the long haul—it's a fundamental part of properly cleaning antique jewelry.
Pearls: As organic gems, pearls are incredibly soft and prone to damage from acids. That includes perfume, hairspray, and even the oils on your skin. A good rule of thumb is to make pearls the very last thing you put on and the first thing you take off. Always give them a quick wipe with a soft cloth after wearing.
Opals: These stones are famous for their water content, which can be up to 20% of their total weight. This makes them highly sensitive to sudden temperature shifts or very dry air, which can cause "crazing"—a fine network of cracks. For a complete rundown on their needs, I highly recommend reading a dedicated guide on how to clean opal jewelry safely.
Turquoise: This stone is known to change color over time, a process that gets sped up by contact with oils, lotions, and cleaning chemicals. Its hue can darken or shift from blue to green, which is why keeping it clean and dry is so critical.
Why Proper Storage is Half the Battle
Beyond cleaning, how you store these pieces is just as crucial. Never, ever toss them into a jewelry box where they can get knocked around by harder stones like diamonds or sapphires. That's a surefire way to get scratches and chips.
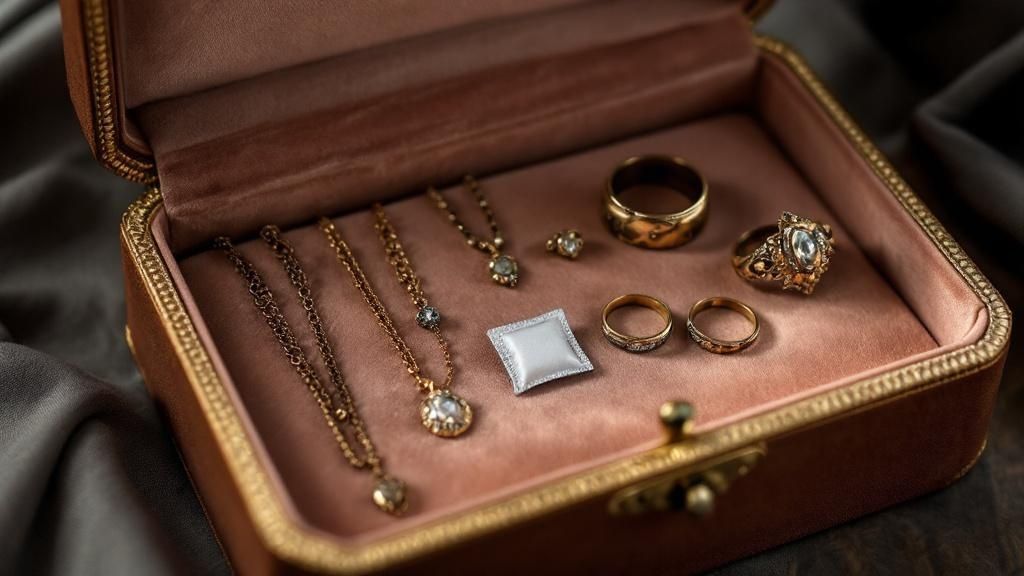
Instead, give each piece its own home in a soft pouch or a fabric-lined compartment. For gems like opals and pearls, an environment that’s too dry can be just as damaging as one that's too damp. Storing them in a sealed plastic bag is a common mistake; it can trap moisture or create a bone-dry atmosphere. A simple fabric pouch inside your jewelry box strikes the perfect balance, protecting the piece while still allowing it to breathe. This small act of care ensures your delicate treasures will remain stunning for generations to come.
Using Advanced Tools for a Deeper Clean
Sometimes, a simple soak and a gentle brush just won't cut it, especially for those wonderfully intricate pieces that serious collectors love. When you're dealing with grime that's worked its way deep into delicate filigree or underneath a complex stone setting, you might need to bring in the heavy artillery: an ultrasonic cleaner.
These machines are fantastic tools in the right hands. They use high-frequency sound waves to create millions of tiny, powerful bubbles in a cleaning solution. This process, known as cavitation, acts like a microscopic scrubbing brush, dislodging dirt from places your hands could never hope to reach. The result can be a brilliance that you thought was long gone.
But—and this is a big but—that power comes with a serious warning. The same vibrations that knock dirt loose can spell disaster for the wrong piece of antique jewelry.
Is an Ultrasonic Cleaner Safe for My Jewelry?
Knowing what not to put in an ultrasonic cleaner is just as important as knowing what you can. The intense vibrations can be incredibly damaging to delicate, porous, or already-fragile materials. They can easily shake a loose stone right out of its setting or destroy the unique finishes that make an antique piece so special.
So, what's the rule of thumb?
Generally Safe: Solid gold and platinum jewelry set with hard, durable stones like diamonds, sapphires, and rubies usually do well in an ultrasonic cleaner. The key here is that the settings must be secure.
Absolutely Not: Keep porous stones like opals, pearls, coral, and turquoise far away from these machines. The vibrations and fluid can cause them to crack, cloud up, or completely fall apart. The same goes for any piece with glued elements, foil-backed stones (common in Georgian and Victorian jewelry), or delicate enamel work.
My best advice? Before you even think about turning one on, give your piece a thorough, hands-on inspection. Gently wiggle each stone. If you feel even the slightest movement, putting it in an ultrasonic cleaner is a gamble you don't want to take. When in doubt, stick to the gentler methods or take it to a trusted jeweler.
Getting the Setup Right: Solution and Settings
If you've determined your jewelry is a good candidate, your success hinges on using the machine correctly. Don't just grab any old soap. You need a cleaning solution made specifically for jewelry, and you must dilute it exactly as the manufacturer recommends. Harsh household chemicals are a definite no-go.
When it comes to timing, less is more. Start with a very short cycle, maybe just one to two minutes. You can always run it for another minute if it's still dirty, but you can’t undo the damage from a cycle that ran too long. This cautious approach is essential for protecting your heirlooms.
The popularity of these devices among collectors is undeniable. The global ultrasonic jewelry cleaner market was valued at a staggering $1.5 billion in 2023 and is expected to keep growing. It's a testament to how effective they are when used properly. You can find more data on this market trend and see how it connects to the world of antique collecting.
Deciding which gems can withstand the ultrasonic vibrations is a critical step. Some stones are simply too fragile for the process.
Ultrasonic Cleaner Safety Guide for Antique Gems
The table below breaks down which common antique gemstones are safe for an ultrasonic cleaner and, more importantly, which ones should be avoided at all costs. This is something I reference all the time before cleaning a new piece.
Gemstone | Safe for Ultrasonic Cleaner? | Reasoning & Precautions |
|---|---|---|
Diamond | Yes | Generally safe, but avoid if the stone is fracture-filled or has major inclusions. Always check for loose settings first. |
Ruby & Sapphire | Yes | These corundum gems are very durable. Avoid if they have significant fractures or are lead-glass filled. |
Emerald | No | Almost all emeralds are fracture-filled with oil or resin, which the ultrasonic cleaner can remove, making inclusions more visible. |
Pearl | No | Pearls are soft, porous organic gems. The vibrations can cause peeling, cracking, and loss of luster. |
Opal | No | Opals contain water and are prone to cracking from heat and vibrations. It's a surefire way to ruin them. |
Turquoise | No | This stone is porous and often treated. Ultrasonic cleaning can cause discoloration and damage. |
Amethyst & Citrine | Usually | These quartz varieties are durable, but avoid if the stone has been dye-treated or has large internal flaws. |
Garnet | Usually | Most garnets are tough, but inspect for any existing fractures. |
Enamel & Foil-Backs | No | The vibrations will almost certainly crack, chip, or shatter delicate enamel and can damage the foil behind old stones. |
This isn't an exhaustive list, but it covers the most common materials you'll encounter in antique pieces. When you're unsure, the safest bet is always to consult a gemologist or a jeweler who specializes in antiques.
Once your piece is sparkling clean, drying it properly is the final step. The infographic below compares a few common methods to help you pick the best one for the job.
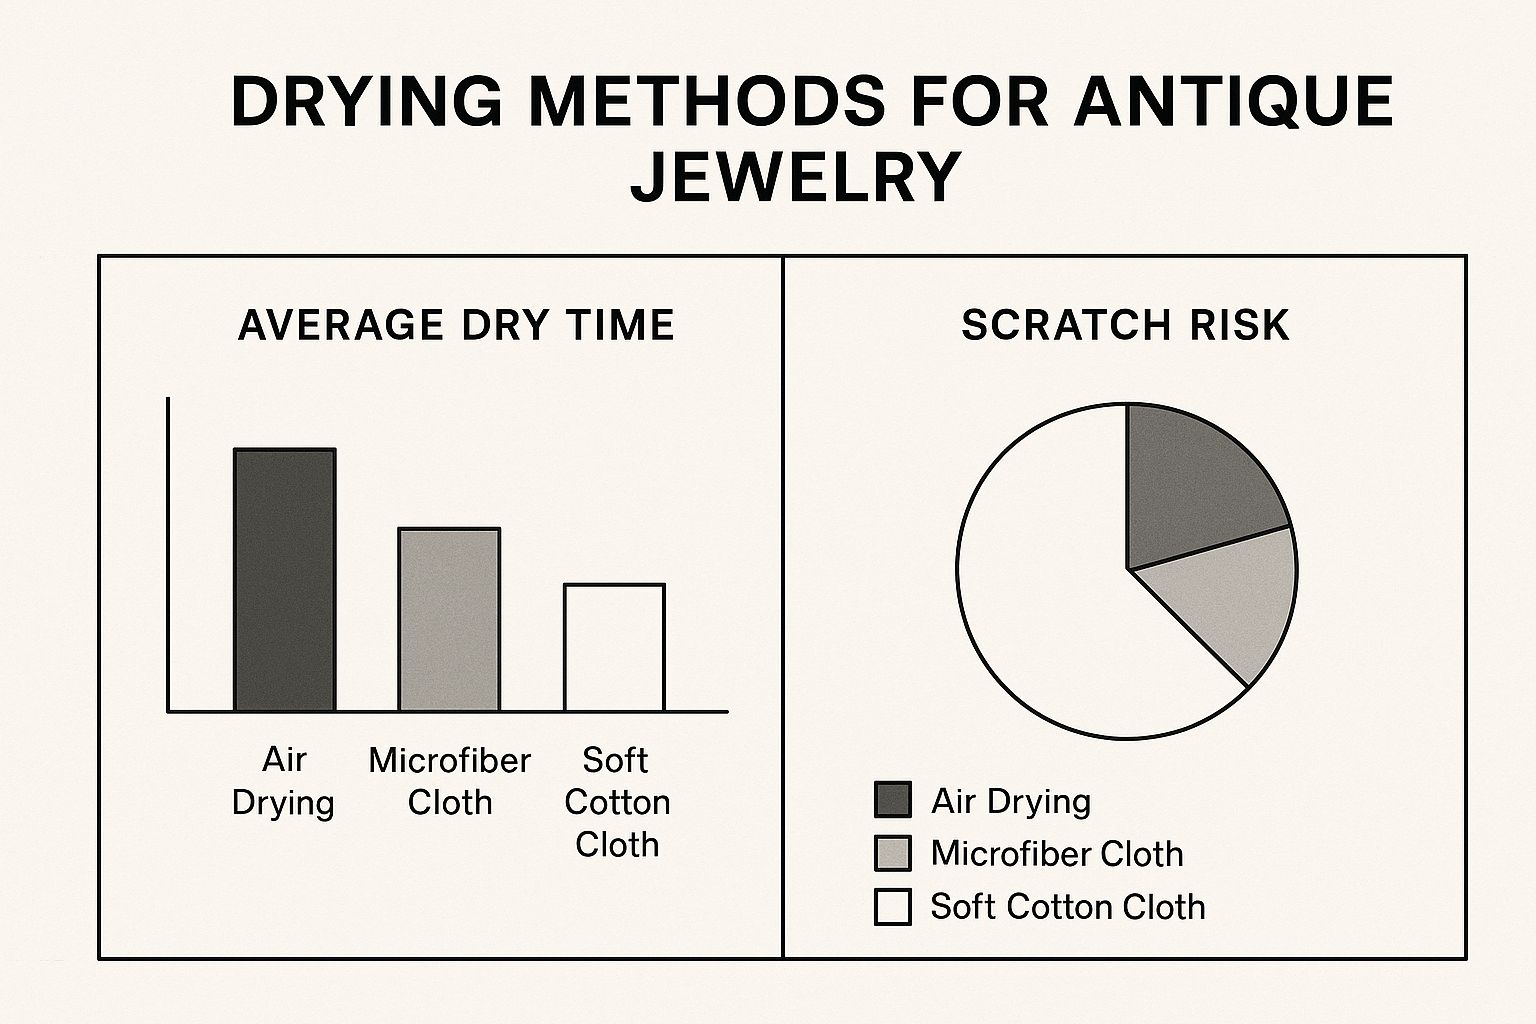
As you can see, a soft microfiber cloth is your best friend here. It's the perfect balance of quick and safe, wicking away moisture without leaving behind lint or, worse, scratches.
When to Trust a Professional Jeweler
While learning to care for your collection at home is empowering, the smartest skill an owner can have is knowing when to put the polishing cloth down. Sometimes, the best way to clean an antique piece is to admit it's beyond your scope and needs the steady hand of a professional. Protecting your investment has to be the number one priority.
There are a few clear red flags that should tell you it's time to call in an expert. Think of these less as suggestions and more as critical warnings that can save a precious heirloom from permanent damage.
Obvious Signs of Structural Weakness
Before you even think about cleaning, your first job is to check for stability. Gently touch the stones. Do you feel the slightest wiggle or shift? A loose prong or a fragile bezel setting is a disaster waiting to happen. Even the most careful cleaning can create enough vibration to pop a gemstone right out of its setting.
You should also look closely for tiny cracks in the band or fractures near old solder points from past repairs. These are serious weak spots that can snap under pressure. A professional jeweler can spot these issues, secure them properly, and then proceed with cleaning, ensuring the piece stays in one piece.
Key Takeaway: If a piece feels fragile or has any loose parts, stop. Don't even try to clean it yourself. A professional inspection isn't just about getting a good clean; it's about preservation. The small cost to tighten a prong is nothing compared to the heartbreak and expense of a lost heirloom diamond.
Another major warning sign is when you can't confidently identify all the materials. Is that beautiful green stone an emerald, a tourmaline, or even glass? Using the wrong cleaning method on a misidentified gem can cause irreversible harm. A professional jeweler or gemologist has the right tools and training to know for sure.
Finding the Right Jewelry Professional
When you do decide it's time for an expert, understand that not just any jeweler will do. You need to find someone with specific, hands-on experience working with antique and estate pieces.
Start by looking for jewelers who are part of professional organizations or have certified gemologists on staff. When you go in for a consultation, be direct with your questions:
Have you worked on pieces from this specific period before, like Victorian or Art Deco?
What's your process for inspecting and cleaning antique jewelry?
Could you show me some examples of similar restoration or cleaning work you've completed?
A true professional will appreciate these questions and give you clear, confident answers. They should walk you through their entire process, explaining the tools they use and why. A thorough inspection that points out any needed repairs before they start cleaning is the sign of a trustworthy expert who truly respects the history of your piece. If you're dealing with very stubborn grime, particularly on silver, it can also be helpful to review some expert tips for cleaning tarnished jewelry before your visit.
Handing your jewelry over to an expert isn't giving up. It's making a smart, strategic decision to protect its legacy for generations to come.
Your Antique Jewelry Cleaning Questions, Answered
Even with a solid guide in hand, it’s completely normal to have a few lingering questions before you start cleaning a cherished heirloom. Caring for antique jewelry often feels like navigating a maze of special cases and exceptions. It’s smart to get some clarity before you dive in.
Let's tackle some of the most common questions I hear from collectors. The goal here is to give you the confidence to care for your pieces safely and effectively. After all, these aren't just objects; they hold memories and history.
Can I Use Household Cleaners Like Vinegar or Baking Soda?
I get this question all the time, and my answer is always a very firm no. While things like vinegar and baking soda are fantastic for scouring sinks, they are far too aggressive for the delicate nature of antique jewelry.
Vinegar is an acid, plain and simple. It can easily etch the surface of softer metals and, even worse, cause permanent damage to porous gems like pearls, coral, and turquoise by literally dissolving their delicate structure. Baking soda, on the other hand, is an abrasive. It might feel soft to you, but on a microscopic level, it will leave a network of tiny scratches on soft metals like gold and silver. Using it vigorously can also strip away the beautiful, desirable patina that gives an antique its character and proves its age.
Your Safest Bet: Stick with the simplest solution. A bowl of warm water with just a few drops of a mild, pH-neutral, ammonia-free dish soap is all you need. It’s more than effective enough to cut through everyday grime without putting your fragile treasures at risk.
How Often Should I Actually Clean My Antique Pieces?
This really comes down to one thing: how often you wear them. It’s a common mistake to think more cleaning is better, but over-cleaning can be just as harmful as neglect. It causes unnecessary wear and tear, especially on fragile settings and old materials.
If you wear it regularly: A quick wipe-down with a soft, dry microfiber cloth after you take it off is ideal. This simple step removes skin oils, lotions, and makeup before they have a chance to build up and cause problems.
If it's for special occasions or in storage: A more thorough, gentle cleaning (like the mild soap soak) should only be done when the piece actually looks dull or dirty. For most of my collection, this works out to maybe once or twice a year, at most.
Think of a deep clean as a spa treatment for your jewelry—something you do when needed, not as part of a daily routine.
What Exactly Is Patina, and Should I Get Rid of It?
Patina is that soft, often dark, finish that develops on the surface of metals like silver, bronze, and sometimes even gold after decades of exposure to the air. This subtle oxidation isn't dirt; it's a testament to the piece's journey through time.
In the world of antiques, patina is highly desirable. It’s a huge part of what tells the story of the piece and is considered a key element of its historical integrity. Polishing a piece to a brilliant, brand-new shine with aggressive chemicals or cloths will erase this history. Doing so can seriously tank its financial and historical value. Your goal with cleaning should always be to remove surface dirt while preserving the patina.
Is It Safe to Clean Jewelry with Glued-In Stones?
You have to be incredibly careful here. Many antique pieces, especially from the Art Deco period or in costume jewelry, used old adhesives to secure stones like foil-backed rhinestones, rather than sturdy metal prongs.
These historic glues are often brittle and can be easily dissolved by water, soap, or pretty much any cleaning liquid. Submerging a piece with glued-in stones is almost a surefire way to weaken the bond and watch your stones pop out.
Instead, the only truly safe method is to use a tightly wound cotton swab or the very corner of a cloth that is barely damp with plain water. You want to meticulously clean around the stones, avoiding the settings and any visible glue entirely.
At Panther De Luxe, we believe that understanding your jewelry is the first step to preserving its beauty and story for the next generation. Explore our curated collections and resources to help you care for your treasures with the expertise they deserve.
Comments